How to make a beautiful frame in Word? New versions of the program.
Gone are the days when people only read textual information. Today, every computer user can independently type texts, edit them and print them. There are auxiliary programs for this, for example Microsoft Word 2010. But working with this program requires special skills. Our article will tell you how to make a frame in Worde.
So, to work you will need a simple program included in the Microsoft Office suite. The text editing utility is called Microsoft Word 2010.
What is a frame and what is it for? A frame is a beautiful frame around text or a blank page that creates some volume on the page. Most often, frames are used by designers. Thanks to the instructions in our article, you will also learn how to make frames of various shapes and colors. So, let's begin.
Create a beautiful frame in Word
To begin, open a Word 2013 document. It is advisable to have a ready-made text fragment of the page in which you want to make the appropriate changes. Next, go to the “ Page layout».

In the center, in the upper corner, click on the icon " Page Borders" A window will open in front of you “ Borders and Shading" There are many different settings here. In this case, we only need those that are associated with the frames. Therefore, we will tell you how to make a frame for the entire text of the page.
Select the "Frame" type and then set " Apply to entire document" To confirm the actions performed, click " OK"at the bottom of the window.

Thus, we received the simplest stroke for the entire page of the document. By the same analogy, instead of a regular frame, you can make a frame in the form of drawings.

The following operations will complicate the shape of the frames. To do this, let's try to create a colored paragraph outline. The initial steps are the same: open the document, go to the “ Page layout" Place the cursor on the paragraph you want to format. In the window that opens, go to the “ Border».

Notice the bottom right corner, which shows that any changes will be applied to the paragraph. On this tab you can select.
- No – means that there will be no frame;
- frame;
- shadow;
- volumetric;
- another.
Note that Word has a very convenient preview window. All changes you make to the document are immediately visible in the small diagram on the right.
Select " Frame"(to do this, left-click on the corresponding icon).
Choose a color. To do this, in the section " Color", click on the small triangle. In the menu that opens, select the color you need (for example blue), and click on it with the mouse.

In chapter " Width» select size in points. To do this, in the section " Width» Click on the appropriate item (for example, 3 pt). Notice the changes on the right. If the thickness and color of the frame suits you, then click the " OK", located at the bottom of the window.

All! The paragraph that you selected with the cursor will be transformed into a beautiful stroke of the color and thickness you need.

If you want to frame a large piece of text in the same way, then simply select the text you need with the mouse.
Then, on the tab " Page layout", click the icon " Page Borders" Go to the " Border", and then specify the type - " Frame».
Select any color and width, then click the " OK».
Thus, there will be another option. Experiment with colors and frame thickness. As a result, any of your pages or individual paragraphs will have a beautiful design in the form of a frame.
Good day to everyone, my dear friends and guests of my blog. In my article today, I want to tell you how to insert a frame in Word to transform your document. In fact, this is a very good thing, and there is nothing complicated about it, but there are differences in different versions of the office.
How to make a frame in Word 2013
First we need to open our text editor, after which we go to the Design tab. In the feed, on the very right side, click on the item "Page Borders". And then select the tab that interests us.
For all pages
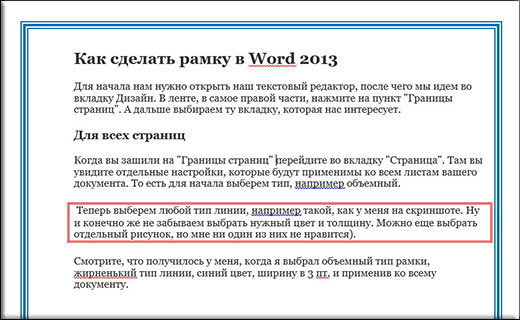
When you sewed up "Page Borders" go to the "Page" tab. There you will see individual settings that will apply to all sheets in your document. That is, to begin with, let’s choose a type, for example volumetric. Now let's select any type of line, for example, like the one in my screenshot. And of course, don’t forget to choose the desired color and thickness. You can also choose a separate drawing, but I don’t like any of them).

Look what I got when I chose a 3D border type, a bold line type, blue color, 3 pt width, and applied it to the entire document.

For a specific part of text
But if you want to frame not the entire document, but only a certain part of the text, then you need to select this part, and then go to the above point, just go to the “Borders” tab. The essence here is exactly the same, but you only apply all this to only part of the document.

Look what I got when I selected a specific paragraph and applied the red border settings to it.
Well, as you already understood, to remove the frame, you will simply need to set the type to “No”. That's all).
Other versions of WORD
If you are the proud owner of earlier versions of Office, then you will need to log in a little differently.
In Word 2007 and 2010, everything happens exactly the same, you just initially need to open a tab "Page layout", and not “Design”, as was the case in the previous example. Well, then you look for the item again "Page Borders" and do everything the same as before.
In Word 2003, the whole process is exactly the same, except that you will need to look for the “Format” menu item at the top of the editor, and select the item from the drop-down menu "Borders and Shading".
Ready frames
In addition to the built-in frame editor, you can use ready-made solutions that can be easily found on the Internet.
For example, if you need frames according to GOST, you can download them. When the archive is downloaded, unpack it. There you will see the file Forms_A4.dot. This will be the frame template. But don’t rush to open it just like that. Copy it to the folder where you have Office installed in the STARTUP folder. Now you have everything installed.

Go to Word. We noticed that when you created a new document, an item appeared: "Security Warning". It always does this when connecting external data. This is fine. Just click on "Enable Content".
Now go to the Add-ons menu. There you will see our downloaded data that we just copied to the office folder. By clicking on any of the templates provided, you will see how it will immediately fit into the document according to all the rules.
Just in case, I put a special font inside the folder for forms of this format. this font.
Patterned frames
In addition to the above, I suggest you use another method to decorate a document, namely loading external patterned frames. Essentially these are just pictures in the format PNG with a transparent background. You can download them.
Now go back to your text editor, look for the “Insert” menu, select “Drawing”, and then look for the files that you just downloaded.
Oh, and don’t forget to right-click on this frame and select “Picture Format”, then go to the “Layout” tab, and then set “Behind the text”. Well, now you can write whatever you want inside this frame, and also move it as you see fit.

Of course, they will not fit on the entire sheet, but you can always stretch them and move them as you need.

Well, that seems to be all I would like to tell you today about how to insert a frame in Word. I hope that many of you will find this information useful. So I look forward to seeing you again on my blog. Check back often. Bye bye!
Best regards, Dmitry Kostin.
When preparing creative works, we try to decorate our documents with frames.
In various versions of Word, it is possible to create frames in the form of a picture for one or several pages.
If you don’t know how to make beautiful frames in Word, then today we will look at this issue so that there are no unknown points left.
Ready? Then let's read.
Inserting frames
1. Open the “Page Borders” window.
1.1. In Word 2013, go to the Design tab and click the Page Borders button.

By clicking on the tab - Design, click the button - Page Layout
(picture 1)
1.2. In Word 2010, go to the “Page Layout” tab and click the “Page Borders” button.

Here, instead of the tab - Design, click the tab - Page Layout
(Figure 2)
1.3. In word 2003, open a Word document, either blank or with text already printed.
Click “Format” - “Borders and Fill”, if this inscription is not there, then click on the double quotes to expand the entire list.

(Figure 3)
2. Let's move on to choosing boundaries
2.1. In the “Borders and Shading” window, switch to the “Page” tab, this is necessary to make a frame around the page, and not around the text.
2.2. Click on the black triangle and select the design you like from the drop-down list.

(Figure 4)
2.3. You can also choose on which pages your frame will be displayed, on all or only on the first.

(Figure 5)
2.4. On inkjet printers, the bottom border of the frame is not printed completely.
By clicking on the “Options” button (number 5), you can make indents from the edge of the page, which will allow you to print the bottom border of the frame more than usual.

(Figure 6)

(Figure 7)
conclusions
If you want to make a frame not entirely, but only on three sides of the sheet, then you can click on the corresponding buttons in the “Borders and Fill” window.

(Figure 8)
This is how you can quickly and easily decorate any document.
Please note that business documents should be drawn up within a more strict framework.
During my time working with the Microsoft Word word processor, I had to study it so much that, if necessary, I consult by phone without looking at the monitor screen.
I assume that you, too, will easily master the ability to insert frames and will already be contacted for help.
Thank you for your attention.
When the task arises of making a frame around text in a Word document, users usually follow the most familiar and simplest path in their opinion, namely, enclosing the text in one large table. However, the Word text editor provides all the necessary functions to make this action more convenient. Using the program's built-in tools, you can quickly create a frame around a single word, sentence, paragraph, or completely enclose all content in a frame that is easily customizable in appearance.
How to make a frame around a word, sentence or paragraphIn cases where you need to frame a specific part of the text, you need to use a tool to create borders for text. This is done as follows.
 With this method, the structural element of the document you have chosen will be enclosed in a frame: part of a word or a whole word, part of a sentence or a whole sentence, or a whole paragraph. If several paragraphs are selected, each of them will be enclosed in a separate frame.
 How to make a frame around all text
In the case where you need to enclose all the text in a document in a frame, this is done in a slightly different way.  Using the method described above, framing is done in a frame in the text editor Word 2007 and Word 2010. In newer versions of Word 2013 and Word 2016, everything is done in the same way, except that instead of a section Page layout you need to use tab Design.
When preparing creative works, we try to decorate our documents with frames.
In various versions of Word, it is possible to create frames in the form of a picture for one or several pages.
If you don’t know how to make beautiful frames in Word, then today we will look at this issue so that there are no unknown points left.
Ready? Then let's read.
Inserting frames
1. Open the “Page Borders” window.
1.1. In Word 2013, go to the Design tab and click the Page Borders button.
By clicking on the tab - Design, click the button - Page Layout
(picture 1)
1.2. In Word 2010, go to the “Page Layout” tab and click the “Page Borders” button.

Here, instead of the tab - Design, click the tab - Page Layout
(Figure 2)
1.3. In word 2003, open a Word document, either blank or with text already printed.
Click “Format” - “Borders and Fill”, if this inscription is not there, then click on the double quotes to expand the entire list.

Click "Format" - "Borders and Fill"
(Figure 3)
2. Let's move on to choosing boundaries
2.1. In the “Borders and Shading” window, switch to the “Page” tab, this is necessary to make a frame around the page, and not around the text.
2.2. Click on the black triangle and select the design you like from the drop-down list.

Selecting a picture for the frame
(Figure 4)
2.3. You can also choose on which pages your frame will be displayed, on all or only on the first.

We indicate whether the frame will be on the main page only
(Figure 5)
2.4. On inkjet printers, the bottom border of the frame is not printed completely.
By clicking on the “Options” button (number 5), you can make indents from the edge of the page, which will allow you to print the bottom border of the frame more than usual.

(Figure 6)

In the parameters you can make indents from the edge of the page
(Figure 7)
conclusions
If you want to make a frame not entirely, but only on three sides of the sheet, then you can click on the corresponding buttons in the “Borders and Fill” window.

Frame on three sides of the sheet
(Figure 8)
This is how you can quickly and easily decorate any document.
Please note that business documents should be drawn up within a more strict framework.
During my time working with the Microsoft Word word processor, I had to study it so much that, if necessary, I consult by phone without looking at the monitor screen.
I assume that you, too, will easily master the ability to insert frames and will already be contacted for help.
Thank you for your attention.
How to make a frame in word? It often happens that you need to quickly create some kind of greeting card or simply write something in a beautiful frame. You can create a beautiful card in Photoshop or Gimp, but many have not even heard of these programs and do not have them at hand. And then they still need to be studied, and you need a postcard or frame for text right now. This is where the Microsoft Word text editor will come to our aid again. It is perfectly possible to create any postcard no worse than a typographic one. A good place to start would be to make a nice frame. This is what we will talk about now, and you will see that it is easy to do using Word.
We've already looked at some techniques for working in Word, such as changing page color, how to create letterhead and brochures, how to create a template, how to place a picture, how to work with dividing lines.
All this will be useful to you when creating graphics and postcards. Today we will learn how to make beautiful frames. For this we don’t need anything other than the Word text editor. It has everything we need.
How to make a frame inWord
In order to create a beautiful frame in Word 2003, open a new document. Enter the menu – Format – Borders and Shading….

The window “ Borders and Shading».
Go to the " Page" Select the frame type on the left. In the center of the window, select the color of the future frame and the design. On the sample you will see the appearance of your frame.
Experiment and find what you like. After selecting, click the button OK"and your frame is ready. Don't forget to save it.
To create a beautiful frame in Word 2007/2010 you need to open the menu Page layout and in the block Page background choose Page Borders.
Do everything else the same as in Word 2003. Read above.
Creating a frame in Word is a very exciting activity that will be very useful to you in your creativity.
Sincerely, Ludmila
If you liked the article, click on the buttons:
Framing a paragraph allows you to highlight an important idea, and a frame around the page decorates or is sometimes necessary for the requirements for the design of certain types of documents. We'll tell you how to make a frame in Word - for a fragment of text or for all sheets, including a frame with a stamp in accordance with GOST.
Framing text
You can select a piece of text using a regular rectangular frame or a curly one.
Regular frame
How to make a frame around text in Word:
- Select the text you want to frame. This can be a single sentence or an entire paragraph.
- On the toolbar in the “Home” tab, click on the “Borders” icon in the “Paragraph” section.
- Choose which sides of the paragraph you want borders on.

To change the appearance of lines or frame text, open the last item in the Borders and Shading submenu. Change the type, color and width of borders. In the “Sample” window, configure which sides to place the lines on. If you want to draw frames for each selected line, in the “Apply to” item, select “Text” - the lines will be framed separately. In the Fill tab, set the background color and pattern.
Figure
You can make a beautiful frame using a variety of shapes. Go to the “Insert” tab, in the “Illustrations” section, click on “Shapes”. In the drop-down list, select an image from the list - rectangles, stars, arrows, callouts and much more. Click on the selected picture, place the cursor in the desired place on the sheet, hold down the left mouse button and move it sideways - a figure will appear on the page. To insert text into the frame, right-click on the image and select “Add Text” from the menu.

The frame-shape can be changed at any time - click on it, the “Format” tab will appear in the menu. Various styles and fill patterns are available on it, you can change the direction of the text, and add WordArt objects. It’s easy to move such a frame around the document - just hold down the mouse button on it and move the pointer in any direction - or copy it, the text content will also move.
Page Framing
Let's figure out how to insert a basic frame in Word. We will need the “Page Borders” tool; depending on the version of the program, it is located in the tab:
- 2016: “Constructor”;
- 2013: “Design”;
- 2010 and in Word 2007: “Page Layout”;
- To create a frame in Word 2003, select the item of the same name in the “Format” menu.
In the window, configure the frame - the type of borders, the format of the lines, their color and width, for patterned frames - the design. In the “Sample” section, set the locations of the borders.

You can apply the created drawing to all documents - in this case, the same frames will automatically appear on all sheets. Or to individual sections, for which you must first place the section break symbols in the right places.
Using Templates
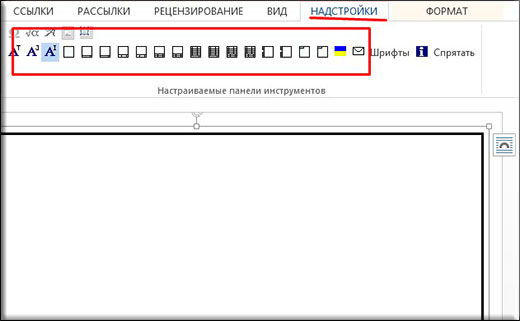
To prepare documents in accordance with GOST, use special frame templates that can be downloaded for free on the Internet. The template is a “.dot” file. Once downloaded, open it like a regular document. A security message appears about running macros - allow the content to be enabled. A new Add-ons tab will appear in the toolbar.

How to insert a frame in Word: select the desired frame with a stamp and click on it. A frame will appear on the current sheet; all you have to do is enter the data in the fields.
Conclusion
We figured out how to make a frame in Word. The program provides interesting tools to create strict or insert beautiful frames. You can make the frames yourself or use ready-made templates to quickly get the finished result.
We use Word 2003
In order to make a frame in Word 2003, you need highlight page by clicking on it.
Next, click on the tab “ Format» on the toolbar. She is upstairs. From the drop-down list, select “ Borders and Shading». 
A window with the same name appears. In it we go to the second tab, “ Page", where we select the necessary options for the frame. 
Here you can set color And thickness lines. The buttons on the right indicate which sides of the sheet the frame will be placed on. In the list " Type" can choose form lines - double, solid, or dotted. " Drawing» allows you to set the frame with one of the repeating template patterns.
To move the frame relative to the borders of the sheet, you need to click on the button " Options" V right bottom corner. 
Frames in Word 2007, 10, 13
Since the 2007 version, the program interface has changed significantly. Now to create a frame you need to find the section “ Page layout" and click on " Page Borders». 
Starting from version 2013, this button is moved to the “ Design».
The window that appears is no different from its previous versions. It shows everything available options: type, color and width of the line, the possibility of design with a repeating pattern, and the sides on which the frame will be displayed. 
Beautiful frame from a picture
Framing a document can be done not only directly using the means intended for this, but also with images, which allows you to significantly diversify the design of the document.
To do this, you will need to download the image you like in a suitable format. The larger the image, the clearer and more beautiful it will be when printed.
Next you need insert downloaded image onto the sheet. This can be done in the menu " Insert", selecting the item " Drawing" or simply by dragging file into the program window. 
After this you will need highlight click on the picture, and right-click on it and select “ Size and position» from the context menu. 
In the pop-up window, go to the “ Text wrapping" and select the item " behind the text».
Now the image will not overlap the typed text and will remain on in the background. In addition, it is not tied to the borders of the sheet, and can freely move to the very edges.
If the picture does not fit in size, you can stretch for the “corners” that appear. Points in the corners change size while maintaining proportions, and points on the sides are stretched vertically or horizontally.