Manicure with shiny tape. Choosing a shellac manicure design with tape: a step-by-step master class.
Attentive fashionistas have probably noted this fashion trend like the shimmering ribbons on celebrity nails. This trend is becoming increasingly popular, penetrating the masses every day. A manicure with design tape is more variable than it might seem at first glance. All the secrets of creating original nail art: how to do it at home, the nuances of using ribbons, a selection of ideas with photos.
Variety of ribbons for nail art
Ribbon nail designs are creative, stylish and attractive. Manicure tape is nothing more than a self-adhesive strip. It may vary in color and thickness. The ribbons have a glossy shine, thanks to which the nail art shimmers in the light and attracts attention to its owner.
Avid lovers of purchasing goods through online stores will be able to find tapes on the Internet under the names stripingtape or nailline. The cost of the accessory is negligible, so you can afford to buy many strips of all shades from the thinnest, which are most preferred, to quite wide ones.
Features of tape manicure
- Regardless of what coating you choose (acrylic, shellac, ordinary decorative varnish), the stripes will be perfectly fixed with an adhesive layer.
- To avoid peeling and depressions from pressing the tapes, the plates must be thoroughly dried in natural conditions or, if gel polish was made, under a lamp. The rule of retreating a millimeter from the free edge and cuticle when gluing a glossy strip is also intended to prevent the above.
- When completing your manicure, you need to use a clear topcoat. Do not be afraid that after a layer of fixative, the tapes will lose their characteristic shine. This technique will ensure the preservation of the design for a longer period.
Ribbons take part in the creation of unique nail art in two ways. The first is to use self-adhesive strips to decorate nails; in the second, the strips play a secondary role and are subsequently removed as unnecessary.

Decorative technology m manicure with ribbon for design
The first thing required is to prepare the plates. Manicure is not only about painting nails, but also about treating them. It is necessary to remove any remaining decorative coating, if any. The most gentle remover is a liquid that does not contain acetone. Read the product label carefully before purchasing it. Look at your nails, are they the same length? Compare if necessary. Clean the plates from overgrown skin - cuticles. Among all the methods, the hardware procedure is recognized as the best - the safest, since you can be sure that you will not injure skin and you won't get infected. If you do not have such a specialized apparatus, then replace the usual scissors or tweezers with a softening gel, after applying which the cuticle will become pliable for removal using an orange stick.
When the nails are prepared, it’s time for the decorative coating. If you plan to use regular varnish, then do not skip the step of a base coat to level the surface. Then go over the color twice and wait for it to dry. Think about the composition in advance and cut the strips. Apply the tape to the plate and press. There is a three-stage system for gel polish. Each layer needs to be dried in turn.
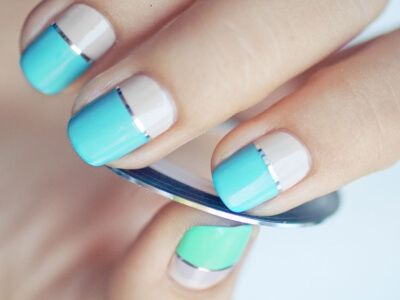
Thanks to the tapes, you can hide the joints between shades, emphasizing the boundaries with color and shine.


Striped principle
This is the second variation of the use of strips in manicure. This technique does not require tapes as such. They can be successfully replaced, for example, with tape or stencil stickers. However, the low cost of self-adhesive strips makes it possible to use them when creating striped designs. In order to make even stripes, the tapes are secured to the nails and, if necessary, removed, exposing the bottom layer of varnish. Ribbons of various lengths, colors, and thicknesses will come in handy here. There is no point in spending spectacular tones on this procedure, since the stripes play an exclusively practical role here.

Ideas with ribbons
We invite you to familiarize yourself with a selection of photos of interesting nail art made using self-adhesive tapes.
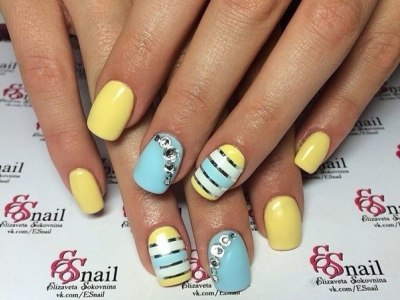
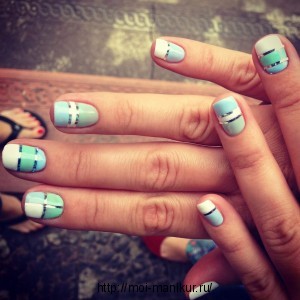
- A monochromatic manicure will be diluted by ribbons located vertically or perpendicularly. Metallic looks better on a dark blue color, and black stripes on a white color. You can, as described in the second method, resort to tapes as auxiliary material. For example, covering your nails with acidic yellow, attach three vertical stripes on top. Next, paint with a layer of gray varnish. Removing the ribbons will reveal the yellow coating in their place. Ideal, even stripes will visually elongate the plate, creating the illusion of length.

- Initially long nails A combination of a pair of harmonious colors, visually dividing the nail horizontally in two, looks advantageous. Favorite mix - delicate blue and pink. The joint between them will be covered by a strip of silver tint. If the color closest to the edge of the nail is made predominant, it will seem that this is a kind of lunar jacket, and if the color from the base occupies a large area, this is an analogue french manicure. If you want to emphasize your impeccable taste, leave the hole transparent, this will add piquancy to the design.

- The trend of recent seasons - the gradient is successfully complemented by stripes, turning into a unique new style. Using sponges, it’s easy to make ombre on plates at home. An alternative is just a few colors applied back to back (green, yellow, red). When everything is ready and thoroughly dried, apply the tapes according to your preferences. You can decorate each finger in a special way (diagonals, geometric figures, verticals, horizontals, etc.). Now paint the surface black and wait for the coating to harden. By removing the stripes, you will discover how original the exposed multi-colored areas look.

Fantasy is inexhaustible. If you think that you have already tried all kinds of designs, you are deeply mistaken. Ribbons in manicure are an amazing accessory that exponentially increases the number of existing nail art designs. As you can see by looking at the photo, the tape technique is simple and accessible, but at the same time beautiful and interesting. Low price, rich assortment, ease of use - arguments in favor so that you decide to experiment with d designing nails with ribbons.
Rate this article:Running out of ideas for nail designs? Then I'll tell you another one. It’s very easy to do, and you don’t need to spend a lot of money on materials. As you might have guessed from the photo, we will talk about such an interesting design accessory as nail tape. And although the design options are a little similar to it, due to the shine, different colors and designs, you can come up with a sufficient number of them. Such a manicure will be original and daring; you simply cannot help but pay attention to it. So, let's look in detail at what a leg tape is and how to make a design using it.
What is nail art tape?
Design tape is a thin self-adhesive strip made in different colors, but always in shiny metallic. It can be of different widths and lengths, but the thinnest one is best for design. In online stores, such tape can be found under the name striping tape or nail line. It costs a symbolic price, so you can purchase the entire set at once so that you have plenty to choose from.
Usage nuances:
- The tape has an adhesive layer, so it can be used on any surface, be it varnish or acrylic.
- You need to glue it on, it won’t come off. But this will prevent the appearance of indentations in the varnish from pressing the tape to the nail.
- When gluing the tape, you should step back slightly from the edges of the cuticle and the contours of the nail plate, including the free edge, otherwise it will easily get caught and come off.
- After the tape is glued, a fixative must be applied on top. This will smooth the surface without affecting the shine.
2 ways to use
 1. First of all, ribbon is used for design as an accessory. The algorithm of actions here is as follows:
- A standard manicure procedure is performed - the cuticle is pushed back and removed, and the nail is given a beautiful and dewy shape.
- The nail is varnished . If the coating is one-color, then 2 layers are applied. It turns out beautifully if several colors are used, and a tape is attached to the joining strip (besides, it hides if something is uneven at the joint). The coating can also be gel polish.
- Cut a piece to the desired length. Glue it to your nail according to the design you came up with. Remember, the coating must be dry!
- If somewhere the length of the tape is slightly longer than required and protrudes beyond the edges, then carefully remove the excess so that at least a millimeter remains to the edge.
- Apply a fixative on top, you can even use 2 layers for reliability.
2. The second way to use ribbons for design is as an auxiliary material. . For example, you can cover your nails with several polishes, then stick the strips in the desired direction and apply another color of polish on top. After it dries, tear off the strips. As a result, you will get colored stripes on a monochromatic background - beautiful and impressive. Just remember to apply the finish, otherwise the surface will not be smooth. In the same way, you can do a striped manicure, for example, draw a vest. This way the strips will be even and thin. And it doesn’t matter what color of ribbon you use (it’s better to choose the most “not popular” color).
There are actually many design options. You can use ribbons as an outline in a French manicure. You can complement another drawing created using acrylic paints. Here are a few more original ideas from the Internet.


If you found this page useful, please recommend it to your friends:
Today there are a huge number of different types of manicure: plain coating, French, ombre, moon manicure, stamping and much more. Each of these types can be complemented with various decorative elements: sparkles, rhinestones, acrylic painting. No less common is nail design tape, which is used to add brightness and elegance to a manicure. In this article we will tell you how to use this tape, examples of application and little secrets that will make your tape manicure perfect.
All about the tape
The tape is a self-adhesive strip made in various colors. It is very easy to use and very inexpensive, which gives you the opportunity to purchase several sets at once for future designs. The tapes come in different widths, we recommend that you choose the thinnest one as it is best suited for the job. The most common colors are gold and silver, but you can choose according to your taste: from classic black or white to all kinds of multi-colored ribbons.
Moreover, the advantage of using such an element is that you can use it to create straight lines on your nails. The ribbon will not only serve as a colorful decoration for you, but will also help if you are a beginner and still have little use of a painting brush.

Exist certain rules that must be followed in order for your tape manicure to last as long as possible:
- The tape is very adhesive, so it can be used together with any coating: regular manicure polish, gel, gel polish or acrylic. However, it is important to remember that it can only be glued to dry, lamp-cured nails.
- In order for the tape to adhere well to the nail plate, it must not be glued completely, leaving the edges free.
- After fixing the tape on the nail, you should lightly walk over it with a special stick so that no air remains.
- We recommend applying the top coat twice so that the tape adheres better to the nails and is protected from various damages.
How to do
To work with tapes, you need a set of tools that are used to create a regular manicure. The only difference will be the need to purchase the tape itself and nail scissors if for some reason you don’t have them on hand.
- Start with a trim manicure, which will help your nails look well-groomed and neat, regardless of the design. Remove the old manicure, if you have one, remove the cuticle, set your nails to the desired length and use a nail file to correct the shape. Next, you need to degrease your nails and remove any remaining dirt and dust from them.
- Apply a base coat that will provide better adhesion of the gel polish to the nail plate. Dry each finger in a lamp.
- Apply base coat. This design can be combined with absolutely any product: regular manicure polish, gel, gel polish or acrylic. Don't forget to dry your painted nails.
- Work with the tape begins. Select the strip you need, cut the desired length and carefully stick it on the nail in accordance with the intended pattern. Check the size of the tape; if it protrudes beyond the edges, carefully shorten it to the required size. Remember to retreat from the edge of the nail.
- Apply top coat to secure the position of the tape. If necessary, do this twice, so the reliability of the manicure will be higher.
![]()
Design examples
Once you have learned how to work with design tape yourself, we suggest that you familiarize yourself with examples of similar work so that you can gain inspiration for your own ideas.
- A solid black finish can go very well with a silver or gold ribbon.
- To the ribbons, you can add rhinestones or sparkles already loved by fashionistas, which can either follow the contours of the ribbon or be located on adjacent fingers.
- You can play on asymmetry by gluing the tapes at different angles. This will draw attention to your manicure and will look very impressive.

- Try using two different tones on one nail and separating them with tape. This design will have a smooth transition, which will allow the selected colors to blend organically.
- You can use the strips to create specific lines on your nail. The technology is the same, only after gluing the tape it must be carefully removed. A thin, even strip will appear in this place, which can be difficult for beginners to paint with a brush.
If you follow all the rules for working with design tape, your manicure will turn out to be very original and durable. Surprise your friends and acquaintances with unusual designs and improve in this direction.
Video on the topic of the article
How often have you seen perfectly straight nails on fashionistas' nails? geometric patterns? Agree, they claimed that they achieved this result on their own at home and did not want to reveal their secret. After reading the article, now you will find out how you can do such a manicure yourself. This is a completely simple method, and your assistant will be... Ordinary tape!
Scotch tape or special nail design tape: what to choose
A manicure with tape takes a long time due to its cutting. There are bits of glue left on the scissors, and your patience is only enough to design several nails.

Adhesive tape for manicure. As you can see, it is very thin and can be used to quickly create neat lines.
Scotch tape for nail design solves the problem of preparing thin strips in no time! You just have to purchase the necessary colors in the store and use them to create a perfectly even manicure. Using ready-made thin strips, you can make a manicure of any complexity. Scotch tape, by the way, can be left on the nails - such a manicure looks incredibly beautiful, and most importantly, your nails will always shimmer in the sun due to the shiny surface of the tape.

What can happen if you don't remove the tape from your nails? Click on the photo to take a closer look.
Experiment and make diagonal, vertical, oblique patterns. The tape must be secured with several layers of clear varnish or Top Coat. This way it won’t come off and will stay on your nails for several weeks. Despite all the obvious advantages of tape, adherents of traditional manicure tools will never go wrong if they remain faithful to tape. This material is much cheaper and allows you to create strips of any thickness and shape. By the way, you can make shaped stencils from tape, for example, a heart, as shown in the photo:
Below, watch two videos showing how to use nail tape.
The first one is more sensible, but the second one can also be useful if you are serious about it!
How to do a manicure using tape, step by step guide
An award should be given to the person who invented manicure tape, because it is not only good for office purposes, but also helps you create wonderful designs on your nails.
In the photo below the algorithm for creating this type of manicure you can see how nail tape helps make the task easier beautiful pattern in just a few steps:
- Stage one! Choose a color palette.
In any manicure with patterns, a combination of three varnishes of different textures will look impressive: glossy, matte and shiny. - Paint all your nails. Remember that before this you need to polish your nails, give them the same shape and remove the cuticles.
- Third stage.
Take transparent or colored tape and cut off the required element with scissors. Think about the shape of the pattern in advance to make it easier for you to decide on the length and width of the tape. Next, you will have to apply tape to your colored nails. The varnish must dry completely, otherwise it will begin to come off along with the tape. If you have little time for a manicure, you can do the pattern the next day after applying the coating. - Paint the area free of tape with any color and let dry. Quickly remove the tape and remove the adhesive layer that remains on the nail.
- The final step.
Finally, glitter, a sticker or any other decoration can be applied.
Here's a video version of the lesson!
And another video, this time with tape and foil! An unusual idea.
Best ideas
The nautical theme reminds you of warm summer days spent at sea, even when your vacation is months away.
For variety, you can create blue and white stripes on your nails, reminiscent of a vest, using tape or tape. The strip can help create a beautiful French manicure, as shown on the ring finger.

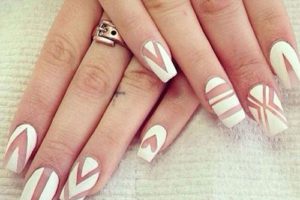
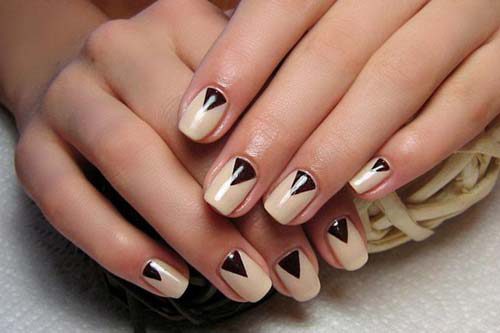
Among the geometric patterns, triangles remain relevant.
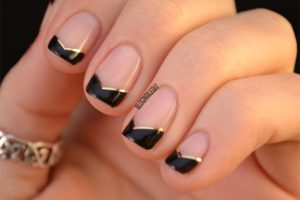
Triangular jacket with adhesive tape for nail design.
The triangular French manicure is beautiful in itself on both round and square nails and does not require any additions. A smile can be painted in one or more colors. The lunar jacket, which is based on a triangle, is suitable for both a teenage girl and a self-confident business woman. By the way, one of three tools of your choice will help you create such a manicure:
- Triangular stencil;
- Adhesive tape;
- Scotch.
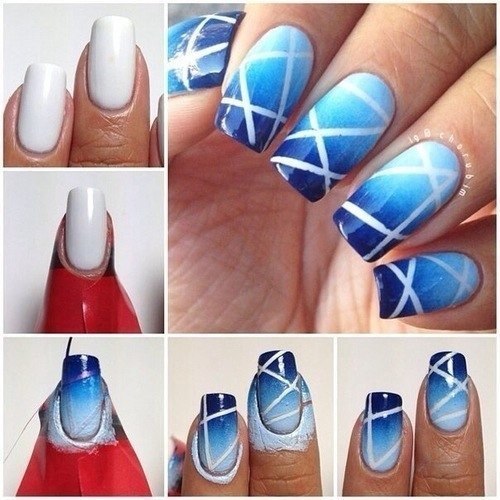
Alternative way using a thin brush is suitable only for the most skilled craftswomen who can independently draw a hole and fill the free edge with varnish. Not everyone can achieve a thin line! A great idea for a tape manicure is to use a gradient as a top coat.
Looking at the photo, which shows the step-by-step progress of the work, it will not be difficult for you to do it yourself: apply a base varnish, adhesive tape or tape, as well as two varnishes mixed on a sponge.
As you can see, you can create nail designs with tape yourself by borrowing a few ideas from educational videos and fashion magazines. All you need to do is apply the varnish and come up with an application - it all depends on your desire and imagination!
In contact with
Everything about a woman should be perfect! To always look fashionable, you need to take care of the beauty of your nails. An elegant manicure adds completeness to the look, and gives the owner of well-groomed hands self-confidence.
Fashion trends are constantly changing, but you need to try to be in trend. Intricate nail designs are a thing of the past. Minimalism is in fashion now, so manicures with stripes are at the peak of popularity.
Manicure Basics

- Nail care begins with removing old polish, giving the nails the correct shape, removing or softening the cuticle.
- It is recommended to treat the uneven nail surface with a special polisher, and carefully file the edges with a file. Currently, short or short marigolds are in fashion. middle length. The darker the polish, the shorter your nails need to be filed.
- Before applying varnish, the nail surface should be degreased. This can be done by wiping it with nail polish remover. The varnish will lie smoother and last longer.
- It is mandatory to apply a base coat before color varnish. This will smooth the nail surface and protect it from the harmful effects of coloring substances in colored varnishes.
Not everyone has the opportunity to visit a master, so a manicure that does not require professional materials and skills will be especially relevant.
Manicure with stripes
A manicure with stripes is easy to do at home with your own hands. For this design you will need:
- adhesive tape - used as a stencil;
- foil - used to create a specific pattern;
- a thin brush for painting - will be needed if you need to draw clear lines by hand, without a stencil;
- nail polishes - two or three shades;
- scissors;
- rhinestones optional.
The choice of a specific design depends entirely on the purpose of the event: business meeting, romantic date, celebration, etc.
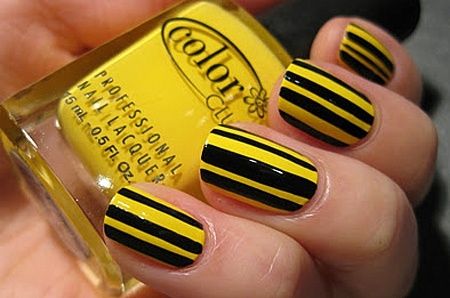
When performing a manicure with stripes, it is necessary to take into account the color compatibility. A classic option is a black and white striped manicure.
For the perfect striped manicure you will need some adhesive tape. It comes in various colors; there are also shiny and matte, thin and wide ribbons.
How to use tape for nails, video
Adhesive manicure tape is affordable and can be purchased at any specialized nail design store. If it is not possible to purchase tape for manicure, you can replace it with regular tape by cutting it into thin strips.
Coating technique for manicure with stripes

- Apply the base coat as the first layer and wait until it dries completely.
- Then apply the second layer.
- Next, we glue the manicure strips depending on the chosen design - horizontally or vertically. In this case, you need to take into account the shape of the nail; it can be visually stretched using vertical stripes.
- Apply a layer of varnish of a different shade and, without waiting for it to dry, carefully peel off the strip.
- We cover the nails with a colorless fixative varnish.
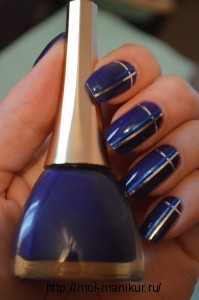
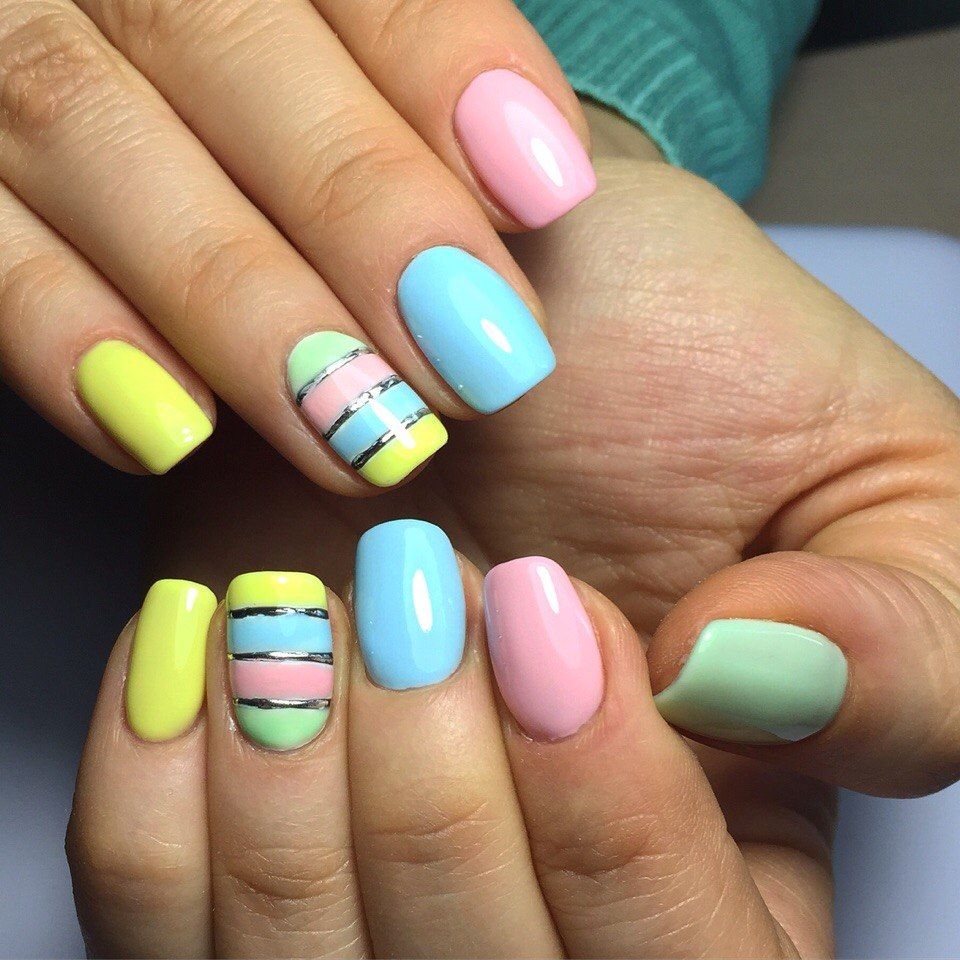
The undisputed leaders in design are the following color combinations:
- white and blue (nautical striped design);
- classic black and white striped manicure;
- manicure in pastel colors with geometric stripes;
- manicure in red, white with gold or silver stripes.
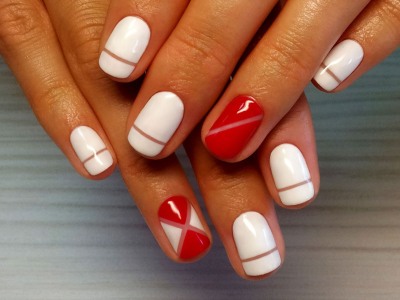
 Black and red manicure Black and white manicure
 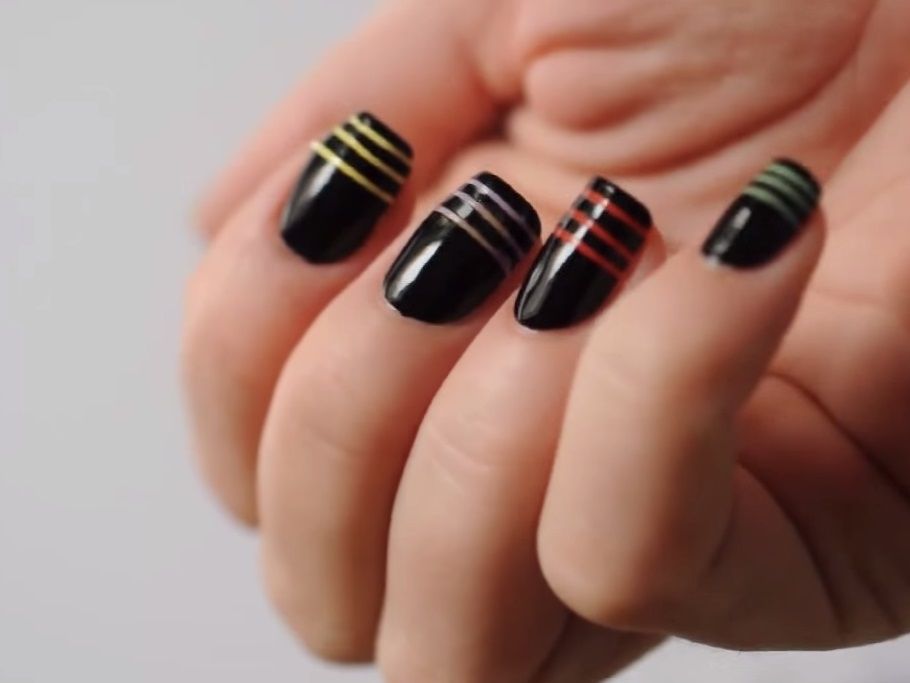 Combination of black with colored stripes
It is important to paint each nail with a different pattern - place the stripes in a unique sequence. You can place accents only on the ring fingers, or on the ring and middle fingers.
For an evening or formal appearance, rhinestones or large appliqués are used. The decorations must be secured with two layers of colorless varnish.
Manicure with stripes in French
French manicure has been popular for many years. It looks elegant on nails of any length. Often used for weddings, but also suitable for a business look.
In a DIY French nail design, you can use special strips for this type of manicure.
Classic French, video
Classic French
- In the classic version, adhesive tape is applied to the nail, retreating a few millimeters from the tip.
- The tip is coated with white varnish.
- Then the tape is removed.
- When creating this famous design, the nail is coated with varnish in a delicate beige or pinkish shade. It is important to stick to pastel colors.
- At the end, all this beauty is covered with colorless varnish.
A new way to create a French manicure
In this case, in White color Not only the tip is painted, but also the semicircle at the base of the nail. This manicure looks very stylish, fresh and indicates that its owner follows fashion. It is given the name “moon jacket”.
For the moon jacket you will need:
- Two types of varnish in suitable shades (you can take one gold or silver, the other matte). The current color will be matte black or burgundy.
- You will also need strips for a French manicure.
French manicure video tutorial
The moon jacket is performed in the following sequence:
- Application matte varnish on the entire surface of the nail in two layers until completely dry.
- Glue the strip so that you get a semicircle at the base of the nail.
- Applying gold or silver varnish.
- Removing the sticker.
- At the transition point between shades, rhinestones or beads are glued as desired.
- Fixed with a top colorless coating.
Summer striped manicure
French manicure stripes will help you create a bright summer striped manicure. You will need several varnishes, maybe neon shades.
- Apply any bright shade to the entire nail surface in two layers. We are waiting for it to dry completely.
- Apply the tape, covering a few millimeters of the cuticle.
- Apply the next shade of varnish. Peel off the strip immediately, without waiting for it to dry.
- Glue another tape, covering a few millimeters of the second shade of varnish.
- Paint the nail a third color. We remove the tape.
- Cover the nails with a transparent fixative.
Bright summer design is ready!
Manicure with foil stripes
Another fashionable trend in nail design is a manicure with foil stripes. This type of design is also not difficult to create with your own hands. You will need colored foil for manicure and glue.
 Combination of different foil strips
  Black manicure with foil
 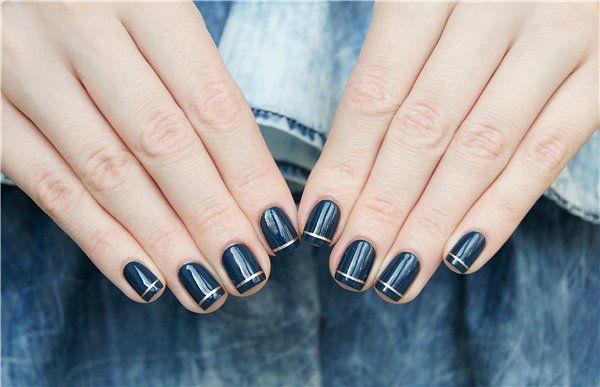 Foil stripes on blue manicure
- Apply a base coat of nail polish and wait until it dries.
- Apply glue in strips. The stripes are placed horizontally or vertically, as desired.
- Immediately apply colored foil to the glue for a few seconds and immediately remove it.
- The final coating will be a clear varnish.
This manicure is universal, it will suit a wide variety of clothes and for any occasion.
Manicure with stripes, fashion trends
- Matte varnish coating is in fashion.
In a manicure with stripes, you can use matte and glossy varnish of the same shade. - Looks absolutely beautiful matte nail with a glossy tip. There is no need to cover this design with a fixative.
- Black glossy nails with thin horizontal or vertical stripes are a hit in manicure. You will need black glossy varnish and special adhesive metallized strips.


The technique is simple:
- First, apply the varnish in two or three layers, you must wait until it dries completely.
- Then the strips are glued on. The edges are cut off with wire cutters.
- Finally, a transparent fixative varnish is used, which will give the nails additional shine.
In any color option, a manicure with stripes looks original and stylish. You will not need a lot of money to purchase materials.
Fashionable spring manicure with stripes, video
Fashionable design is easy to do with your own hands! Thanks to a striped manicure, you can always be the center of attention.
2015-09-28