How to make angel eyes for a vase yourself? DIY angel eyes, installation Install angel eyes on a VAZ 2106.
Today, tuning domestically produced cars has become quite commonplace. Pumped-up VAZs can be seen in almost any area, in every city and region of our country. However, car enthusiasts often limit themselves to installing new body kits. On the one hand, it’s beautiful, but on the other, it’s no longer interesting, and it’s simply impossible to stand out from the crowd in this way. But there is a way that will really transform your VAZ without significant technical changes. And it consists in installing such illumination as “angel eyes”. How to install them, read further in our article.
How to make LED angel eyes? Preparing materials and tools
Unfortunately, ready-made kits of such optics for this model are difficult to find in stores, so you have to do everything with my own hands. In order to make “angel eyes” for the VAZ-2106, we only need a few plastic sticks. Their length should be equal to the size of the optics on the “six”, that is, for work we need to have 4 such sticks, each 40-45 centimeters long.

We will also need 4 for optics (if you are making LED angel eyes). As for the choice of color, it all depends on your imagination. You should purchase 4 new glasses as a reserve (it is very difficult to pick out the old ones intact).
Let's get started
To bend the sticks, we need some kind of cylindrical container. For cars like the VAZ-2103 and -2106, a coffee tin would be the ideal choice. But before this, the sticks need to be heated over an open fire or in the oven. In the latter case, they are placed on an inverted frying pan lid. After a little heat treatment, the sticks are subject to bending. To do this, we prepare a pair of pliers, a pattern in the form of a jar and a chair. The parts are removed from the oven using the first tool (one is taken by the end, and the other is wrapped around the can).

Now we wait until the plastic cools down. When it hardens, remove it from tin can already formed rings. We cut off the excess ends of the sticks (they will definitely be visible) using a hacksaw so that we get a perfect circle.
We connect the LEDs and connect the wires
Next, we move on to the most complex and responsible operation - installing LEDs. Holes are drilled at the two ends of the products strictly to the diameter of the purchased light bulbs, and their legs are cut off with a length margin of 5 millimeters. Then the LEDs are soldered parallel to each other. They are connected separately, each wire goes to its own track. It is important not to confuse the polarity, otherwise the entire work will have to be redone. In order not to confuse where the “plus” is and where the “minus”, use multi-colored wires (preferably red and black). The length of each should be approximately 15 centimeters. At this length we cut the wire that leads to the “plus” and solder the resistance here.

Now we buy some (the cheapest possible) transparent nail polish and apply it drop by drop into each hole (there are 2 in total). Before it has time to dry, we insert diodes into the holes. In time, the entire structure should stand in the open air for about 30 minutes.
Why is it better to use this particular varnish?
The fact is that after drilling, the inner surface of the parts will be scratched; accordingly, the plastic does not have normal contact with the diodes. From here we get a bad glow of the rings, which we don’t need at all. The varnish fills all these voids and makes one whole from two elements.
For reliability, it is recommended to make small notches on the rings (but not along the entire circumference). The distance should be at least 10 millimeters, and the depth should be about 0.5 millimeters. That's it, at this stage the “angel eyes” on the VAZ-2106 have been successfully manufactured. Now it remains to do the second part of the work - installing parts into the car's optics.
Installing "angel eyes" on the "six"
First, we will have to completely remove and disassemble the headlights (don’t forget to turn off the power to the car’s on-board power supply before doing this). Next we have to remove the glass surface of the optics. If we cannot do this on the spot, we try to slightly heat the headlight over the same gas stove. Sometimes even after these manipulations it is not possible to remove the glass. In this case, the only way out of the situation is to break this part of the headlight unit. Fortunately, optics for the “six” are not very expensive, so you don’t have to worry about financial expenses. If debris has formed on the reflector, be sure to remove it from there. Here you need to be extremely careful. Remember that under no circumstances should you touch the surface of the reflector with your hands, much less use special alcohol-containing substances, powder, gasoline, etc. for cleaning. We clean the dirt only with a cotton swab or a piece of rag with coarse lint. Otherwise, the illumination range of the headlights will be no more than 5-10 meters.
How does the installation of “angel eyes” proceed? The edges of the glass are treated with sealant. After this, the ring with the diodes facing up is placed in the headlight. In this case, the notches should face the lamp. To be safe, apply silicone sealant to the remaining edges of the glass. Remember that the headlight must be sealed, otherwise it will constantly sweat and become cloudy. We wait 30 minutes for the sealant to harden, then connect the wires. Those that come from the “eyes” must be connected with the old ones that come with the headlight (low beam).

If desired, you can connect in another way. First, we disconnect the plug of the wires that go to the dimensions and turns. We connect the minus of the former with the plus of the latter (that is, two into one). The freed “+” from the dimensions will be used to connect a pair of “angel eyes”. The minus can be attached to the signal mount. In this case, the “angel eyes” will turn on not as low beam, but as dimensions (from the outside it looks very impressive!).
Conclusion

So, we found out how to install angel eyes “angel eyes” on a VAZ-2106 with our own hands. As you can see, with just 8 LEDs you can radically change the appearance of the car without installing any body kits or spoilers.
VAZ 2107, despite the considerable age of the model, has not lost its popularity. The low price, ease of maintenance and unpretentiousness appeal to domestic car owners. To make the familiar features of the “Seven” attractive and emphasize individuality, owners use a variety of tuning elements. “ Angel eyes” for VAZ 2107 - a simple and inexpensive way to decorate the car with your own hands.
Advantages of tuning “angel eyes”
Tuned “LADAs” are often found and invariably attract attention. This is especially true not for the annoying plastic body kits (many of which are very standard), but for newer, brighter (literally and figuratively) parts - the “angel eyes” headlights on the VAZ 2107.
The advantages of this direction of tuning are as follows:
- You can modify the lighting system yourself, without resorting to the services of a service station;
- materials for modifying headlights are quite affordable;
- “angel eyes” provide high-quality illumination, noticeable even in the daytime;
- The lighting system is reliable and durable;
- tuning provides beautiful original appearance“sevens”.
This illumination is an excellent addition to the large rectangular headlights of the VAZ 2107.
What are “angel eyes”
Tuning headlights “angel eyes” are luminous rings located around the perimeter of the reflector. This gives the headlights an unusual and attractive look. For the first time, such tuning was used by the famous German company BMW and it quickly became popular among owners of all brands of cars.
The luminous “border” on the reflector is made of LED strip, which is reliable and has low power consumption.
The LED strip is mounted and connected very simply, so the services of specialists are completely unnecessary. Anyone can make “angel eyes” on a VAZ 2107 with their own hands.
Options for “angel eyes” on the VAZ 2107
Tuning angel eyes headlights can be done in several ways:

Let's look at the latest options in more detail.
What is needed to make “angel eyes” on a VAZ 2107
To decorate your “seven”, you need the following tools and materials:
- plastic tubes or strips corresponding to the perimeter of the car's optics;
- heat-resistant sealant for optics;
- LED strip (the color and brightness of the LEDs depends only on your taste);
- spare headlight glasses (in case it is not possible to carefully remove the standard glasses);
- insulated wire or cable;
- resistors;
- insulating tape;
- battery (9 volts);
- headlight size template;
- glue gun;
- pliers;
- hair dryer (if not, you can use a regular oven);
- drill with a set of drills and attachments.
How to make “angel eyes” on a VAZ 2107
When the materials and tools are collected, you can begin to work. LED strip backlighting is made as follows:
- make a mold with a perimeter corresponding to the size of the “seven” headlights and the planned “eye” shape;
- heat the transparent tube with a hairdryer or in the oven to a temperature at which it begins to bend easily;
- Using pliers, bend the heated tube around the perimeter of the template;
Important: do not allow the tube to overheat, otherwise bubbles will appear in its material.
- wait until the tube cools down;
- make notches on the tube in increments of 2 mm;
- insert LEDs (LED strip) into the tube;
- solder the LEDs in series (the LED strip can be soldered or cut only in the places specified by the manufacturer);
- solder resistors and wires to the LEDs (the value of the resistors depends on the length of the strip and the type of LEDs);
- sand and insulate the soldering areas.
If not LEDs are used, but an LED strip, the tube can be replaced with a plastic strip.
It is necessary to carefully check the quality of the workmanship before installing “angel eyes” in the headlights.
Installation of “angel eyes” on a VAZ 2107
After manufacturing the LED backlight, it must be installed inside the headlight unit. This is done like this:
- dismantle the headlights;
- heat the headlight glass with a hairdryer and remove it;
- install “angel eyes” in the headlight units and glue them with glue or sealant;
- connect the backlight wires to the side lamps;
- glue the headlight glass with sealant;
- install and connect headlights;
- check the operation of the LED backlight.
Now you know how to make “angel eyes” on a VAZ 2107 and can do the work yourself. This will make your car more attractive and it will become more recognizable in traffic.
I met a huge number of car enthusiasts who were dissatisfied with the installed angel eyes, like on a BMW. The second well-known name is “LED rings.” Some shone faintly, others faded quickly, others had a blue tint to the light.
At the end of the article there will be many photos of installation on popular cars 2110, 2114, Priora, Kalina, Mazda, BMW.

- 1. Distinguishing good from bad
- 2. How to make it yourself
- 3. Installation
- 4. Installation examples
Difference between good and bad

The standard, of course, is the angel eyes of BMW, BMW. First, car enthusiasts will see enough quality in expensive cars, then they want to buy inexpensive and more beautiful ones. But in the end they get a large set of disadvantages, because they think that different models are no different. They buy the cheapest junk, with the weakest and lowest quality diodes, and get the appropriate result. This is also facilitated by stores that increase prices up to 5 times.
A little LED wisdom. If you want to buy a chocolate bar, but you only have enough money for a piece of gamna, then it’s better to save up for the chocolate bar.
There is no need to buy cheap ones, they will quickly fail. To replace with others, you will have to disassemble and reassemble the headlight each time. If you don’t do it yourself, then this work also costs a lot of money. Each time you will need a new package of rubber headlight sealant. After calculating all the costs, you will see that it is better to install good ones for a long time.

Aliexpress sells ready-made sets of LED angel eyes for a specific car brand, for example Mazda 3. The price for such products is quite high, 3-5 times higher, they write like a copy of branded ones. But as practice shows, the quality is low, the assembly is poor, and they break quickly. It is often necessary to advise readers on what to do in this case. There are usually two options, replacing several LEDs or replacing the entire LED ring.

To make it clearer for you, look at the difference between the characteristics of Chinese and branded LEDs 5050, 5630, 5730, 3528. The Chinese put a crystal 3-4 times weaker in a standard case, and the quality is 10 times worse. It is difficult to distinguish good ones from low-quality ones, they look the same, you need to calculate the power of one LED. Many online stores cannot resist the temptation to sell a cheap product worth 100 rubles for 1000 rubles.

How to make it yourself

Readers of my site are interested in how to make angel eyes with their own hands after reading articles on the Internet. According to statistics, 99% are encountering this for the first time and mostly want to save money. They do not know the standards for light intensity and other parameters, so the result is not very good.

As a light source, you can use an end (corner) LED strip or a regular flat one.
On the Internet, the most popular option for making LED angel eyes with your own hands from transparent plexiglass or plastic. Shallow recesses are applied to it, and 0.2 or 0.5 Watt LEDs are inserted at the ends. As you can imagine, the power is too low, the light will scatter forward and inward, and decrease inside the transparent material. Such an LED ring will be fully visible only at night, the brightness is at the level of a normal size. Even powerful LED diodes of 1W, 3W, 5W will not help.

To avoid breaking the PCB, first cut out the circle and then remove the middle. Make conductive paths and all that remains is to solder the LEDs. This method is quite expensive in terms of time and materials. For comparison, the cheapest diode ring for 20 LEDs costs from 80 rubles on Aliexpress, delivery is already included in the price.
For it to shine at the level of a prestigious car, a power of 5-10 Watts and a luminous flux of 300 lumens are required, and the light should only go forward.

Another way is to use a flexible light tube, which is most often inserted into headlights as side lights. The tube can be cut and made into a ring; it will hold its shape due to contact with the reflector. The two-color tube can serve as markers and turn signals.
Installation

Installing angel eyes with your own hands is quite difficult; it requires skill and sometimes good nerves. Installation requires disassembly of each headlight. Most headlights are assembled on a sealant, which softens when heated with a hair dryer. Much less common on sealant, which is rubber. It doesn’t melt or soften; you have to carefully pick it out and cut it for several hours. One headlight can take from 1 to 5 hours. The first time it took me about 10 hours to analyze it. Due to inexperience, you can ruin the presentation in the area where the glass and the body meet.
Then the diameter of the seat is measured and the angel eyes are installed. Degrease the gluing areas and fix the parts. The kit often comes with double-sided tape for installation, but I don't trust it. The halogen low beam lamp in the headlight gets very hot and affects this tape.

Reassemble the headlight in the reverse order using a special rubber sealant. Assemble in such a way that you can disassemble it without consequences next time. If you assemble it poorly, moisture will get inside, the headlight will sweat, and the wires will rot.

There are several connection options in the headlight:
- inclusion along with dimensions;
- instead of side lights;
- together with DRL;
- turning on two-color lights along with the turn signal;
If the connection to the dimensions does not suit you, you can use the controller for the daytime running lights DRL to control on and off. Search for "DRL controller". To connect RGB, single-color schemes are suitable, but you will have to look for a place to place the RGB control unit.
If you are not confident in your abilities and lack experience, it is better to contact a specialist auto electrician.


Installation examples
The leaders in installation are domestic cars VAZ 2114, VAZ 2110, Priora. Among the foreign cars are BMW, Mazda 3, BMW E39, Ford Focus. They are also actively installed on motor vehicles, scooters, motorcycles, and ATVs.
..


VAZ 2114

Among domestic cars, the second place in popularity is occupied by angel eyes on the VAZ 2114, the first place is shared by Priors and VAZ 2106, which have round reflectors.


VAZ 2110


Kalina VAZ


Mazda 3, 6 Mazda 3, 6

Among imported cars, angel eyes are popular on the Mazda 3, Mazda 3. They look especially chic on the Mazda 6, which has 4 circles in each headlight. The RGB LED rings will look interesting and will complement the dimensions of the turn signal.


Priora VAZ 2170

The most popular option in Russia is angel eyes on the Priora. The shape of the headlights is well suited for such tuning; the reflectors are round in shape.


Ford Focus, Kuga


Used as daytime running lights, they have become a very popular decoration, emphasizing the image of the car owner. But unfortunately, not all models and brands of cars are equipped with them at the factory. Today we will look at how you can make and install angel eyes on a VAZ 2106 yourself.
DIY angel eyes for six
There are many options invented by car enthusiasts for making angel eyes for installation in VAZ 2106 headlights. Let's start with the simplest and most budgetary.
How to make angel eyes with two LEDs
To make this design you will need the following materials:
- 8 any super-bright LEDs with a diameter of 5 mm with radial leads.
- 4 resistors with a resistance of 2 kOhm each and a power of at least 0.25 W.
- 4 round sticks made of transparent organic glass, 50 cm long and 8-10 mm in diameter.
- Sealant.
Expert opinion
Alexey Bartosh
Ask a question to an expertThe voltage in the on-board network when the engine is running can reach 14.5 V, which will greatly reduce the service life of the “eye”. That is why it is advisable to include a stabilizer in the circuit that maintains the optimal voltage on the LEDs. For example, the integrated stabilizer KR142EN8B, which costs around 20 rubles, is suitable.
 Materials needed to make simple angel eyes
 Prepare the following tools:
- A hacksaw or a blade made from it.
- Two pliers.
- A round mandrel with a diameter of 104–110 mm (a 200-gram tin can of instant coffee is ideal).
- Large frying pan or pot of boiling water.
- Hot glue gun.
If everything is ready, then you can start. Dip the stick into boiling water and, as soon as the glass softens, use two pliers to wrap it around a pre-prepared mandrel.

After the stick has cooled, remove it from the mandrel and saw off the ends with a hacksaw so that there is a 5 mm gap between them.
 Curved blanks and finished ring for angel eyes
 Now we drilled two holes at the ends of the stick with a diameter of 5.5 mm and a depth of 7-8 mm. To install LEDs in these holes, use any transparent nitro varnish - it will not only securely fix the semiconductors, but also make the walls of the holes smoother, and therefore more transparent.
Solder the LEDs in parallel and solder wires of different colors to them: this will make it easier to maintain polarity when connecting the structure to the on-board network.
Find out in advance the polarity of the semiconductor terminals and glue them in so that after installation the terminals of the anodes and cathodes can be easily soldered.
 A hole in the end of the tube and an angel eye with installed LEDs
 The final touch remains: shallow (0.5 mm) cuts along the entire length of the ring at intervals of 5-7 mm. If you do all the above operations 4 times, then we can assume that the angel eyes are ready for installation in the headlights.
 Creation of cuts and finished angel eyes for VAZ 2106 at work
 To do this, the headlights will have to be removed, and the glass on them, wrapped in rags, will be broken - this is easier than tearing off the glass from a durable sealant.
Before you break the windows, don’t forget to look at which ones were for high beam and which were for low beam.
Place the finished angel eyes into new glass with cuts to the glass and glue them using a hot glue gun or sealant. At the same time, we drilled holes in the top of the reflectors: this is where you will lead the power wires. When the sealant has set, coat the ends of the reflectors and glass well, then press them tightly together until the sealant has completely set. The rings can be glued not to the glass, but to the reflector, but in this case, use a sealant, since a heat gun is powerless in front of large, cold metal.
 Assembly of the headlight with angel eyes (rings glued to the reflector)
 All that remains is to install the headlights in place, without confusing the high and low ones, and assemble a simple circuit:
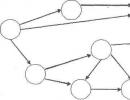
 Connection diagram for angel eyes for VAZ 2106 to the on-board network via the KR142EN8B stabilizer
 The microcircuit must be equipped with a small radiator or mounted directly on the car body.
Angel eyes on LED strip
These angel eyes look much more effective than the previous design, but, oddly enough, they are not more difficult to make. For this version of DRLs (daytime running lights), the following materials will be required:
- LED strip (SL) white glow (2 m).
- 4 plexiglass sticks of rectangular cross-section (8x10x500 mm).
- 4 new glasses from VAZ 2106 headlights - 2 high beams and 2 low beams.
- Sealant.
- 12 V voltage stabilizer for powering LEDs.
The tools you will need are the same as for the previous design: a hacksaw for metal, two pliers, a mandrel with a diameter of 104–110 mm, hot water, a glue gun.
Make rings in the same way: heat the sticks in boiling water and bend them on the mandrel using two pliers:
 Making rings for angel eyes
 Expert opinion
Alexey Bartosh
Specialist in repair and maintenance of electrical equipment and industrial electronics.
Ask a question to an expertIn the version shown in the photo, the master used a glass salad bowl as a setting, but this is not the most the best option. When heated and subjected to simultaneous mechanical impact, the glassware may break. In my opinion, it is still better to use a metal coffee can as a mandrel.
Trim off the excess stick. As a result, you should get something like this:
 Finished angel eyes rings for VAZ 2106
 Now you need to attach the LED strip to these rings. Any width up to 8 mm with a 12 V white light will do (colored DRLs will cause problems with the traffic police, but more on that below). For example, a tape assembled on 5730, 2835 or 5050 is single-color, but the latter will cost a little more.
Cut 4 pieces of the required length from the tape (it is sold in 5 m reels), but do not forget that you can cut the SL along the areas marked on it (every 3 diodes). If the pieces turn out to be slightly longer than needed, it’s okay - the tape can be secured to the rings with a slight overlap. An open circle will create an unpleasant effect of incomplete angel eyes.
Prepare a heat gun and apply the SL to the ring with the LEDs facing the glass. Slightly bending the tape, glue it with dots to the ring. You can apply dots anywhere between the LEDs. As a result, you will get something like this:
 5050 tape glued to the ring
 In the photo it looks like the SL is glued into the groove, but this is an optical illusion. In fact, the tape is glued to the bottom of the LED ring to the glass.
When bending the tape, be careful and work without fanaticism. It doesn't bend well laterally, but it still bends. If the SL swells somewhere, then let it - it will not affect the quality of the eyes. Otherwise, you may damage the conductive paths and the piece of tape will be damaged.
Solder the wires to the SL, observing the polarity (marked on the tape near the contact pads). All other operations are the same as in the previous design (see above). Take out the headlights, remove the glass, glue the ring with a gun or sealant, assemble the headlight and put it in place. The connection diagram for these eyes will look like this:
 Connection diagram for angel eyes assembled on an LED strip
 And this is what the result of the completed work will look like:
 This is what angel eyes look like on an LED strip during the day...
  ...and at night
 Options for ready-made modules
If you don’t want to bother with making angel eyes, you can use ready-made rings that are on sale. The most popular of them:
- Gas discharge (CCFL).
- Cluster.
- LED.
Gas discharge
They are ordinary fluorescent tubes made in the shape of a ring. Since such tubes require high voltage and ignition, a boost converter with a starting system (inverter) is included with the rings.
 Gas discharge angel eyes
 Cluster
These eyes are a solid base on which an LED matrix (COB technology) is applied, made in the form of a radial spiral. These eyes are powered by 12 V, and often come with a 12-volt stabilizer.
 Cluster angel eyes using COB technology Angel eyes on SMD LEDs
 Legality of installation
How legal is it to install angel eyes yourself and will there be any problems with the traffic police? Angel eyes are a type of daytime running lights, and therefore the requirements for them are the same:
- DRLs turn on with or instead of low beam headlights and turn off when switching to high beam.
- The color of the front lights, except for fog lights, must be white of any color temperature - from warm to cold.
So it turns out that you can have white angel eyes? But there is one more nuance. There is a provision “On the inadmissibility of operating a vehicle with installed light diffusers and lamps that are not provided for by the design of lighting devices and their optics” and the phrase: “The operation of vehicles with changes made that are not provided for by the design is prohibited.”
So it's impossible? It is possible, but only if the changes are made by employees of specialized service stations that have the appropriate license. Thus, by installing homemade angel eyes, you risk losing not only them, but also your right to drive a vehicle for a period of six months to a year.
The question arises: why are they being sold then? They sell a lot of things: cellular jammers, wiretapping, stun guns capable of knocking out a brontosaurus... It’s just not prohibited to sell and buy, but you will use them at your own responsibility.
That's probably all about angel eyes. If you carefully read this article, you can easily do your own headlight tuning by making and installing this original type of daytime running lights.
Video
Today, many people can only afford to buy a domestic car: a Kalina Priora or a VAZ. These brands are often found on the roads of our country.
To make them more attractive and unusual, many car owners go for original auto tuning. The most popular and easiest do-it-yourself auto tuning today is “angel eyes” headlights.
Tuning "angel eyes"
We will tell you how to make angel eyes on a viburnum or a vase with your own hands in this article.
Benefits of tuning
Today, the “pumped up” VAZ (models 2101, 2105, 2106, 2107, 2109, 2110, 2112, 2114, 2115, 21099) or Viburnum Priora are found in all regions of our country. Car tuning can be very diverse, often installing new body kits. But this won’t surprise anyone anymore. But the installation of “angel eyes” on vehicle domestically produced is still a curiosity and will be able to amaze even the most ardent opponents of the domestic automobile industry.
The advantages of installing “angel eyes” on a Priora or VAZ are the following points:
- the ability to assemble a lighting system with your own hands;
- availability of system materials;
- high-quality headlight illumination;
- long service life of the prefabricated system;
- beautiful appearance of the car;
- high-quality and original auto tuning of a domestic car.

Illumination “angel eyes” will be an excellent addition to any VAZ model (from 2101 to 2115 and 21099) or Priora.
Tuning features
Auto-tuning “angel eyes” consists of luminous rings that are located on reflectors. Such rings give the car originality and unusualness. It is worth noting that this type tuning is the most attractive in terms of finishing of domestic vehicles.
Note! BMW is considered the creator of such tuning.
Glowing rings are formed from LED strip, making this tuning:
- durable;
- resistant to mechanical damage;
- provides high-quality lighting;
- Quite easy to assemble.
Due to the fact that the basis of the luminous rings is an LED strip, anyone can do such tuning with their own hands. To do this, you just need to strictly follow the instructions given below.
Getting ready for work

In order to decorate your vase (models from 2101 to 2115 and 21099), you will need to prepare a certain set of materials and tools.
Note! It is almost impossible to find a suitable lighting and optical system for a car in stores. Therefore, you will have to make it yourself.
To make “angel eyes” for a vase, you will need the following materials:
- several plastic sticks. They must be equal in length to the dimensions of the optics on the machine. Therefore, to create tuning we will need four plastic sticks with a length of approximately 40-45 cm;
- heat-resistant sealant suitable for working with optics;
- four LED bulbs or strip. If using tape, give preference to the SMD 5050 model with 60 diodes per meter. The choice of LED glow color is determined only by your imagination. The best solution would be to match the color of the car with the color of the LEDs;
- four spare glasses for headlights. You need to buy them just in case, since it’s unlikely that you can remove the old ones intact and without chips;
- cable;
- resistors;
- 9 volt battery;
- a can or any round object that has the same diameter as the headlights;
- plexiglass with a sheet thickness of 10 mm.
The tools you will need are a glue gun, a hair dryer and pliers. You also need a drill with a set of drills and disk attachments.
Execution options
“Angel eyes” on a vase can be made in several ways:
- Simply purchase it at a store that specializes in alternative headlights. In this situation, all you have to do is install the headlights on the car yourself. But there is one significant drawback - finding suitable headlights is quite problematic, and they are not cheap;
- design of “eyes” using transparent tubes and LEDs;
- making tuning using LED strips.
Let's look at the option when “angel eyes” are made from plastic tubes.
We create beauty
When all the listed materials and tools have been collected, you can safely begin creating “angel eyes” on a vase or prior.
In order for everything to work out correctly and quickly, you must adhere to the following instructions:

Curved tubes
- We heat the transparent tube until it begins to bend and easily give in to the necessary deformations. You can heat the tube using a hair dryer or a regular oven;
- take a round shape. In its role, you should use a round salad bowl or coffee can. Using pliers, we bend the heated plastic tube around the perimeter of a round shape;
Note! Be careful while shaping the tube. so that it is not overheated. Otherwise, small bubbles may form in the plastic.
- Next, we wait for the tube to completely harden;
- after that, we saw off the edges so that LEDs can be installed in the tube;
- then we assemble the resistor and LEDs, carefully insulate the contacts and grind the soldering points;
- then you need to make notches on the tube in increments of approximately 2-2.5 mm. In this case, you should retreat 1–1.5 cm from the edges;
Note! To ensure that the notches are made evenly, the process of their formation must be controlled using a plastic clamp. If you make notches with the LEDs turned on, then you can already at this stage view the final result of your work.

Notches on the pipe
- In order for the glow emanating from the LEDs to be uniform and bright enough, the notches should be placed closer to the center. At the same time, they need to be made deeper: in the middle - 5 mm, and at the ends - 2 mm;
- after this, it is necessary to solder the diodes, making sure to observe the sequence so that the current flowing through them is equalized. The tape should be cut and soldered only in specially designated areas;
- We finally insert the LEDs into the tube.
As a result, the ends of the rings should have holes 5-7 mm long and 5 mm in diameter. It is recommended to use foil to cover the ends of the plastic tube.
If an LED strip is used, it is simply glued to a plastic strip. In this case, the tape is soldered according to the standard scheme.
Before installing your homemade “angel eyes” system on your car, be sure to check it for build quality, the glow of the LEDs and the strength of the resulting structure. Otherwise, if problems are discovered after installation, it will be very difficult to eliminate defects.
Installation on the machine

Ready tuning
Once you have assembled the angel eyes optical system, consider that half the battle is done. All that remains is to install it correctly on the headlights of your car. At this stage it is necessary to perform the following manipulations:
- here we need heat shrink tubing. It can be bought at any specialized store. Choose a white product. This color will not attract unnecessary attention and will not stand out against the background of glowing LEDs;
- attach the LED ring to the vehicle headlights;
- we cover them with new protective glasses, since the old ones will most likely no longer be suitable;
- We treat the joints with sealant.
Now you see that “angel eyes” can be made quite easily yourself, following the step-by-step instructions. The end result will be a beautiful auto-tuning for a domestic VAZ (model 2110, 2112, 2114 or 2115), making your “swallow” more attractive and original. The main thing is to strictly follow the assembly steps and believe in yourself.
 Solving the problem of flickering LED strips when turned on