Knitting patterns for children's dresses 28 30. Knitting and crocheting for newborn girls
The yoke and lower part of the dress are made of various openwork patterns. Convenient, Nice dress for the baby knitted, description and knitting pattern.
DIMENSIONS: 50/56 (62/68) 74/80
YOU WILL NEED: yarn (100% sheep wool: 95 m / 25 g) -125 (150) 175 g col. kiwi; knitting needles and circular needles No. 3; hook No. 3; 4 small buttons with a diameter of 1 cm.
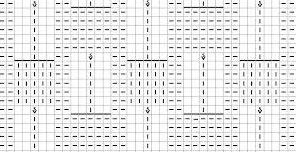
Basic pattern 1 (knitting needles No. 3): knit according to pattern 1. It shows odd circular rows. In even circular rows, knit all stitches and yarn overs. From 1st to 32nd r. repeat constantly.
Basic pattern 2 (knitting needles number 3): knit according to pattern 2. It shows odd circular rows or knit rows. In even circular rows, knit all stitches. In purl rows, purl all stitches. From 1st to 14th r. tie 1 time. then 3-14th r. repeat constantly.
Knitting density: main pattern 1 - 28 p. x 47 r. = 10 x 10 cm: main pattern 2 - 29 p. x 42 r. = 10 x 10 cm.
DESCRIPTION OF WORK:
Knit the dress up to the armholes in circular rows.
On needles No. 3, cast on 171 (209) 247 loops and close into a ring. Mark the beginning of the circular row with a thread of a contrasting color. Knit 1 round. purl, 1 round. R. knit and 1 circle. R. purl. Then continue working with the main pattern 1.
Repeat rapport in a circular row 9 (11) 13 times. After 18 (23) 28 cm from the initial row, evenly distributed, subtract 45 (47) 67 sts and knit with the main pattern 2 in 126 (162) 180 sts. In a circular row, repeat the rapport 7 (9) 10 times. After 21 (27) 33 cm from the initial row, divide the work in half in the middle. Finish the front and back separately.
First, finish the front by knitting the first 63 (81) 90 stitches. Leave the back loops temporarily. For armholes, close in the 1st row. on both sides 3 (3) 4 p. and in every 2nd r. close on both sides another 0 (1) 1 x 3 p., 1 (2) 2 x 2 p. and 3 (3) 4 x 1 p. = 47 (55) 60 p.
After 25 (32) 39 cm from the starting row, close off the middle 11 (13) 12 stitches and finish both sides separately. First, continue knitting on loops along the left edge (= end of the row) and at the beginning of each front row, decrease 1 x 3 sts, 1 (1) 2 x 2 sts and 4 (5) 4 x 1 sts.
At the same time, after 27.5 (34.5) 41.5 cm from the initial row, evenly distributed, make 2 holes for buttons. To do this, cast off 2 stitches at a time and cast on the closed loops again in the next row.
After 29 (36) 43 cm from the initial row, close off the remaining 9 (11) 13 stitches of the shoulder. Then continue knitting on loops along the right edge (= beginning of the row) and at the beginning of each purl row, decrease 1 x 3 p.. 1 (1) 2 x 2 p. and 4 (5) 4 x 1 p.
At the same time, after 27.5 (34.5) 41.5 cm from the initial row, evenly distributed, make 2 more holes for buttons. To do this, close off 2 stitches at a time and cast on the closed loops again in the next row. After 29 (36) 43 cm from the initial row, close off the remaining 9 (11) 13 stitches of the shoulder.
Then knit the remaining 63 (81) 90 sts of the back to the end. For armholes, close in 1st r. on both sides 3 (3) 4 p. and in every 2nd p. close another 0 (1) 1 x 3 p., 1 (2) 2 x 2 p. and 3 (3) 4 x 1 p. = 47 (55) 60 p.
After 28 (35) 42 cm from the starting row, close off the middle 13 (15) 14 stitches and finish both sides separately. First, continue knitting on loops along the left edge = end of the row and at the beginning of each front row close 0 (1) 2 x 4 p., 2 (1) 0 x 3 p. and 1 x 2 p.
After 31 (38) 45 cm from the initial row, close off the remaining 9 (11) 13 stitches of the shoulder. Then continue knitting on loops along the right edge (= the beginning of the row) and at the beginning of each purl row close 0 (1) 2 x4 sts.. 2 (1) 0x3 sts and 1 x 2 sts. After 31 (38) 45 cm from of the beginning row, close off the remaining 9 (11) 13 stitches of the shoulder.
Ideas for knitted items for little princesses are simply amazing in their variety. Dresses, sundresses, bodysuits, booties, caps, sets for baptism and discharge - all this can be crocheted or knitted. Yes, some things require experience and patience, but beginners can take simple models that look no less impressive on a child.
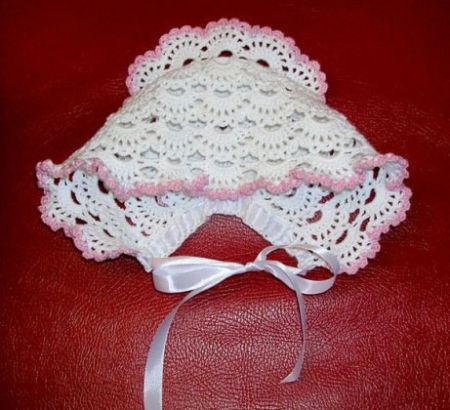
Adorable openwork cap for a newborn baby
If you have skills in crocheting, then making such a cap with your own hands will not be difficult. Beginners can also try to knit it, since the openwork pattern here is not too complicated and will certainly be possible for those who are taking their first steps in such needlework.
Materials
- White cotton yarn – 50 g.
- Pink cotton yarn – 10 g.
- Crochet hook No. 2.
- Satin ribbons for ties – 70 cm.
The model is ideal for discharge in the warm season or for summer walks
Size
The cap is suitable for a child from birth to three months.
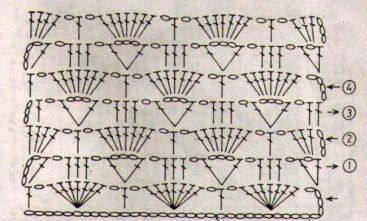
Scheme
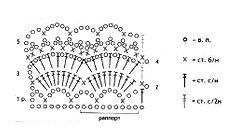
Scheme openwork pattern
Description
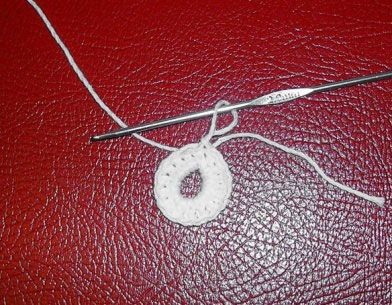
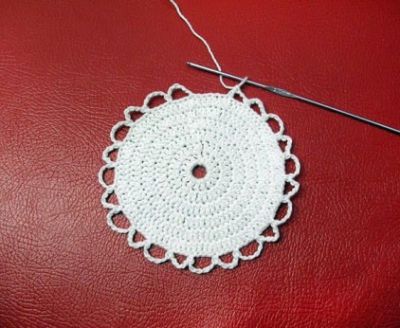
1. Donyshko
Knitting starts from the bottom. To do this you need to make a chain of 10 air. loops and close it into a ring. The next row will be 16 stitches. with double crochets (Fig. 1).
Knitting the bottom (Fig. 1)
In the third row you need to knit two stitches from each loop. with double crochet (32 pcs.). In the fourth row, increases (two columns from one loop) are made through 2 loops, in the fifth - through 3 loops, in the sixth - through 4 loops, in the seventh - through 5 loops. The result will be a circle (Fig. 2).
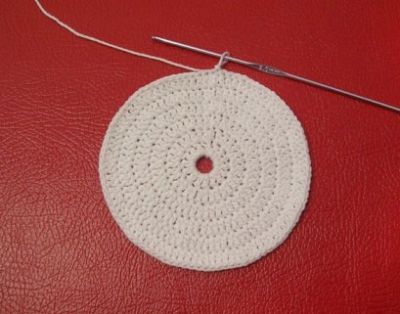
Knitting the bottom step (Fig. 2)
2. The main part of the cap
The beginning of the main part begins with tying the circle with arches. Arches are made of 5 air. loops and knit in every fourth stitch. A small section (about 2 cm) should be left untied.
Tying the bottom with arches made of air loops
After this, you need to turn the knitting and start tying the work with an openwork pattern according to the pattern.
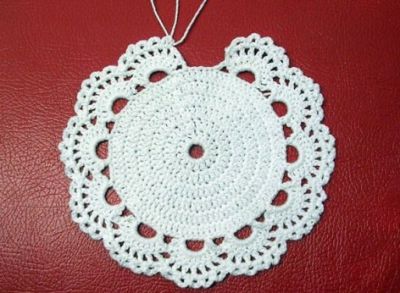
First row of openwork pattern
Next, you need to knit as many rows according to the pattern as needed to the desired depth. For a newborn baby, 4-6 rows should be enough, but you need to take into account the thickness of the threads and the size of the hook. If possible, it is better to try on the product.
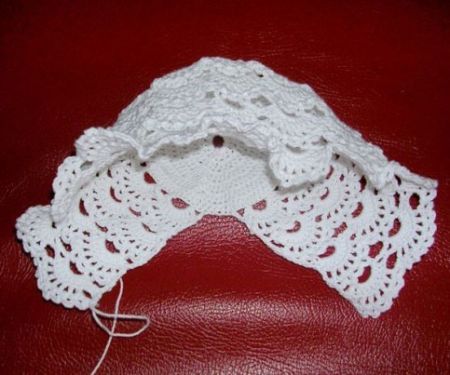
The main part is finished with an openwork pattern
Then you need to tie the cap along the bottom edge so that you can insert a ribbon for the ties. The first row of strapping is st. without a crochet, second - art. with two or more yarn overs (you need to focus on the width of the ribbon). At this stage the thread is cut.

Knitted border for threading ribbon
3. Finish
First you need to tie the bottom. The binding is done according to the openwork pattern. The tying thread is attached at the location indicated by the arrow.
![]()
Now you need to take pink yarn and decorate the edge of the bottom binding with one row of st. without a crochet. The same binding is done along the front edge of the cap. A ribbon is inserted into the border along the bottom of the cap. The work is finished.
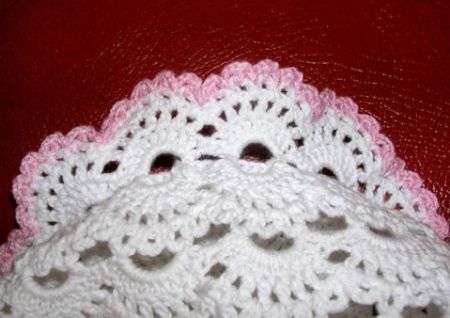
Decorating the product with pink yarn
The cap is ready!
Crochet summer set for girls (dress, panties, Panama hat)
Size
The set is designed for a child from 0 to 3 months.
Materials
- Yarn 100% cotton (white) – 150 g.
- Yarn 100% cotton (turquoise) – 50 g.
- Buttons – 2 pcs.
- Underwear elastic (needed for panties).
- Crochet hook No. 3.

This beautiful set for your baby will be indispensable on warm summer days.
Scheme

Rice. 1
Rice. 2
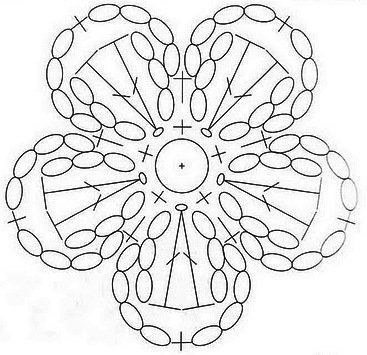
Rice. 3
1. Dress
The dress needs to be knitted from the yoke. First you need to cast on 44 stitches. Every 11th loop you need to notice and then make increases (one loop at a time) before and after these loops. For a square yoke you will need 4 rows. Next will be one row according to the hem pattern (Fig. 2). After this, you need to set aside the loops for the sleeves; they are knitted in one row according to the hem pattern. When knitting sleeves, you need to make up five air. loops for armholes Then you can continue knitting the hem (14 rows with white threads + 1 turquoise). To finish, you need to tie the neckline next to the st. without a crochet.
2. Panties
The front and back parts must be started in the same way - a chain of 10 air. loops (white thread). The back part consists of 10 rows (one increase must be made in each row).
We knit the front part like this: two rows without increases, attach the thread to the beginning of the back part and knit, making increases every other row. Having knitted eight rows, you need to combine both parts and knit four rows in a circle.
To finish, the panties are tied with turquoise thread on top (three rows of 1x1 raised elastic). You need to thread a linen elastic band into the harness to keep the panties in place.
The step edges of the panties are decorated with turquoise thread in one row of st. without a crochet.
3. Panama hat
The bottom of the Panama hat starts from the ring (10 air loops) and continues knitting st. single crochet according to the pattern (Fig. 1). After this, you need to knit 8 rows of st. without a crochet. In the ninth row you need to make 12 increments evenly and finish knitting. For decoration, you need to tie a Panama hat in one row according to the pattern (Fig. 2) with turquoise thread.
In conclusion, according to the diagram (Fig. 3), you need to knit two flowers and sew them to the dress and hat, decorate the middle of the flowers with a button.
The knitted summer set is ready.
Knitted dress for girls
Size
The model is designed for a child from birth to six months.
Materials
- Children's yarn – 200 g.
- Knitting needles No. 3.5.
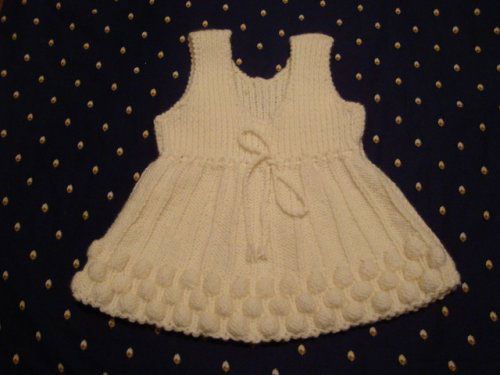
If you knit a dress from wool yarn, you can wear it in cold weather as a warm sundress with turtlenecks.
Scheme
1. Back of the dress
You need to start knitting from the back.
2. Before
The front part is knitted similarly to the back, but the neckline should start at the height of the armholes.
3. Assembly
It is necessary to sew the front and back along the shoulder and side seams. The neck and bottom can be crocheted st. without a crochet or in a lobster step. This way they will look more elegant and neat. You need to crochet or knit a lace to thread it through the holes under the yoke.
The baby's dress is ready!
Decorative headband for girls
Size
All calculations are given for knitting a model of size 50─52
Materials
- Fine yarn (cotton or acrylic) – 20 g.
- Hook No. 2.
- Hat elastic band to match the yarn – 50 cm.
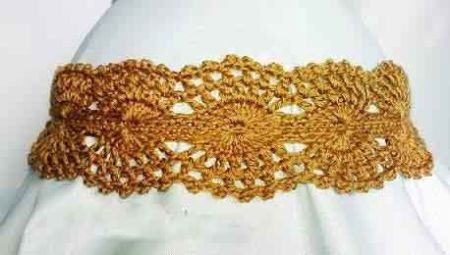
These headbands look beautiful and will complement any little baby’s outfit.
Scheme
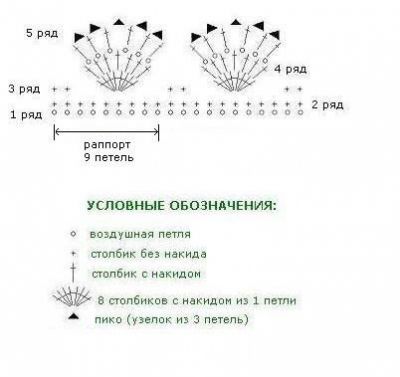
Description
- First, 127 air are recruited. loops and knit one row of st. without a crochet. You need to carefully thread and hide the hat elastic into this row of posts.
- The remaining rows are knitted according to the pattern.
- Cut the thread and attach it to the bottom of the headband and also knit rows according to the pattern. In this case, you need to ensure that the knitting is symmetrical.
- Cut the thread, fasten and sew the ends of the bandage.
- Steam the finished bandage thoroughly with an iron and let it dry.
A beautiful accessory for a little fashionista is ready!
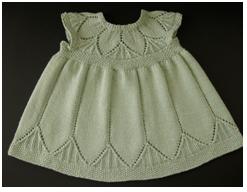
Knitted set for baby (sandbox and bolero)
Size
The set is designed for a girl from birth to 3 months.
Materials
- Threads (100% cotton) white – 100g.
- Threads (100% cotton) turquoise – 40 g.
- Buttons – 4 pcs.
- Knitting needles number 3.

Such knitted items always look fashionable and relevant. The set is ideal for summer
Knitting techniques and density
Persons satin stitch (knit rows - knit stitches, purl rows - purl loops).
Density: 10 cm x 10 cm = 29 loops x 34 rows.
Pattern and diagrams
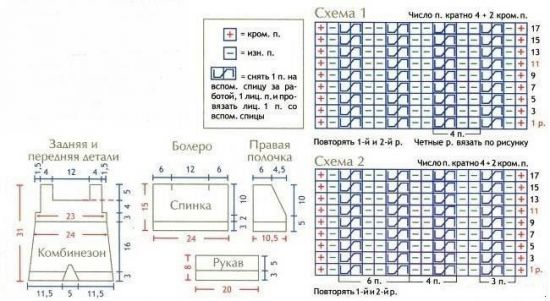
Pattern and patterns of knitting patterns
1. Sandpiper
Work begins from the back. It is knitted as follows:
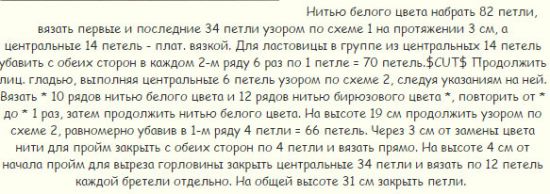
The front of the sandpiper is knitted similarly to the back. Then you need to assemble the product by sewing the back to the front along the side seams. Two loops are made on the straps and buttons are sewn on.
2. Bolero
The bolero is knitted according to this description:
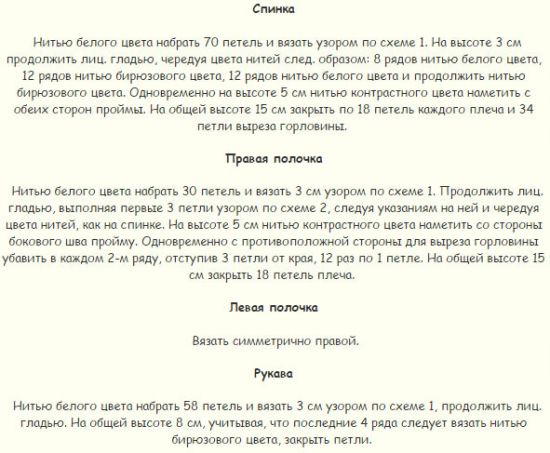
You need to assemble the product by making seams along the shoulders and sides. Sew the sleeves into the armholes. Then you need to knit a strip to decorate the edges of the bolero. To do this, loops are made along the edge of the back, shelves and neckline with white threads, and 2.5-3 cm are knitted according to the pattern from the first diagram.
Summer kit is ready!
These are the interesting and relevant patterns you can knit for your little one, spending very little time and effort. Most of the given master classes will be able to be repeated even by those needlewomen who have recently begun their first steps in crocheting and knitting.
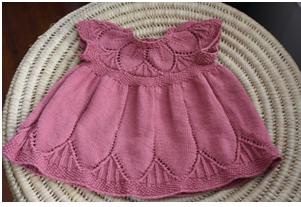
Newborn babies are the object of pride and admiration for any parents who try in every possible way to emphasize the natural charm of their little girls. But with all the desire to decorate a newborn princess, it is important not to forget about her comfort. Dresses knitted as beautiful as they are comfortable to wear. That’s why we’ll next look at how to knit a dress for your baby.
Video: Knitting a dress with a round yoke
Knitting a dress with an openwork yoke
Preparation
To knit a dress for a newborn girl aged 0-3 (6-9) months. you will need 100% alpaca yarn in the amount of 150 (200) g, the color can be chosen according to your taste, since this model for a baby is equally good in any color. We will use regular and circular knitting needles of the third number. To complete it you will also need a hook (2.5) and 3 buttons of small diameter.
Motifs used
Pattern “Pearl”: 1P - 1 face. loop (LP), purl 1 loop (IP). 2R- LP = IP, and IP = LP. Repeat 2R. 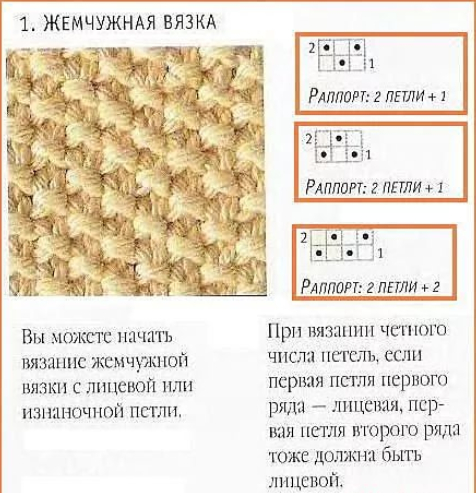
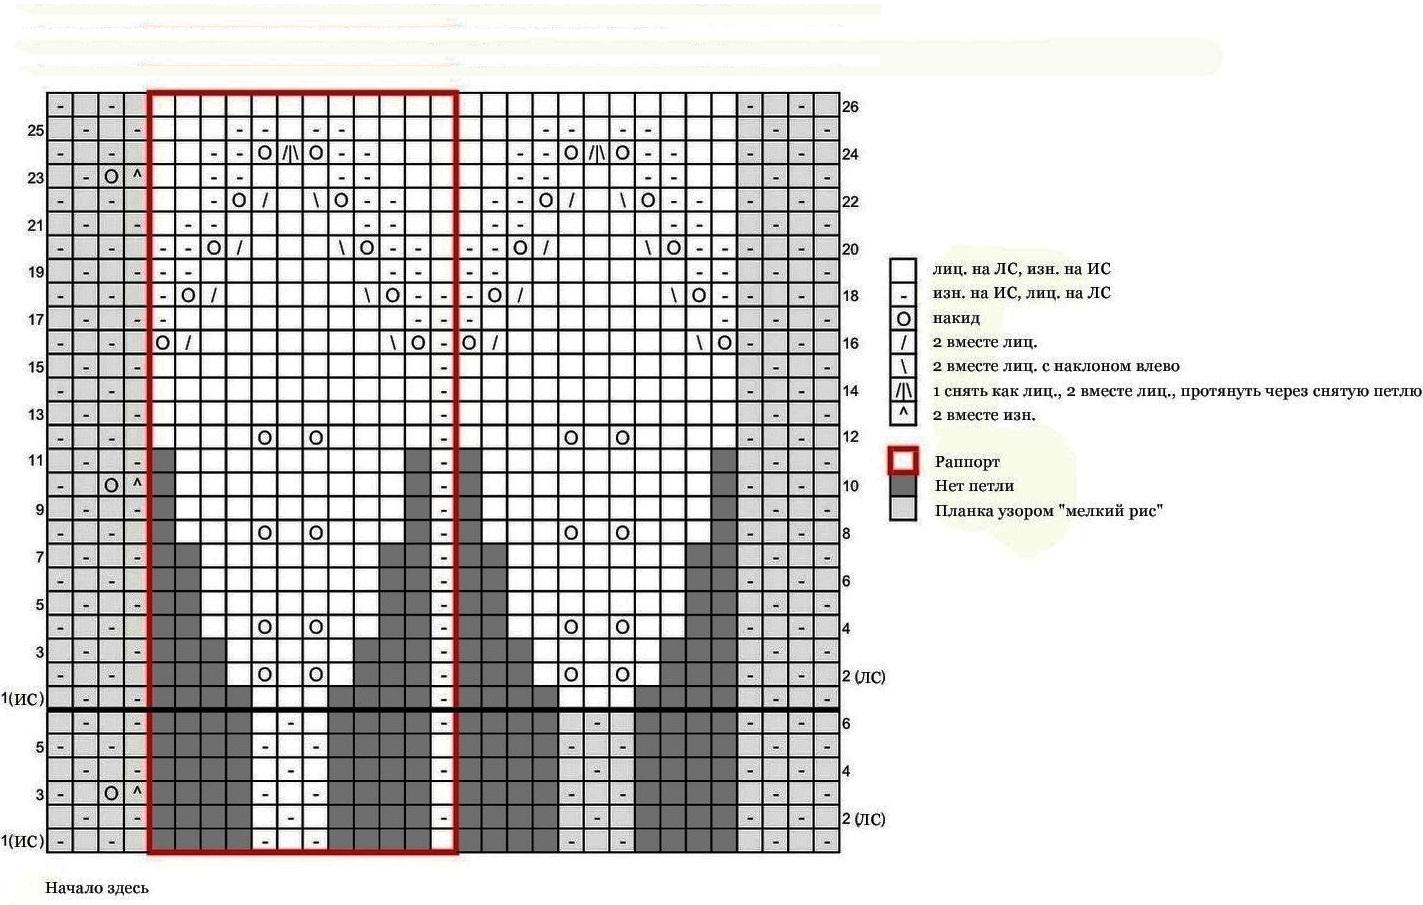
Openwork pattern:
- 1P – we throw a thread (N), 1LP, N, 2LP together behind the back half (ZP), 3IP, 1LP, 3IP, 1LP, 3IP, 1LP, 3IP, 2 LP in 1 behind the front half (PP). Repeat *-*;
- 2P – N and LP knit LP, and IP – IP;
- 3R –N, 3 LP, N, 2 LP together for ZP, 2 IP, 1 LP, 3 IP, 1 LP, 3 IP, 1 LP, 2 IP, 2 LP in 1 behind PP, repeat *-*;
- We knit until it turns out * N, 15 LP, N, 2 LP in 1 for PP, 1 LP, 2 LP together for PP* repeat *-*.
 Knitting process
We start knitting a dress for a newborn from the hem. We use circular knitting needles. We dial 200 (220) P and perform 10 R with a pearl motif, 2 R with satin stitch, then * 1IP, 109 LP*, again *-*. We continue with openwork, after which 1 R – LP. Then we work like this: *H, 17 LP, move 1 P, 2 LP to 1, threading the removed one through the one you knitted*, again *-* to the end of P, then 1 R – LP. Track. R - * 18 LP, N, 2 LP in 1 behind ZP *, *-* to the end of R, 1 R – LP. We alternate the last 2P up to 17 (20) cm. New P all LPs 2 together. After 10 R - pearl.
We start knitting from the center of the back and make decreases for the armholes. Having reached 19 (22) P, we use additional knitting needles. We move 10 P and in their place we dial 30 (35) P. This will be the sleeve of this model for the baby. We knit 42 (46) sts of the front half, remove 10 sts for extra. tool, and again we dial P for the sleeve in the same way as described above and finish knitting P, marking its end with a marker or thread of a contrasting color. Thus, let's mark the middle of the girl's dress from the back. Next we knit *1 IP, 19 LP*rep. And the openwork is like on the hem (3 P) and from the 4th P under even numbers - N and LP = LP, and IP = IP:
![]()
All combinations in the row descriptions are repeated until the end of R:
- 5R – N, 5 LP, N, 2 LP for GP, 1 PI, 2 LP per GP, 2 PI, 1 LP, 2 PI, 2 LP in 1, 1 PI, 2 LP in 1;
- 7Р – remove N, 7 LP, N, 2 LP for ZP twice, 1 IP, 1 LP, 1 IP, 2 LP in 1 twice;
- 9P – like 7P, only where 7LP – 9LP;
- 11Р – move N, 11LP, N, 2 LP for ZP, 1 LP, 2 LP in 1;
- 13R – N, 13LP, N, move 1 P, 2 LP into one, threading the removed one through the one that is knitted;
- 14Р – turn over, knit IP;
- 15R - 2 LPs together, 12 LPs, 2 LPs in 1, N;
- 16, 18 and 20P = 14P;
- 17P – from 2 LP-1, N, move 1P, from 2 LP -1, pass the removed one through decrease, 10 LP;
- 19Р - from 2 LP -1, N, remove 1P, from 2 LP -1 - thread the removed one through decrease, 8LP;
- 21Р=19Р, only instead of 8 LP - 6LP.
Now 5P with the “Pearl” motif and we complete the work.
This model for newborn girls has short but knitted sleeves, which now have to be completed. To do this, remove 36 (46) P from the sleeve neckline and those P that are on additional tools and knit 10 P with the “Pearl” pattern. Close the knitting.
Completion
So, the knitted outfit for a newborn girl is ready and the final design remains. For this purpose, using a hook, we tie the edge of the back neckline with non-woven columns, on one of the edges in the process we make three small buttonholes with a diameter equal to your buttons, and to the other we sew these same buttons.
Video: Children's openwork dress from Lana Vi
A selection of knitting patterns with a description of the work