Knit a round yoke with knitting needles. How to knit a round yoke ☆ large selection with basics and samples
Instructions
First start knitting the upper part of the front. To knit a dress from thick yarn, use knitting needles No. 3.5, and for thin yarn - No. 1.5. Cast on the knitting needles the required number of stitches, based on your calculations. Knit, forming the contours of the part, in accordance with your pattern. For the back, knit two parts, adding 8 loops on each side for the strap. This is where the dress clasp will be located. Knit the placket in garter stitch. Make holes for buttons on the left side panel. Sew the side and shoulder sections, baste the fastener bar.
The skirt of the dress can be knitted with any fancy pattern, for example, leaves, cones or braids. Using circular knitting needles, cast on loops along the bottom of the resulting yoke. Distribute the loops so that there are an equal number of motifs on the front and back of the dress. To do this, the total number of loops should be divided by the number of loops in the motif repeat. Knit the required length of the skirt in the round.
To knit the sleeves, pick up stitches at the armhole and knit from top to bottom. The sleeve length depends on your desire; you can knit short, long or 3/4 length.
Decorate the neckline, hem of the dress and the edges of the sleeves with lace. Decorate the yoke with embroidery or appliqué. All that remains is to sew the buttons to the placket on the back of the dress and put on the new thing.
Video on the topic
note
How to knit a dress with knitting needles - sleeves - for this we cast on 40 - 42 - 44 - 46 loops on short needles No. 3 and knit five rows around the circumference. Next, we change our knitting needles to No. 3.5 and knit with stockinette stitch. Sew on the buttons and pass the silk ribbon at the waist into an openwork knit - child dress knitting needles - done!
Knitting has remained one of the most popular types of needlework for several centuries. Of course, a great variety of clothing models appeared during this time. It seems that they are all different. But if you look closely, you can distinguish only a few types. You can always come up with something original based on them.
One of the most popular types of knitted models is with set-in sleeves or raglan, assembled from individual parts. This is how sweaters, dresses, vests, coats and other items of clothing are made. It is better to knit such models according to the pattern. It is enough to make a basic pattern once, and you can knit anything using it. For the pattern, take measurements: half-circumference of the chest, hips and waist, sleeve length, armhole depth and height. Make a pattern for a straight dress. By reducing the length of the product, you will get a pattern for a jacket or sweater. As a rule, products from individual parts are knitted from the bottom. Sweatshirts and sweaters start with elastic. The parts are crocheted or sewn. When making such models, it is very important to correctly calculate the armhole and sleeve cap. Decrease loops on raglan go through the row one loop at a time.
An interesting model can be made from rectangles. The details of the shelf and back look exactly the same. They are knitted from the bottom or top to the middle of the shoulder. The sleeves are also rectangles. This is one of the most simple ways knitting, but the pattern must be made especially carefully and clearly.
Some things are more convenient to knit without seams. In this case, it is better to start from the top, from the collar. The most common method is raglan knitting from the collar. To do this, the total number of loops should be divided by 6, 1/6 each for the sleeves and 1/3 each for the front and back. You can knit on 5 knitting needles or on knitting needles with fishing line. At the beginning of work, it is necessary to accurately mark the beginning of the raglan lines. The raglan line itself is done like this. If you start a row from the front or back, work the main pattern until there is 1 stitch left to the raglan line. Purl it and make a straight or reverse yarn over. Start the sleeve with two knit stitches, followed by a straight or reverse yarn over and a purl stitch. Thus, it turns out that 1 loop of each line will be on the front or back, and 3 loops, not counting the yarn overs, will be on the sleeve. Knit even rows according to the pattern. Add loops to the bottom of the armhole. Then knit straight to the waist, hips or hem, depending on the length of the project.
Products with a one-piece sleeve are obtained by knitting them in one piece from the bottom or from the sleeve. In this case, it may be necessary to sew the side seams. To knit a sweater or dress at the bottom, cast on the knitting needles for the calculated number of stitches. Knit straight to the bottom line of the armhole. Then add loops on both sides to the sleeves. It is necessary to make an accurate calculation so that the sleeve is not too short or too long. It can be corrected only with the help of a longer than intended or shorter elastic band, which is tied at the very end. Knit the fabric up to the neckline. Find the middle of the row and mark it. Having retreated equal distances from this point to the right and left, close the loops under the neck, and in the next row add the same amount. Having reached the armhole, decrease the sleeve loops in the same sequence as you added them, and finish the product with a straight fabric. After you have sewn it, knit the collar and cuffs. This is convenient to do on five knitting needles.
Knitting starting from the sleeve is not much different from the previous method. The most significant difference is that after knitting to the beginning of the neckline, you need to divide the work and do the front and back separately. In this case, the parts do not have to be removed from the knitting needles. If you knit on knitting needles with fishing line, simply divide the row in half, tie a new ball to the beginning of one of the parts and work the front and back in parallel. After tying the hole for the neck, connect the work. In both this method and the previous one, the unfolded product, which has not yet been sewn, is a cross.
You can develop your own models based on these options. For example, a square yoke can be calculated based on the raglan knitted at the top. It is enough to choose a suitable drawing. A round yoke is also convenient to knit on top. To do this, distribute the number of loops that need to be added evenly throughout the entire row.
A separate genre is poncho. It is more convenient to knit it from above, dividing the total number of loops into 4 parts. The lines for adding loops coincide with the middle lines of the parts. The addition is exactly the same as for a raglan knitted on top, only the border between the parts passes between two front loops, that is, on each part a purl loop, a yarn over and 1 knit stitch are knitted. By the way, in this way you can knit not only a poncho, but also a skirt and the bottom of a dress.
Video on the topic
Sources:
- what models are there in 2017
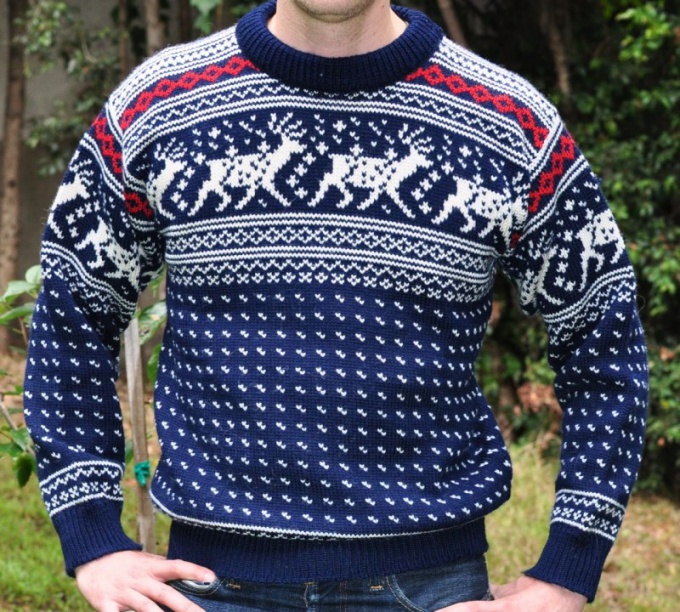
Norwegian sweaters are unusually warm, thanks to the special weave of natural wool yarn. They are not afraid of any frost. Plus they are very beautiful. Traditionally, they are crocheted with snowflakes, deer and geometric jacquard patterns.
IN last years The round yoke came into fashion. Many needlewomen knit it with crochet or knitting needles. It is beautiful and unusual, and most importantly - completely unique if you make it with your own hands.
sources of inspiration
At first glance it may seem that to find beautiful pattern It’s not easy for a coquette. But every craftswoman has patterns for napkins and round tablecloths in her collection. Taking a part from there, you can get a completely original part for a new dress or blouse.
It is also fashionable today to knit clothes from motifs. Round or square elements, like a mosaic, can be easily assembled into different shapes, including for the design of a round yoke.
It is worth paying attention to the fact that crocheting a round yoke always starts from the neckline, since expanding the fabric is much easier than narrowing it. At the same time, you need to make sure that it does not become too puffy. Strict adherence to the pattern will help to avoid such an annoying effect, in which the finished canvas should be in the same plane or the edges should be slightly pulled into a bowl. But you shouldn’t tighten it too much, as this can then restrict the movement of your hands in the finished garment.
Simple round crochet yoke
Next, the dress itself is knitted with the same pattern, but this model provides a small insert of single crochets, which is knitted immediately with a yoke. Its width is not very large. You can start knitting a pattern approximately from the high waist line. The length of the skirt depends only on personal preference.
Yoke made of motifs
An equally popular crochet technique is creating products from motifs. At the same time, it is not necessary to carry them out according to any specific scheme; it is enough to simply develop a design and arrange the future yoke. 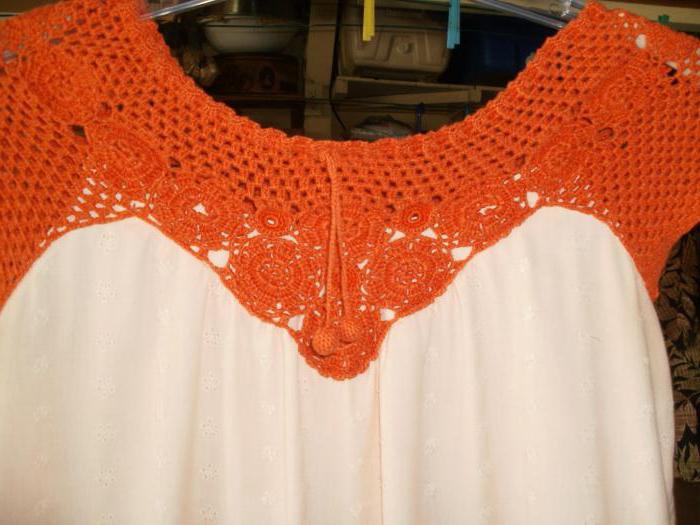
Round and eight-pointed motifs are best suited for these purposes. Crocheting a round yoke, the patterns of which vary, starts with one flower. We collect 10 air loops and connect them with a ring. Next we knit 8 double crochets with 3-5 chain stitches between them. The next row consists of double crochets - 5 under each arch. Then the same number of columns with air loops between the groups. The end result is a round flower, which will be the basis of the yoke.
Options for using a yoke
A beautiful and fashionable round yoke, crocheted at home, can be used in different models clothes. Most often it is a detail of knitted blouses, dresses and tops. They are also good for children's clothing.
Yoke looks even more interesting as an addition to unknitted items. If you are going to sew a sundress, dress or blouse, it makes sense to decorate them with a lace yoke. This will add elegance to such clothes and make it original and unique.
When making any product with any yoke shape, we need to build a pattern in full (or scaled) size, then apply the lines of our yoke to the pattern.
Then we need to take some measurements on the knitted sample with the selected pattern and on the existing pattern.
1. You need to know the volume of the yoke at the top - in cm and in the number of columns - pink line.
2. Know the volume of the yoke by its lower, wide edge - in cm and in the number of columns - green line.
3. Know the length of the yoke of the selected model in cm and in the repeats of the knitted pattern - the brown line.
Depends on:
a) by how many columns should each repeat of the yoke pattern be increased (expanded), in which rows of the repeat is it most convenient to make the necessary increases;
b) the yoke can be of any length from top to bottom, and depending on what pattern it is built on, it depends:
With a narrow (short) yoke, will we finish all the details with raglan decreases towards the armholes;
Will we issue increases for the armholes themselves?
Are shortened rows needed at the transition to the main fabric, etc.
Example 1. Round yoke with front closure, sleeveless (drop shoulder)
Let's look at a specific example, pattern and specific model.
Let's make a model with a dropped shoulder formed by the length of a round yoke, based on a standard pattern with a set-in sleeve for 48 size. Select a pattern and knit a sample. We make all calculations based on the pattern and knitted sample:
(699x559, 132Kb)In the 10x10 pattern we get 25.2 stitches and 12.2 rows. In one repeat - 6 stitches and 4 rows. Around the neck circumference of 50 cm, cast on 126 vp. +1, i.e., we dial 21 rapport. From calculations of the expansion of yokes, we know that the initial number of loops increases no more than 2.8 to three times, and the measurement of cm with tape around the body and lowered arms should be within 130 plus or minus 10 loops, we calculate to which we need to reach the number of columns in the rapport by expanding the yoke.
Measuring cm with tape according to the pattern gives 136-137cm, which according to the sample gives us (136x127p): 50cm = 345.4p. We typed 21 repeats, which means that we must reduce the resulting calculated number of loops to a multiple of 21:
345.4:21 = 16.5 loops = 17 loops in one repeat along the bottom of the yoke.
Let's take a closer look at our sample. With a repeat height of 4 rows and a yoke length of 19.5 cm, we need to knit 23 rows, adding evenly to the lines of the pattern.
(555x699, 111Kb)Having knitted the yoke, we proceed to distribute the yoke into two shelves and a back. We have 21 rapports. If we traditionally divide into 3 parts - one for the front, the second for the back and the third for both sleeves, we will get 7 repeats per 1 part, which corresponds to 7p.x17p. = 119 loops, and the width of the back without armholes is 39 cm, which is equal to 6 rapports of the extended circuit.
17px6p=102p. Let's check again: (39cm x127st.): 50cm = 99st.
Therefore, we will separate 6 repeats on the back, 3 repeats on the shelves, and 4.5 repeats on the sleeves.
First, we need to lengthen the back - knit a full repeat of the pattern in height, to obtain a “sprout” - i.e. so that the “front” of the model does not “ride” up, does not ride up to the neck.
On the middle 6 repeats of the yoke, which correspond to the back, we knit 4 rows of the pattern. Now we knit with the rapports obtained by expanding the yoke pattern
(528x699, 74Kb) According to the pattern, the width of the back with armholes is 49.5 cm or 7.5 repeats. Let's add armholes to the back on its sides. To do this, after knitting the 4th row of the back sprout, we knit a chain of chain stitches at the end of the row. 5 cm long, make lifting loops and perform 0.75 repeats of the pattern on the knitted chain, 6 repeats of the back pattern, on the other side of the back we similarly add the width of the 2nd armhole, also include them in the pattern and knit the entire length of the back on 7.5 repeats (0.75+6+0.75= 7.5 rap.).
Then let's start doing one, then the second shelf:
(699x468, 54Kb) We will tie the formed armholes. We will tie the bottom and fronts by making strips and holes for buttons on the right strip. Let's tie the neckline.