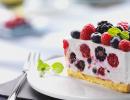
Applying gel polish at home. Cover your nails with Bluesky shellac from the “Cat's Eye” collection. Gel polish manicure ideas.
Today, gel polishes occupy a strong position in the world of nail services. This coating is popular among both craftsmen and clients. And this is not surprising, because the simplicity and convenience of the process, the intense color and durability of the shine of gel polish cannot remain without female attention. What are the advantages of gel polish and how to apply it correctly at home?
Benefits of gel polishes
- Persistence. The coating, with the correct application technology, will last on the nails for at least two to three weeks. You will not need to renew your nail polish every two or three days; your nails will always have a perfect and well-groomed appearance.
- Easy to use. Everyone knows that many salons do gel polish coating. However, this does not mean that you cannot make such a coating at home. The varnish is applied in the same way as usual, but you additionally need a lamp and various auxiliary liquids.
- Huge selection of colors, effects and textures. In order to create an unusual manicure, rather than a monochromatic coating, you don’t have to be a master. Various sliders, rubs, rhinestones, varnishes with different effects, stamps and many other interesting things will help you feel like a real master.
- Safety. With the correct technology for removing gel polish, your nails will look no worse than before applying it.
- Rescue for fragile nails. Due to their structure, such varnishes can thicken and even out the nail plate.
What you need to apply gel polish
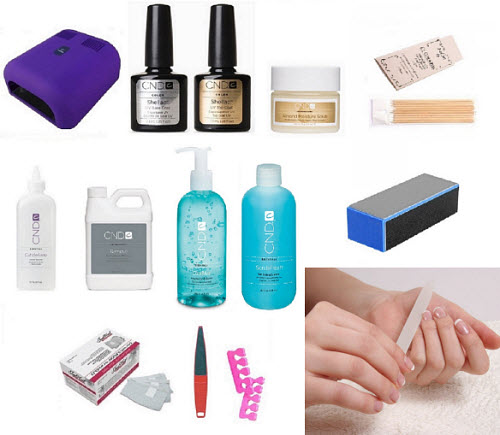
Before buying gel polishes, you need to get a starter kit. After all, for such a coating one varnish will not be enough. Now you don’t have to bother and buy a ready-made, fully assembled starter kit, which can even include a lamp. But this option is not suitable for everyone; some want to select the necessary materials and tools according to their own taste and discretion. It's up to you to decide which is best. We will simply list what should be in the starter kit so that you can carry out all the stages of applying gel polish.
- Lamp.
- Manicure tools.
- Lint-free wipes.
- Degreaser.
- Dehydrator.
- Primer.
- Top coat/top.
- Gel polish.
- Base coat/base.
- Liquid for removing the sticky layer.
- Cuticle oil.

Stages of applying gel polish
- Step 1: Remove upper layer nail plate. A highly abrasive buff will help you do this. Just don’t overdo it, you only need to remove the gloss. Do not touch the treated plates with your fingers. Remove dust with a special brush.
- Step 2. Degrease the nail plate. You can use a degreaser or dehydrator for this. If you have the first product, then blot a cotton pad with it and go over all the nail plates, if the second, then, as a rule, it comes with a brush, go over the nails as you would with regular polish.
- Step 3. Apply primer, this is done in the same way as painting your nails with regular polish. Please note that for applying gel polishes it is recommended to use an acid-free primer; an acid primer is intended for extensions. In addition, after it your nails will not have a very attractive and healthy appearance.
- Step 4: Apply base coat. It will not allow the polish to penetrate your nail plate, and will also provide good adhesion. It should be applied in one thin layer using rubbing movements. Remember to seal the end of the nail to prevent chipping. The base must be dried in a lamp.
- Step 5. Apply colored gel polish. It needs to be applied to a dry base in two or three layers, it all depends on the density of the varnish. Application should be careful, making sure that the varnish is not on the cuticle and side rollers. Don't forget to dry each layer in a lamp.
- Step 6: Apply top coat. It is applied over colored varnish and also requires drying.
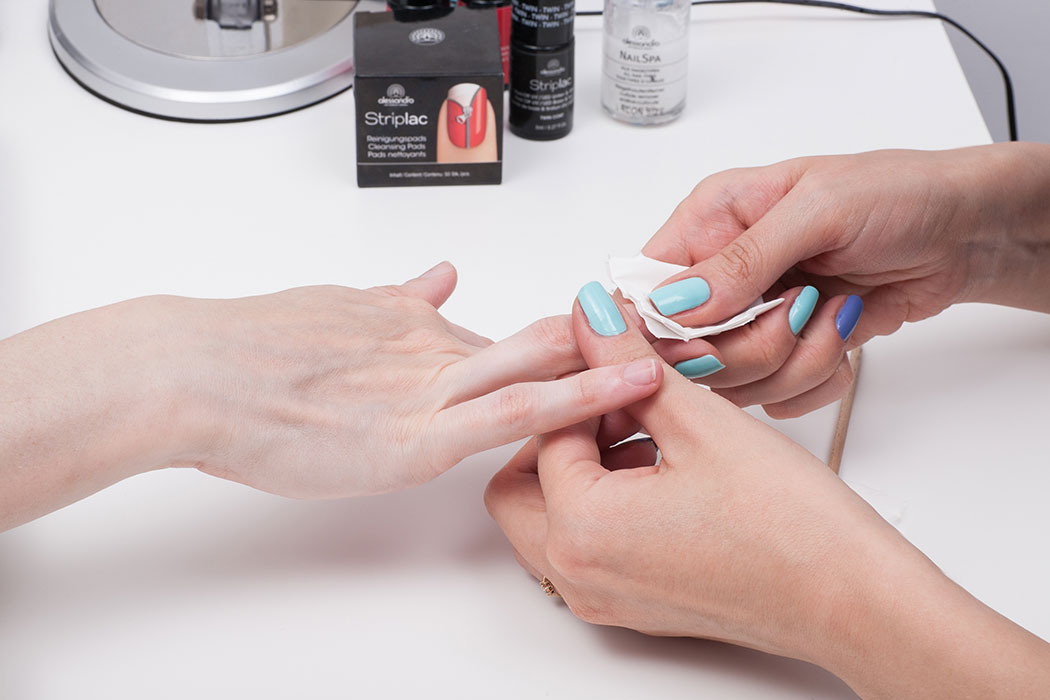
- Step 7: Remove the sticky layer. To do this, soak a cotton pad with a special liquid and walk it over the dried top coat.
- Step 8. Soak the cuticles with special oil.

All that remains for you is to stock up on all the necessary tools and materials, and you can safely get to work. Don't be upset if you don't succeed the first or second time. After all, they learn from mistakes. Train, develop your skills in this coating and your work will be no worse than professional craftsmen.
One of the most important components of a girl’s image is a neat manicure.
But not every girl knows how to paint her nails on her own.
Usually, if you manage to paint your nails beautifully on one hand, on the other it will turn out haphazardly and you will have to wash off the polish and try again and again.
And many girls, after an unsuccessful manicure at home, resort to the help of a specialist in a salon and pay money for such a seemingly simple procedure.
Can't you paint your nails yourself?
How to learn how to paint your nails correctly the first time, and not torment yourself with numerous attempts - further in the article.
How to paint your nails correctly: basic rules
Of course, before painting your nails you need to get them in order. You should definitely do a neat manicure - shape your nails, remove burrs and trim the cuticles. After this, you need to apply moisturizer to your hands. Immediately after applying the cream, you should not paint your nails - the varnish will lie unevenly and will peel off quickly. Before applying nail polish, the surface of the nails must be degreased and treated with nail polish remover.
After degreasing, an important step follows - applying the base coat. This stage should not be neglected, because the base coat evens out the surface of the nail plate and helps protect the nail from the aggressive components of colored varnish.
Typically used as a base coat:
1. Colorless, transparent varnish
2. Strengthening agents
The next step is to apply a cuticle protectant.. To learn how to paint your nails correctly and quickly, and cope with this difficult task on the first try, it is better to purchase such a product. The bottle with the protective agent looks like nail polish, and the consistency is also very similar to varnish. However, when this product dries, it forms a film that can be easily removed when finishing the manicure.
The protective agent is applied after the base coat has dried. It is better not to skimp and not to apply too thin a layer, otherwise the product will come off in pieces. It must be applied to the cuticle and skin around the nail. After application, wait until it dries and you can proceed directly to painting your nails.
If the previous step is skipped, then it is better to stock up on cotton pads, cotton swabs and nail polish remover to wipe the polish off the skin after drying.
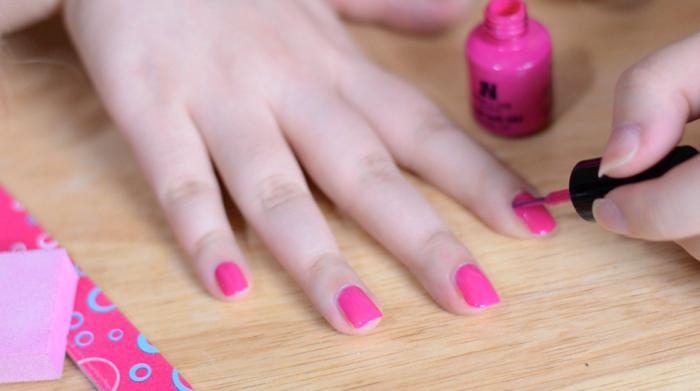
You need to put a small amount of varnish on the brush so that there is enough varnish to paint one nail. For each nail - a new portion of varnish. You need to start painting your nails from the middle of the nail plate, stepping back from the cuticle and moving the brush straight down. After this, the varnish must be applied in the same direction - from the base of the nail down, but painting the side parts of the plate. The first layer of varnish has been applied, which means that you must wait for this layer to dry and begin applying the second.
Why do you need to apply a second coat of varnish? As a rule, one layer will peel off quickly, and it won’t look very bright or rich. The second coat deepens the color and makes the coverage more even. You can leave one layer of varnish on your nails only if the varnish is very thick and there are no gaps left after its application.
After applying the color layer, you should top coat - the final stage of manicure. This coating is applied only to dry nails, that is, you will have to wait quite a long time before starting this stage. Therefore, many girls, when doing a manicure at home, neglect this coating.
Top coat - is it necessary? The final coating allows you to extend the “life” of your manicure and give your nails a glossy shine. You don't have to apply this layer if you plan to change your nail color often. However, if your hands are constantly in water, it is better to apply a top coat.
After all layers have dried, you should begin processing the cuticle. If a special protective agent was applied after the base coat, congratulations, this stage will be easy! Simply remove the film and enjoy a beautiful manicure. If you don’t have a protective agent at hand, arm yourself with cotton pads, cotton swabs and liquid and carefully remove the varnish from the surface of the skin. If you begin to cleanse the skin before it is completely dry, there is a chance that you will touch your nails and damage your manicure. Therefore, in order not to spoil the work done, you need to be patient.
It takes about half an hour for the varnish to dry completely.. The entire home manicure procedure lasts about an hour. But there is no need to rush in this matter, otherwise the result may not be pleasing.
How to properly paint your nails with gel polish: the difference between gel polish and regular colored polish, the nuances of the procedure
Gel polish is extremely popular among girls. Many masters who previously practiced gel nail extensions or did regular manicures with regular varnishes have long since retrained and use mainly gel varnishes in their work. But why?
In terms of strength and durability, gel polish is not inferior to gel, and unlike gel, it does not damage the nail plate
Even during pregnancy you can apply shellac, because it has no contraindications
Gel polishes are applied to nails much faster than gels, since the bottle with gel polish has a brush like regular colored polish for ease of application.
The colors of gel polishes are stable, that is, the color will remain as bright after a month as on the day of application.
The nail plate is protected from exposure environment and mechanical damage when it is covered with shellac
Undoubtedly, gel polishes have enough advantages over both gels and conventional colored varnishes. After all, the shellac coating can be renewed once every three weeks - when the nail plate grows and the part not covered with gel polish becomes noticeable.
In order to properly paint your nails with gel polish, you will need the following:
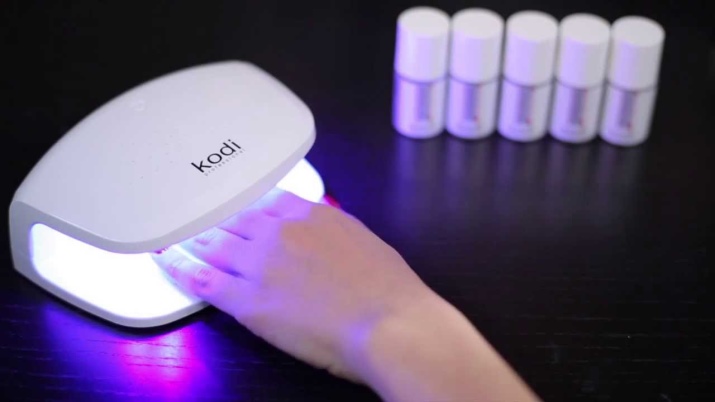
UV lamp, which can be purchased at a specialty store
Basic gel polish
Colored gel polish
Top coating
Liquid for removing sticky layer
Gel polish is applied, like regular polish, to prepared nails treated with a degreaser or nail polish remover.
The application sequence is not particularly different:
2. Similar to the technology for applying colored nail polish, you need to apply the first layer of colored gel polish and dry it in a UV lamp for 2 minutes.
3. After the first layer has dried, apply colored gel polish to the second layer and dry again for 2 minutes.
4. After the second layer has dried, you need to apply a top coat and dry your nails for 1 minute.
Applying gel polish is practically no different from applying ordinary nail polish, so you can safely try making shellac at home. A UV lamp and gel polishes can be purchased in specialized stores. They even sell inexpensive kits for beginners. By purchasing a kit and learning how to make shellac at home yourself, you can save a lot, because getting shellac coating done by practicing craftsmen is not cheap.
How to properly paint your nails with gel polish: choosing a gel polish
All the girls who have not used gel polish before or did not pay attention to what brand of gel polish the master uses are puzzled by the choice of gel polish. The choice of gel polishes is huge, the price range is quite wide - how to make the right choice?
There is only free cheese in a mousetrap, you need to remember this. Therefore, when purchasing gel polish at a low cost, there is a risk that the gel coating on the nails will not last very long or that the condition of the nails will worsen after removing the coating. A standard bottle of high-quality gel polish cannot cost 200 rubles.
Professional gel polish costs from 700 to 1600 rubles, per bottle of 15 ml. This is a normal price for quality products. By purchasing professional gel polish, you can be confident in the quality of the product and if any problems arise with your manicure (gel polish is cracked, chips appear, the coating lasts on the nails for less than 10 days), first of all, you need to review the coating application technology, everything whether the actions are performed correctly.
The leading brands of gel polishes are Gelish, Entity, NSI Polish Pro, Salon Manicure by Color Club.
To avoid having to deal with lengthy restoration of the nail plate after removing shellac, it is better not to take risks and purchase quality products.
December 21, 2016.
You've probably heard more than once about such a popular nail coating material as shellac. Today, Shellac occupies a leading position among other brands of gel polish thanks to fast technology application of layers and long-lasting coating of gel extensions or short natural nails. From this article you will learn how to properly paint your nails with gel polish at home so that your manicure turns out beautiful and resistant to damage.
We would like to immediately dispel your fears about the high costs of purchasing the necessary tools and materials for covering your nails with shellac at home. Do not rely on the prices of beauty salons, which are often overpriced for such procedures. Today you can purchase a very inexpensive and high-quality 36 W UV lamp for polymerization (drying) of layers applied to nails. 
When using the device individually at home, it is enough to change the fluorescent lamps once every 5-6 months. In addition, it is not necessary to buy shellac for a home manicure. Now many brands of decorative cosmetics produce high-quality analogues of gel polish, which are somewhat cheaper than shellac. If you carefully watch the photo and video lessons on how to properly paint your nails with gel polish, and also carefully follow the technology of drying the coating in a UV lamp, then your manicure will be no worse than the result of the work of a master from a beauty salon.
♦ ADVANTAGES OF COATING NAILS WITH GEL POLISH
• you can quickly paint your nails at home without long drying of the applied layers;
• shine, intensity and depth of color are maintained for several weeks;
• gel polish coating is resistant to external damage. Your manicure on long or short nails will last for a long time without chipping, scuffing or cracking;
• thanks to a special layering technology, your natural nail plate is reliably protected from deformation and delamination;
• Removal of the coating is quick and easy. There is no need to file your nails;
• high-quality gel polish contains no allergens or toxic substances.
► before painting your nails with gel polish, be sure to remove the remnants of the old coating with a special product (remover). Be sure to take a break for 2-3 weeks after using gel manicure polish several times in a row.
♦ FEATURES OF TECHNOLOGY COATING NAILS WITH GEL POLISH
During the procedure, three layers are sequentially applied to the nail plate:
▪ base coat;
▪ base coating (gel polish of one or several shades);
▪ fixing (finishing, top) coating.
Each applied layer must be dried (polymerized) in a UV lamp.
Before painting your nails with gel polish, apply a base layer with a manicure brush to protect and securely adhere the nail plate to the next layer.
The gel polish coating can be made monochromatic or use a combination of different shades (contrasting, pastel, with a gradient transition in ombre style). Now at the peak of popularity, French-style nail design, when the free edge of the nail is separated from the rest of the “smile line”, different combinations of shades are used before and after the “line”. Gel polish is applied quickly and evenly over the entire surface of the nail under the cuticle, which allows you to create almost any design on long or short nails at home.
By next layer- a finishing coat that will reliably protect your manicure from damage, chips, and scratches in the next few weeks. Before applying the top coat, you can complicate the design and lay out a pattern of rhinestones on the gel polish, or make a fashionable manicure in the “broken glass” style.
♦ LIST OF ACCESSORIES FOR GEL POLISH MANICURE
❼ manicure brush;
❽ liquid for degreasing, disinfection;
❾ clinser (liquid for removing the sticky layer from the surface of the nail after polymerization in a UV lamp);
❿ lint-free manicure wipes.
♦ HOW TO PAINT YOUR NAILS WITH GEL POLISH
♦ HOW TO REMOVE GEL POLISH FROM NAILS

- click on the photo and expand step by step instructions for beginners
♦ VIDEO LESSONS FOR BEGINNERS
Dear girls! Please share your secrets, experiences and tips that will help beginners correctly paint their nails with gel polish at home.
If you want to post your photos and video materials on the topic on the site, please write a message to us by email: This e-mail address is being protected from spambots. You need JavaScript enabled to view it
to Home Page
INTERESTING FOR WOMEN:
Today, gel polish is becoming more and more popular, leaving it a thing of the past. It perfectly replaces regular polish, but lasts much longer without losing color. By being careful, you can have a perfect manicure for up to 3 weeks.
An irreplaceable thing
Gel polish is a special substance with different colored pigments, mainly used for the top coating of the nail. It must be polymerized in a UV lamp for about 2 minutes. If you apply the product in only one layer, you will get a translucent color, and if you apply it in two, it will be dense and rich. The main thing is to know how to use gel polish, then it will not be difficult for you to quickly get a beautiful, neat manicure. Unlike its predecessors, this coating does not need to be mechanically cut off; it easily dissolves in a special liquid. To do this, you need to use a product with acetone or remover. Now you can watch it anywhere women's magazine ideas for manicure with gel polish, they impress with their variety and allow you to choose the option that best suits your look and outfit.
Correct application
Improper preparation of nails or application of material will affect the period during which the manicure will look beautiful. Technology is very important, which is why you need to know the basics of working with it.
First you need to carefully prepare your nails for the procedure, clean them using a preparator, a degreaser and a dehydrator for these needs.
In order for the coating to last a long time and not crack, it is important to remove the oily layer from the nails. The primer will help with this, but if it is not applied, the varnish may crack. Such modern products do not contain alkali, which is why the natural nail does not suffer. Do not touch the already processed plate with your fingers. An obligatory step is to apply gel polish, only the base one, which will protect the nails from various coloring pigments and help bond the colored layer to the nail plate.

Perfect coverage
When you work with gel polishes, you need to apply all the components with smooth movements from top to bottom, this helps to obtain a perfectly smooth surface. The thinnest layer should be applied to the base product. Moisten the brush with it a little and apply it to the nail plate, as if rubbing it into it. The main thing is to paint the nail and its tip completely to avoid the problem of the coating lifting. If the end of the nail is poorly painted, you may end up with chipping of the color layer in the future. Next, you will need a special lamp for gel polish, put your nails in it for 2 minutes for polymerization.
Bright varnish
Manicure using colored gel polishes is slightly different; for example, bright shades must be applied in at least two layers.
How to use gel polish to ensure a manicure without flaws? It can be difficult to apply the first layer of dark varnish and completely paint over the nail, but the next layer of coating will cover all the imperfections and even out the surface.
Manicurists advise applying 3 thin layers of the material and not forgetting to paint the end of the nail. And again you need to put the marigolds in the lamp for 2 minutes
French manicure
To get the perfect French manicure without yellow spots, hands must be kept in the lamp for 1.5 minutes. For a snow-white “smile” line on nails with a French manicure, you can apply a white layer several times.
At the last stages, you need to take the fixing varnish and apply it to the nail, the layer should be slightly thicker than the colored one. After the nail is covered with this varnish, you need to send it back to the lamp for polymerization for 2 minutes. If the fixative does not dry completely, the nails will lose their shine. Take special remedy without acetone and remove the sticky top layer, after which you will get nails with a beautiful glossy shine.

Removing gel polish
For those who get a manicure in a beauty salon, it is better to remove the polish from your specialist or ask him the name of the company of the product that was used in the manicure, then purchase a special remover.
How to use gel polish general outline It's clear. How can you learn to remove it very carefully? Let's try to figure it out. The advantage of carrying out this procedure at home is clear to everyone - there is no need to go anywhere and wait in line to see your specialist.
For this procedure, you will need nail polish remover, but it must contain acetone. Also prepare cotton wool, regular foil, a nail file and a sander.
Removing gel polish is done in stages: first, soak a small piece of cotton wool in liquid with acetone and apply it to the nail plate. Then you need to wrap the top with foil and hold for about 15 minutes. Remove the foil from each finger in turn, using an orange stick to remove any remaining gel polish on the nail. Remember: if the polish is difficult to remove from the nail, do not rush to pick it off, just wrap it in a piece of foil for a while. After the procedure of removing the coating, the nail may be rough; carefully polish it with a soft polisher. Then do a manicure, giving your nails your favorite shape and length.
Pros and cons of manicure with gel polish
Gel polish has its positive and negative sides. If we talk about the advantages, then first of all it is perfectly smooth nails and the ease of the application process. This coating dries quickly in a special lamp, and the nails look much more natural than extended nails. But most a big plus is that it lasts for a long time, from one to three weeks. A well-studied technology for coating nails with gel polish will bring you only advantages.
The disadvantages include the high cost of the procedure itself for applying varnish from a specialist. It will take about 20 minutes to completely remove it.
There are also several contraindications to applying gel polish - an allergic reaction to the components of the product and weakened own nails. Sometimes it’s worth giving your nails a rest from gel polish. In addition, experts recommend removing it after two weeks, rather than persistently maintaining such a manicure for a long time.
Proper storage
It is very important to store products correctly. If you do not follow the rules, the product may quickly thicken, and you will not be able to use gel polish in the future. To begin with, never place it near a switched on UV lamp and do not leave the bottle under direct sun rays(this is the same ultraviolet). After applying the gel polish to all nails, wipe the neck of the bottle with a napkin, remove any remaining polish and close the bottle tightly enough.

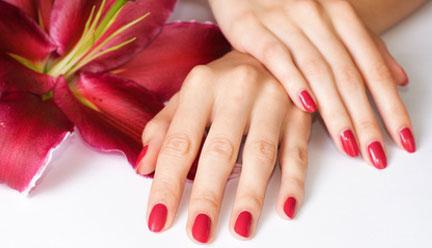
Gel polish manicure ideas
A beautiful manicure depends on how to use gel polish and what color to choose. The most popular manicure is covering nails with a single-color varnish. The color palette is so versatile that the product can be matched to any outfit.
A gradient look looks elegant where several colors, usually two or three, merge together. Performing this manicure is quite simple, but what an effect!
But the undisputed leader is the classic French manicure. And if you decorate the tip of your nail with colored varnish and add a little sparkle, you can go to any occasion. Experts advise lovers of French to try doing it, which also looks quite elegant on the nails.
A beautiful, bright, and most importantly, long-lasting manicure is what many women dream of. But often the coating peels off the nails within two or three days. But it was like that before. Now everyone has the opportunity to perform a manicure with gel polish, which will allow you to create a bright, beautiful and very durable nail art of nails to your taste.
Coating features
Nail manicure using gel polish is becoming more and more popular every day. It allows you to create a beautiful, long-lasting manicure even on your own at home. In addition, unlike nail extensions or covering them with acrylic, gel polish is safer for the structure of the nails. The variety of shades, the possibility of applying a pattern or rhinestones on top of this coating make it possible to create a manicure for every taste and occasion.
main feature gel polish lies in its durability and the absence of such a defect as cracking on the surface of the nail. Therefore, you don’t have to worry about the safety of your manicure and feel free to do household chores such as laundry, washing dishes and wet cleaning.
Being the opposite of standard varnishes and acrylic coating, this product not only does not injure the nails, but also helps to strengthen them and enhance growth. Therefore, this type of nail art is ideal suitable for women with thin and brittle nails.
Also, such a coating will best choice for those who love bright and beautiful manicure, but cannot or does not want to do it on their own every day. The unique formula of this product allows it to maintain the brightness of the colors, their shine and safety on the nails for more than 14 days. Therefore, this nail design is perfect for those who go on vacation or a long business trip.

But perhaps the most important feature of gel polish is the need to use specific equipment when applying it.
The process of covering the nails with it is not difficult, but it can become completely impossible due to the lack of necessary tools. Therefore, before proceeding directly to the manicure, you should purchase all the necessary attributes in advance.

Those who decide to try to do their own manicure with gel polish need to stock up necessary equipment, and first of all this concerns special ultraviolet lamps. There are two types of such lamps on sale - UV and LED. It is best for beginners to give preference to the first option, as it has a lower cost and is easier to use.
You will also need special files of various sizes and a special file for grinding the nail plate - buff. In addition to the gel polish itself in various shades, you will also need a special base and fixer. Particular attention must be paid to ensure that these two products are intended specifically for gel coating; those used for nail extensions are not suitable. After using them, the gel polish begins to crack within a few hours. As a last resort, you can coat the gel with ordinary colorless varnish, but in this case you should not count on long-lasting manicure.
You will also need such components as special lint-free cotton pads or napkins, degreasers, orange tree sticks and emollient cream or cuticle oil. But it’s not enough to buy everything necessary tools, you need to learn how to use them correctly.

First of all, you need to undergo special training. It is preparation for further work that plays a role important role. Not only does it depend on how correctly the manicure is performed. appearance and perseverance, but also an opinion about you as a specialist.
This can be done either at specialized courses or by asking good specialist show you a master class. It’s even better to take private lessons periodically, this way you can avoid many problems at work and, if necessary, immediately receive competent help. The instructions for working with gel polish itself are very simple, all the steps are accessible, understandable and described in detail, but it is still better to see once than to read or hear several times.

An important role in the work is played by the neatness of both the master himself and his working area. Therefore, it is very important that your desktop is always in perfect order. The first impression is the most important thing, even if you plan to do manicures only for yourself and your friends.

Simply applying gel polish to your nails in one color quickly gets boring. Therefore, it is recommended to constantly improve your professionalism. The easiest way is to purchase special stickers, rhinestones and stencils to create drawings and patterns.

Experienced manicurists strongly recommend that all beginners, even those who plan to apply gel polish exclusively for themselves, create a portfolio of their work. This will allow you to clearly see the progress of your activities or spot some mistakes.
In addition, in the future this will allow the client to have a clear choice of possible nail designs.

How to apply at home
But you can learn how to paint your nails with gel polish efficiently, beautifully, correctly and accurately only by practicing regularly. Therefore, first of all, you need to understand in detail how to properly paint your nails with gel polish at home yourself.
Getting a manicure with my own hands without leaving the walls of your home, there are two ways. They differ in the materials used and the type of lamp. In the first case, to perform a manicure you will need a file, a buff, a base and top coat, a UV lama, gel polish of the desired shade, a degreaser and a disinfectant. In the second case, similar tools are used, but a primer is also added to them, and the UV lamp is replaced with an LED lamp.

The instructions for the first method contain the following steps:
- Filing the edge of the nail to give it the required even shape and removing the keratin layer from its surface using a regular file and a buff file. The buff must be used with caution; it is enough to make only a few movements with this tool to remove shine from the surface of the nails. This is necessary for better bonding of the coating to the nail.
- Then you need to trim the cuticle, using special tweezers.
- Degreasing the nail bed is a mandatory step in a manicure with gel polish.
- After this, the surface of the nail bed is covered with a special gel base. It is best to apply it to each finger and dry it in a lamp. In UV the drying time is two minutes.
- After this, a thin layer of the selected shade of gel polish is applied to the dry nails. Please pay Special attention that the first layer should be translucent. We also recommend applying it to each finger in turn, and each next one should be painted after the previous one has dried.
- We apply a second layer of gel polish, which should be much thicker than the first. We also dry the tips of our fingers in a UV lamp.
- Finally, a top coat must be applied to all nails, which should also cover the end of the nails. It must also dry completely under ultraviolet rays. After time, the sticky layer from the nail is removed using a disinfectant.


If we talk about the second method of performing a manicure at home, then the sequence of actions is similar to the method described above. The difference lies in two things:
- After degreasing the nail bed, a primer is first applied to it, which is dried in a lamp, and only then the base for the gel polish is applied. Further manicure techniques are performed in the same step-by-step manner as in the first method.
- Unlike an ultraviolet lamp, an LED lamp allows you to dry the coating not in two minutes, but in just 15-20 seconds, which can significantly reduce the procedure time.
Although in the first version of the manicure, an LED lamp can also be used. It all depends on financial capabilities and personal preferences. The technology for performing a manicure with gel polish does not necessarily imply the use of a primer. But experienced craftsmen they say that this particular product allows you to extend the life of your manicure and has a positive effect on your nails.
Performing a manicure step by step, you can add some of your own changes. For example, before applying the top coat, you can decorate your nails with colored threads, rhinestones or any design. It must be remembered that additional decorations can be applied only after the gel polish has dried in a lamp.
After decorating the nails, they must be especially carefully coated with a fixative to fix the elements on the nails and dried in a lamp for about three minutes or 30 seconds, it all depends on its type.

When doing a manicure with gel polish, you need to pay special attention to the accuracy of applying all types of coating to the nails. You should carefully ensure that the gel polish or fixative does not get on the skin ridges around the nails and cuticles. Firstly, they can provoke irritation or an allergic reaction, and secondly, such a manicure will look untidy and careless.

How to do a manicure with gel polish at home, see the video below.
But making nail art using this product is only half the battle. Sooner or later it will need to be removed from the nail plate.
Withdrawal rules
This type of nail polish cannot be removed the same way as regular nail polish. Some masters remove it from the nails with a file, that is, they file it off, just like acrylic coating or extended nails. But this is absolutely wrong. Firstly, it is a waste of time, and secondly, such a procedure can significantly damage the nails.
To remove gel polish from the surface of the nails, you can use a special cleaning solution, which can be purchased immediately complete with the gel. You can also use regular nail polish remover, but provided that it contains acetone.
In addition to the liquid itself, you will also need cotton wool discs or balls, orange tree sticks, as well as regular kitchen foil.

The discs are generously moistened in the selected solution and applied tightly to the fingertips, and wrapped with foil on top. The hands remain in this position for an average of 20 minutes. If a special product was used, then its exposure time on the gel polish is 15 minutes. If you used regular nail polish remover, leave it on your nails for half an hour.
Then the foil with cotton wool is removed from the fingertips. The nail covering underneath should swell greatly and rise above the surface of the nail itself. Using an orange stick, carefully lift it to the end and move it to the edge of the nail, then remove it completely. Under the influence of liquid, the varnish turns into a thin film, which can be easily and simply removed from the surface of the nail without damaging it.
Of course, you should understand that the longer this product was on the surface of the nails, the more difficult it will be to remove it, and the procedure may take much longer. Therefore, the optimal time interval between application of this coating and its removal is considered to be 14 days.

After removing the gel polish, you need to give your nails a rest for at least a couple of days. It is best to make special herbal baths or baths with sea salt, this will help them recover faster after the procedure.

Master classes
Using gel polish, you can create a manicure in any style and color. And so that you don’t have to rack your brains and look for the most suitable options, we have prepared for you 3 master classes on nail design with gel polish. Among them, you will definitely be able to choose the most suitable option for yourself.
The first master class will help you create the most elegant and popular French manicure of all times. You can choose not only classic colors for this design, but also any others to your taste.
- Prepare a lamp, buffer, nail file, primer, primer, base, gel polish of two selected shades, fixative, disinfectant, cotton pads and special strips for french manicure.
- We file the edges of the nails and treat their surface with a buff.
- Apply the primer in one layer and put the nails in the lamp for 2 minutes or 10 seconds, it all depends on its type.
- We cover the entire surface of the nails, including the end, with a base for gel polish, and apply a thin layer of primer to the tips of the nails. We send the marigolds one by one into the lamp for a similar period of time.
- Apply two layers of base shade gel polish to the entire length of the nails. Do not forget that the second layer can be applied only after the first has dried.
- We glue special strips to the nails, with which we limit the painting area with the second shade. Paint the tips of the nails with a second, darker color, again in two layers, sending your hands into the lamp each time.
- Finally, coat all nails with a fixative, dry them in a lamp and remove the sticky layer using a disinfectant.
Your French manicure, done yourself at home and in your favorite colors, is ready.

See the video below for 3 ways to apply French manicure with gel polish.
Lovers of rhinestones and sparkles should definitely like quilted manicure . And the following master class will tell you how to do it yourself:
- Prepare rhinestones, special super glue, light-colored gel polish, degreaser, base, fixative, lamp, manicure thread, file and buff.
- Prepare your nails for coating using the same tools, as in the previous master class.
- Apply a layer of base to your nails and place them in the lamp for 30 seconds to one minute.
- Remove the sticky layer and lay out the manicure thread over the entire surface of the nails in the desired order.
- Apply successively two layers of the selected gel polish to the entire surface of the nail. Drying each of them for two minutes or 30 seconds in a lamp.
- We remove the threads from the nail and apply small drops of glue to its surface where we plan to apply the rhinestones.
- Place the decorations on super glue, pressing them lightly.
- Finally, apply the fixative and leave the nails to dry for another two minutes.
A beautiful iridescent quilted manicure is ready. You can apply glitter not to every nail, but only to a few. The same applies to applying a pattern using threads.

How to make a quilted manicure with gel polish, see the video below.
The so-called partial manicure is also very popular. It consists in the fact that 3-4 nails on the hand are painted with gel polish of the same tone, and the remaining ones are decorated at your own discretion - you can use stickers, you can create any design or borrow elements of a quilted manicure. This nail art is very easy to make.
- Prepare a lamp, file, buffer, degreaser, fixative, base, primer, gel polish, stickers with patterns, disinfectant.
- Prepare your nails for the procedure, as in the two previous cases.
- After degreasing the nails, apply primer to them and place them in the lamp for 2 minutes. When performing this manicure, each layer of product should be dried for two minutes or 30 seconds in a lamp.
- Apply gel polish base to all nails and dry.
- Next, apply gel polish to all nails except the ring finger on one hand, as well as the little finger and middle finger on the other hand. Dry it in a lamp.
- We glue the prepared stickers to the unpainted nails. They can be color, black and white, with images of flowers, and so on. It all depends on your taste. We cover all nails with a fixative and send them to the lamp.
- Remove the sticky layer with a disinfectant.
Your bright and individual manicure is ready. If you have the proper skills and patience, you can replace the stickers with any of your own designs or rhinestones. This manicure always attracts attention, and depending on the chosen shade, it is suitable for any occasion and look.

The technique of applying a sticker-slider in manicure with gel polish is in the video below.
A manicure using gel polish can be anything: bright and invisible, classic and rebellious, but one thing cannot be taken away from it - durability, brightness of color and ease of execution.