How to unscrew a plastic thread from a chandelier. Electric cartridge types, device, connection and repair
Nowadays, LEDs are widespread and popular, which are also used for household use. Lighting manufacturers recommend not using standard 60-100 W incandescent lamps, replacing them with LED lamps. Notice the socket in the chandelier can be made by hand.
There is no doubt that, thanks to its excellent technical characteristics, such electrical equipment will very soon be used everywhere.
And the popularity of LEDs is not surprising, because they have undoubted advantages.
- Thanks to the use of the diode principle, electrical energy is consumed as efficiently as possible.
- High efficiency of LED lighting. This value is 10 times higher than the efficiency of a conventional incandescent lamp.
- Such lighting devices operate for quite a long time - up to 100 thousand hours.
Therefore, after installing the LED, you will forget for a long time about spending money and time on maintaining or replacing lighting fixtures.

Advantages and uses of LED lamps.
However, it is not always easy to replace conventional incandescent lamps with LED lamps, because modern LED lamps have dimensions that differ from the conventional lamps used in Soviet times. For this reason, it is necessary to replace the cartridge in the chandelier.
Types and markings of chandelier sockets
Threaded electrical sockets are marked with the letter “E”. The marking also indicates the diameter of the base (millimeters). Note technical characteristics can be seen on all product bodies.
The operating principle of all cartridges is the same. They differ only in that they have different overall dimensions and different designs. The enterprises produce three types of cartridges, which are designed for 220 V in the electrical network, and are in full compliance with the state standard:
- E14. This type of cartridge is used to ensure that the backlight works in a microwave oven, refrigerator or table lamp. Typically, the maximum current consumption for them is 2A (440 W).
- E27. Used for many lamps. Maximum current consumption is 4A (880 W).
- E40. Cartridges of this type are used in street lighting and are rated at 16 A (3500 W).
How does a standard cartridge work?
A typical cartridge consists of several basic elements. The outer cylindrical body contains a sleeve with an Edison thread. The cartridge also consists of a bottom and a ceramic liner. Conductors are suitable for the cartridge, from which the tone is transmitted through brass contacts in the amount of two pieces to the base of the lighting lamp.
To increase the safety of lamp operation, it is necessary to connect the phase correctly - to the central contact of the base. At the same time, the possibility that a person can touch the voltage phase with his hand is minimal.
The process of replacing a cartridge in a chandelier
Before carrying out work on replacing the cartridge in a chandelier with your own hands, you need to ensure electrical safety. For this purpose, in the electrical panel, the circuit breakers that are responsible for powering the chandelier are turned off. After this, the de-energized chandelier is removed, since if it is suspended from the ceiling, it will be inconvenient to replace the cartridge.
First you need to get to the place where the wires are connected. This place is located under the ceiling - it is covered by the top cover of the chandelier using a protective cap. Remove the electrical tape at the place where the wires are connected, and carefully disconnect the supply wire from the wires with which the chandelier is equipped.

All this work is carried out with extreme caution, since if the wiring was carried out in Soviet times, then we used aluminum wire for this. Since school, we all know the characteristics of aluminum - a brittle metal that is easy to break.
If you find a connection made by twisting, and the wires are copper and aluminum, then, after replacing the socket, try to connect these wires in the chandelier using self-clamping terminal blocks of the Wago brand.
How to properly disassemble a cartridge
Some novice or inexperienced electricians think that changing the cartridge in a chandelier is easy and simple, even if the chandelier hangs suspended from the ceiling. But, as can be seen from practice, in order to make the working conditions more comfortable, it is necessary to remove the chandelier, then the work will be more organized, and you will be able to complete it quickly.
Disassembling and replacing the electric socket for a chandelier.
So, you remove the chandelier and begin dismantling the socket. The cartridge is disassembled, and its wire is disconnected from the ceramic block. After this, the base of the socket must be separated from the chandelier. This is done various methods, which depend on how the base is attached. Different designs have various ways fastenings

How to disassemble an electric cartridge yourself.
Advantages of using E14 cartridge
The most common method is to attach the electric cartridge to metal tubes. Connection using this method has become widespread because it significantly expands the possibility of using a design solution. Such a cartridge has the ability to hold heavy structures.
However, the entire load does not go to the cartridge, but to the metal pipe. Often additional nuts are screwed onto it to give greater stability. This allows you to securely attach any heavy lampshade to the socket or decorate the room with a variety of decorative caps.
It is necessary to pass the wire to the cartridge through the inner surface of the tube. If the previous electrical wiring is quite old, it may be doubtful whether it is still reliable. Then the wiring needs to be replaced. In this case, you need to remove the old wire from the tube, pulling a new one through it, consisting of two wires.
How to install an LED lamp socket
Install the electric socket using the reverse order. This must be done carefully so as not to damage the insulation. Otherwise, you will be bothered by frequent short circuits.
How to connect a chandelier using wago terminal blocks
After replacing the socket in the chandelier, you can begin connecting it directly to the electrical network. When connecting wires, it is not recommended to use twisting - it is better to use connecting terminal blocks.
This connection method is fast and convenient, no tools or additional insulating materials are required, and you will get reliable contact. Used in various lamps.
How to properly remove the base from the socket
It is not always possible to remove an old incandescent lamp from its socket without problems. Sometimes it happens that the base sits firmly in it, so after you unscrew the light bulb, you are left with a glass bulb in your hands. Without removing the base, you will not be able to use the cartridge in the future, so you need to find a way out of this situation.

How to remove the base from an electric socket yourself.
First you need to turn off the power to the chandelier. After this, the cylindrical part of the cartridge body is unscrewed. In this case, it is necessary to hold the cartridge from below. This will make it easier to remove the base.
If top part The cartridge still does not unscrew, try using pliers to pull out the base. Grab the base by the edge and rotate it in the socket. Experts recommend using a regular plastic bottle in such cases.
You need to melt its neck over the fire and place it in the base, which is stuck in the cartridge. After a short period of time, after the plastic has hardened, the base without special effort unscrews from the cartridge.
Currently, lighting devices use various light sources that are connected to the network through sockets. The cartridges themselves are an important link in the electrical circuit of the device. And some malfunctions of these elements require their replacement. But to do the job yourself, you need some basic knowledge.
Chandelier socket: types
Since the advent of incandescent lamps, devices have been developed through which the lamp is connected to the electrical network - sockets. From Soviet times to the present day, only two types of cartridges are used in chandeliers.
Types of connectors:
In the manufacture of cartridges, two types of materials are mainly used - plastic and ceramics. Ceramic products are more fragile than plastic, but they are very resistant to overheating. Thus, they allow the use of incandescent lamps of any power.
Old-style plastic cartridges were also distinguished by increased resistance to overheating and mechanical stress. But modern products, when working with lamps of higher power and temperature, quickly fail.
Note! Currently, with these types of bases, not only incandescent lamps are produced, but also halogen and LED light sources.
One of the design elements of plastic sockets is the so-called “skirt,” which allows the product to be mounted on various surfaces or structures (for example, in a table lamp with a lampshade).

These devices are divided into two types and according to such a parameter as the method of fastening the conductors in the terminal. It can be using a screw or a screwless contact.
Replacing a socket in a chandelier: dismantling the device
Replacing the socket in a chandelier is a fairly simple job. But to do it correctly, you need to know in what order it is done. And be sure to follow safety rules.
Operating procedure:
- Power outage;
- Dismantling the chandelier;
- Removing the cartridge.
Before dismantling begins, it is necessary to turn off the power supply to this conductor. To do this, in the distribution panel, you need to turn off circuit breaker. Lighting groups are equipped with 10 or 15 Ampere circuit breakers.
Note! After turning off the power supply, use an indicator screwdriver to check its absence. When touching the wires, there should be no indication on the device.
Since in a chandelier, each socket is connected with wires, first of all it is necessary to determine what type of clamp is used. If it is screw, then using a screwdriver, the screws are loosened and the wires are pulled out. If the clamp is screwless, then to remove the wires, it is better to use thin knitting needle, which presses the spring holding the wire, thereby making it easy to pull it out.
How to properly connect the cartridge to the wires
How well the connection is made will determine how long and correctly the device will work. It is worth noting that connecting wires to cartridges depends on several important parameters.
Connection features:
- Conductor characteristics;
- Type of terminal.
These works are carried out both when connecting the cartridge to an already laid wire on the ceiling, and when installing it in a lighting fixture.
An important parameter when connecting a wire is the type of core used in it. For example, an electric cartridge with screw terminals can be easily connected with both stranded and single-core wires.
Note! The best option The wire for connecting the cartridges is a single-core conductor.
But if it is not difficult to connect wires with any characteristics to a screw terminal, then connecting a multi-core cable to a self-clamping terminal is a little more difficult. To do this, you should use the following tricks.
First of all, it is necessary to disassemble the cartridge and remove the insulation from the wires. The insulation is removed to a length corresponding to the length of the terminal.
Most The best way- this is the use of a soldering iron. In this case, the cores of a stranded conductor are treated with flux and tinned. In this way, a certain rigidity of the conductor can be achieved.

Provided that there is no soldering iron. You can use any product from hard metal. This could be a knitting needle or a nail. A prerequisite is that the cross-section of the object is larger than the cross-section of the wire.
How to fix a light bulb socket
Many problems associated with lighting devices can be easily fixed on your own. To do this, you will need certain knowledge and tools for electrical installation work.
Malfunctions:
- One of the wires has burned out;
- The light bulb burst;
- The lamp base does not reach the socket contacts.
Quite often, due to incorrect connection, one of the wires of the power cable burns out. In this case, you should not clean the burnt contact and try to connect it. To do this, you need to disassemble the device, disconnect the second wire, and use pliers or wire cutters to make them the same length. After this, the wires are stripped and connected to the socket.
Note! When working with electricity, follow safety regulations.
It happens that an incandescent lamp screwed into a socket explodes or the lamp bulb separates from the base. In this case, the base itself remains in the socket. It's very easy to fix this. The switch for this line is turned to the “off” position and the base is unscrewed from the socket using pliers.
One of the most common malfunctions is the lack of contact between the light bulb and the socket contacts. In this case, using a screwdriver, the cartridge contacts are bent to their original position.
If there is still no contact after this, then it is necessary to clean the oxide from the cartridge terminals. If necessary and the design features of the cartridge, the contacts can be changed and new ones installed.
How to replace a cartridge in a chandelier (video)
Using this information, you can easily cope not only with electrical installation work, but also be able to quickly and efficiently repair a chandelier or lamp without calling an electrician.
The question of how to unscrew a light bulb seems ridiculous and banal to many. Indeed, there are many different solutions here. However, situations often arise when burnt-out lighting sources are in no hurry to leave their place in the lamp.
As a result of a voltage surge or a short-term short circuit of the spiral, the bulb base (the metal element of the lamp designed to screw it in) can be welded to the socket and, with excessive force applied, the glass bulb can break off from the rest of the lamp.
The worst option is if you find yourself with a problem alone, the bulb breaks unevenly, there are fragments sticking out in the base, the lamp is in a lamp under the ceiling, which is quite difficult to remove, and the whole room is left in the dark. In this case, there is no need to panic; your accuracy and compliance are important. correct order further actions.
How to unscrew the base if the light bulb breaks
Greetings to all friends on the website “Electrician in the House”. I was prompted to write another article on lighting by a girl who had problems with lighting in her apartment. The crux of the problem was “exploding light bulbs.” Or rather, the incandescent light bulbs in the chandelier in the kitchen often burst, and everything would have been fine if not for one thing.
Unscrew the damaged light bulb from the socket chandeliers, and even with protruding fragments, as you understand, are problematic, especially for a girl. And to deal with the problem, she sometimes had to call an electrician. This girl asked for advice on what to do in this case and how to remove the remains of an exploded light bulb.

To be honest, I never thought before that people could have such problems. But as it turned out in life, this is not the case, and many people ignorant of electricity find it difficult in such simple situations. Let's look at what ways there are to deal with the problem of a base stuck in a cartridge; I think this will be interesting not only for beginners.
Even knowing how to unscrew the base if a light bulb breaks, you need to correctly assess the current situation. When lamps explode in a socket or are accidentally broken, their conductive elements may remain energized. Also, the broken part often retains sharp edges of glass. It’s clear that you shouldn’t go in there with your bare hands, and it’s easy to cut through rubber gloves.
It’s good when the room is powered in the electrical panel from several circuit breakers. In this case, we turn off only the circuit breaker from which the lamp (chandelier) with the damaged lamp is powered.
If the room is dark, having an electric carrier and a table lamp, it is easy to build yourself a backlight using a nearby outlet on another line. If this is not possible, use a flashlight or the backlight on your mobile phone.
Do not forget that during operation the light bulbs themselves and their bases become very hot. It is better to wait a few minutes and let the lamp cool down thoroughly. During this time, you can take care of possible fragments that will fall onto the floor when the base is removed. At the place where they are planned to fall, you need to spread a rag or film (in extreme cases, use a bucket or basin). Also prepare the equipment necessary for further actions.
There are several ways removing the base remaining in the socket, let's look at the most common ones.
Method #1 - pliers or needle-nose pliers
To solve the problem, use thin-nose pliers or pliers. Who doesn’t know what thin-nose pliers are - these are miniature pliers with elongated and thinned jaws. They are more convenient for capturing small parts. It is better to use tools with insulated handles.
First you need to carefully tear off the remaining fragments of the lamp bulb from the base. Try to keep them off the floor.

Next, the base is carefully grabbed by the edge with the selected tool and twisted outward. The main thing here is not to damage the circumference of the cartridge. But if you do everything carefully, there will be no problems. When the base does not move, you can try to bend its sides inward and only then try to unscrew it.

There was one case in my practice, one person in the evening The light bulb in the three-arm chandelier burst. He decided to take out the base to screw in a new light bulb. In order to make it brighter, this “professor” thought of turning on the light on the lamps that were still in operation and reached for the socket with pliers. He was so shaken... so before unscrewing the light bulb base from the socket, TURN OFF THE VOLTAGE.
Method #2 – plastic bottle
Another life hack that will help us cope with like a broken light bulb regular plastic bottle. Its neck fits perfectly into the base.

In order to unscrew a broken light bulb, you need to slightly melt the neck of the bottle with matches or a lighter, place it in the remaining base and wait a while.


After the plastic hardens and is soldered to the base, begin to unscrew the resulting structure. It takes about 10-15 seconds for the plastic to melt and harden.

Method #3 - unscrew the cartridge
Another convenient way is to disassemble the cartridge itself. But I want to note that this method will not work with ceramic sockets, which are installed in most modern lamps and chandeliers.
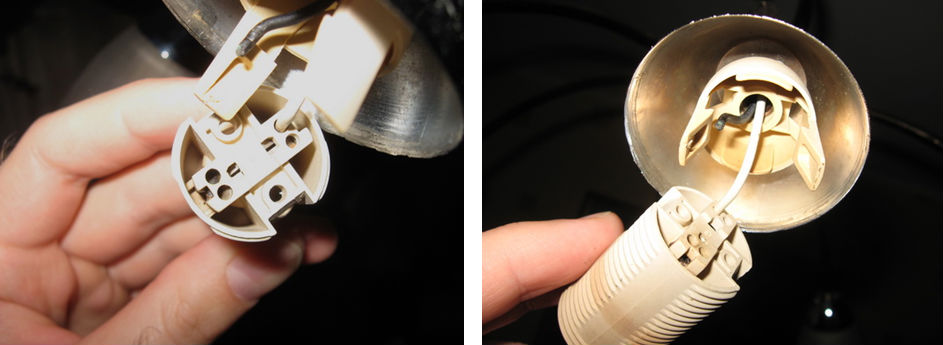
This procedure can only be performed with carbolite cartridges of the old (Soviet) type. The difference between carbolite and ceramic cartridge The fact is that the first one is collapsible.

The carbolite cartridge is disassembled into three main parts: two carbolite halves, which have a threaded connection between each other and a ceramic core on which brass terminals (contacts) are attached.

One of the halves of the socket has a metal sleeve in the form of a thread for screwing in the lamp base. If this half is unscrewed from the base, the base of the broken lamp will remain in it.

Method #4 - use a cork
Next method If it has burst, the solution is to use a cork plug. We take a cork plug, sharpen it a little along the edges and insert it into the protruding base. Then unscrew the plug along with the base.
If the lamp shatters and there are glass fragments sticking out in the lamp, you can try to string a soft cork on them, so that the fragments are tightly buried in the crust. Next, carefully begin to turn the plug with the base. This is done before they fall out.

Start by looking at yourself simple option– installing a new one of the same type instead of a faulty one is hardly worth it. Even a schoolchild can cope with this, knowing that first you need to turn off the voltage, and then unscrew the cartridge itself, loosen the clamping screws of the terminal block, and so on. This question is mainly of interest to those who want to “modernize” a chandelier in order to use an energy-saving lamp instead of the traditional “Ilyich light bulb” - for this they often have to replace the chandelier socket. Let's look at this in more detail.
It is pointless to recall the advantages of various halogen and others. Once they have been chosen, then all their advantages are already known and appreciated. But why change the cartridge in a chandelier? The whole point is a mismatch in the parameters of the socles (diameter and thread). Without delving into the classification of cartridges and the differences between their types (, E40), it is enough to indicate that it is necessary to install one of two - “14” or “27”. E40 sockets are intended for street lamps.
1. Turn off the machine in the apartment (entrance) panel. Hence the conclusion - it is advisable to replace the cartridge during daylight hours. What if this condition cannot be met for some reason? Install a table lamp near the location of the chandelier so as not to work in complete darkness.
If the wiring in the apartment is done “wisely”, then the sockets and ceiling lamps are routed along different lines (although the author has also encountered “pleasant exceptions”). But we turn off the input machine for safety. This means that the sockets will also be de-energized.
In an apartment, if an internal shield is installed, it’s even easier. It is enough to turn off the corresponding machine.
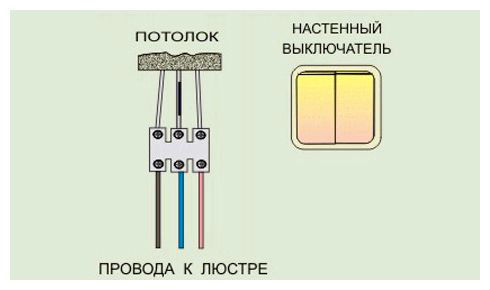
2. Turn the wall (or other) chandelier switch to the “off” position. If for some reason it is undesirable to turn off the input machine.
3. Using an indicator probe, check that there is no voltage on the terminal block of the chandelier, through which its wires are connected to the intra-apartment line.
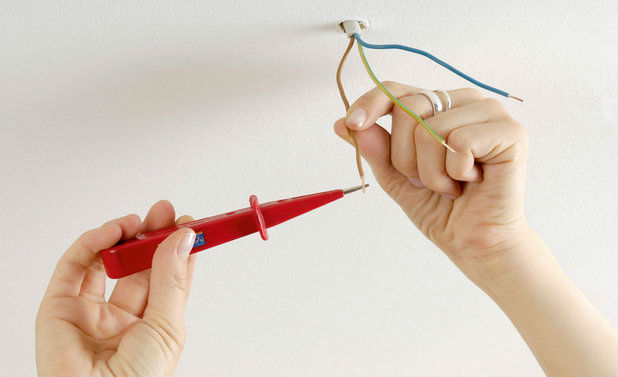
Why is this necessary if everything is already de-energized? According to the rules of electrical installation, a switch (circuit breaker) is installed on the phase line, before the lighting fixture. Now the question is - does everyone know this? And of those who are “in the know,” how many comply with this provision? It’s better not to take risks and check the presence/absence of potential at all terminals of the block.
4. Disconnect the chandelier wires. Here you need to figure out what is more convenient to do - leave it hanging or first remove it from the hook (“butterfly”).
5. Lower the chandelier down. Replacing sockets at a height, especially if the lamp is quite large, with several bulbs, is not the best solution.
6. Remove the cartridge. First, it unwinds, after which the wires are disconnected from its ceramic block. Next, remove the lower part of the body. Its fastening is carried out in different ways, depending on the design features of the chandelier. The procedure is easy to determine by visual inspection.
If the chandelier has been in use for a long time, then you need to pay attention to the condition of the wires inside it (from the socket to the block). At this stage it is easy to replace them with new ones.
Next is reassembly and connection. And here is one more piece of advice - this must be done immediately. If you leave the installation of a new cartridge “for later,” then it is not a fact that such work will go quickly. Those who do this for the first time have difficulties, since much is forgotten already on the second day. Proven by practice.

If the connection of the chandelier was previously made by twisting, then it is advisable to organize a new connection using terminal blocks.
For household use, it is better to purchase products from WAGO. It is much more convenient to work with spring-loaded contacts. Learn about the range and specific application of these products.

To restore the chandelier to full functionality, it is not necessary to replace the lamp socket, which does not light, even if the filament is not broken. Depressurization of the flask (another probable malfunction) is a rare occurrence.
Typical faults
- “Retraction” of the tongue. This often happens if, when replacing light bulbs, they are screwed in too hard. Therefore, the central contact of the base does not reach it. It is not difficult to lift it a little, for example, with a thin screwdriver.
- Carbon deposits on the cartridge tongue. As a result, contact is broken. You can clean it with fine sandpaper. If it is not at hand, the plaque can be easily removed with the tip of a knife.
- Poor contact where the wires are attached. Pulling the screws is a matter of seconds.
Practical tips:
- Before you start work, you need to take care of your own safety. What and where to turn off, how to check that there is no voltage on the wires is indicated above.
- In any case, if you have to work on a chandelier, you need someone to stand nearby and help, and at the same time, insure.
One of the main components of a chandelier or lamp is an electric socket, through which not only the light bulb is fixed and current is transmitted to it, but also the lampshade and other elements for controlling the light source are attached.
The design of the product consists of the following elements:
- cylindrical body;
- internal threaded sleeve;
- ceramic insert;
- a pair of brass or copper contacts;
- bottom;
- fasteners.
The design of the product body eliminates the possibility of electric shock when screwing in the light bulb. This is due to the fact that when the central contacts touch, the base is inside the cartridge.
Types of cartridges
Structurally, several types are distinguished according to the method of attaching the light bulbs:
- Screw threaded(the incandescent lamp is screwed inward). Suitable for standard incandescent lamps.
- Pin(fastening is carried out using fastening tabs or pins located on the outer surface of the product). Used for fluorescent, halogen and.
The material used to make the case is:

The principle of operation of all cartridges is identical, the only differences are dimensions and design. All products are designed for operation in a 220V power supply.
The following types are distinguished (the value “E” with a number is used for designation, where the number corresponds to the diameter of the sleeve):
- E5 and E10. They are rarely used due to the consumption of a considerable amount of current with insignificant light output.
- E14. Product small size, used with decorative lamps, so-called “minions”, of identical diameter. Their power does not exceed 60 W.
- E27. The most commonly used threaded socket designed for use with conventional, fluorescent, LED and halogen lamps.
- E40. This type is intended for street lighting, where powerful large lamps are used.
Chuck selection
When choosing of this product First of all, you should give preference to a well-known and trusted brand.
To avoid difficulties with fastening, the design of the new socket must correspond to the type of product previously used in the chandelier. It is better to give preference to a ceramic product due to its reliability during operation.
Basic selection requirements:
- the power of the lamp that is planned to be connected;
- diameter corresponding to the type of cartridge;
- marking;
- parameters: dimensions, power;
- the price should not be too low.
The cost depends on many factors, in particular the type of product and its manufacturer. Today the market provides consumers with a wide choice of both Russian and imported brands.
The price range is quite large:
- Type E27:
- domestic production – 25 rubles;
- China – 45 rubles;
- Italy – 130 rubles.
- Type E14:
- domestic production – 20 rubles;
- China – 20 rubles;
- Italy – 90 rubles.
- For halogen lamps:
- domestic production – 15 rubles;
- China – 30 rubles;
- Italy – 150 rubles.

How to change the cartridge in a chandelier
Replacing the product is not particularly difficult and does not require electrical experience, but it does require caution and compliance with all rules and recommendations.
Reasons for replacement
First of all, the need to change the product is indicated by the lamp not glowing when the switch is activated. This is due to rusting of the sleeve or central contact. As a rule, stripping does not have a positive effect.
Replacement is required if:
- The presence of cracks and other defects on the outer part of the body;
- When internal elements come into contact, a short circuit occurs.
- Exit from working state.
- The service life is 5 years.
Required materials and tools
During the work you will need:
- replacement product;
- terminal blocks for connecting electrical wires;
- indicator mini-tester (screwdriver);
- insulating tape;
- construction knife with replaceable blades.

Step-by-step replacement guide
Replacing the socket in a ceiling lamp is carried out in the following sequence:


Place the chandelier on a table or other convenient surface, disassemble it, removing all the shades and unscrewing the bulbs so as not to break them.
Checking work
After attaching the chandelier to the ceiling, a lamp is screwed into the socket and electric current is supplied. If the replacement work is done correctly and all contacts are connected, the lamp will glow.
If, after replacing the product, any problems are detected (flashing of the lamp or its burnout), their causes should be found. Alternatively, it could be an incorrect connection of the current supply wires.
- Carry out the replacement without turning off the power to the room, is strictly prohibited, often leading to tragic consequences.
- If problems are detected in the main it is necessary to completely or partially replace it.
- Sometimes cartridges initially have lead wires, so when connecting different types of wires, for example, aluminum acts as the main one, and copper comes from the lighting device; it is advisable to use special terminal blocks for connection. If there are none, the wires should be connected, twisted and covered with insulating tape.
- Before removing the chandelier, you should remember or sketch the connection diagram, which will eliminate the possibility of incorrect connection.
- If the reason for removing the ceiling light is a cartridge that has come out of fret, you can try to repair it. Often, brass plates come off, oxidize, or rust. In this case, they can be cleaned with sandpaper. You should also inspect the contact fasteners located under the ceramic insert. If necessary, they are cleaned and tightened. After a thorough inspection, the socket is assembled and the lamp is screwed into it, the ends of the lamp wires are placed in a carrying case. The result of a properly carried out repair will be the emission of light from the lamp.
- Sometimes it is not possible to remove an incandescent lamp from the socket - the base gets jammed, and when the lamp is unscrewed, only the glass bulb is removed. In order for the cartridge to be used in other chandeliers in the future, it is necessary to unscrew the cylindrical element of the product body, holding it by the lower part. If these manipulations do not give a positive result, you can unscrew the base using pliers, taking its edge and turning it in the socket.