Professional photo shoot at home. Ideas for a home photo shoot
Wedding photographs are from a different opera, but some of my advice may also be useful.
I ask everyone who wants to make a successful photo shoot under the cat.
1) Most of The success of the shooting depends on the photographer, I think this is already clear. The choice is huge now, there are a lot of guys shooting well, but everyone works in their own style. Therefore, carefully study the portfolio. Choose someone who is great at shooting exactly the direction you need. If a master is great at photographing architecture and sunsets, it’s not a fact that he can handle street style or a family photo album.

2) Think for yourself - what would you personally like? Look for shooting options on the Internet, create something like a moodboard (a board with different cut-out pictures) for inspiration. If you saw a cute picture in a magazine, attach it immediately, otherwise you’ll forget it later. I myself use this technique all the time.
You can then show these collages to the photographer, which will help a lot. This is a collective creation, and if you do not want to be misunderstood, then it is better to provide a professional additional information. Otherwise, it will turn out later - “I wanted to be pretty, tender and romantic, but I turned out to be a sexy femme fatale,” because during the shoot you languidly rolled your eyes and took ambiguous poses, and the photographer accordingly relied on this very mood of yours. For you it's sweet and vulnerable, but for him it's hardcore.
3) Pay attention to Photoshop, many people are too keen on it. If you are not happy with this, be sure to say so in advance, otherwise there is a chance you won’t recognize yourself in the photo later. In general, I am against strong retouching; I love live shots, without perfect skin and correction of moles and wrinkles. But this is everyone's personal choice.
4) Choosing a location. First, decide what you want more - studio or plein air (open air). Both have their pros and cons. Studio shooting is easier, there are changing rooms, you are not tied to the weather, you are comfortable and warm. But! The studio is always about staged shots. Those. You will most likely lose a certain ease and carelessness. Photos “in motion” most likely too. In this sense, filming outside is much more interesting at any time of the year. There is a high chance that the photographer will “catch” your natural emotion.

5) If you decide to film in a studio, then don’t be lazy and look at the different options offered in your city. The photographer can recommend something, but the final choice is yours. Each photo studio has pictures and examples of filming in different rooms, and it will be easier for you to understand what awaits you in the end. Ideally, you can stop by and see everything with your own eyes. If necessary, you can also bring additional paraphernalia, such as books, candles, paintings and other things.
I highly recommend discussing discounts with the studio administrator. On certain days and times they have different prices, so you can save a lot of money on this. Or, if you rent a studio, for example, for two hours, the third one can come as a gift. Everyone has their own tricks, don’t forget to be curious.

6) If you want to shoot in the open air, you need to consult an experienced photographer. Without a doubt, we all have our favorite places, square/monument/park bench, but not every place is suitable for a photo shoot. It can be very crowded, or windy, or shady, etc. All this must be discussed with the photographer, and if necessary, he will take additional lighting equipment with him. They usually have their own list of great places that look better on the cards. Moderately contrasting, without unnecessary greenery (mostly everyone doesn’t like it), with many different angles. The more diverse the space, the better. The photographs will give the impression that you were all filming in different places.
Separately about the weather. In our climate, nothing can be accurately predicted, so you always need to have a backup plan in case of rain and snow. Again, photographers know places where they can shoot in any weather, if the shooting is urgently needed and there is no question of any postponement. Also talk about this in advance so that there are no surprises.
7) Preparation for a studio photo shoot. You choose clothes based on the general concept that you have already decided on (or the concept is chosen based on the existing items). If you need a certain image, but don’t have the necessary clothes, hire a stylist; it is our responsibility to provide the client with everything necessary, within reason, of course.

If you are planning to create looks that are different in style, then always start with the most natural one, with a minimum amount of make-up and the simplest possible styling. Then the makeup artist (or you yourself) will gradually touch up the color. Believe me, there is nothing worse than starting with red lipstick or smoky eyes, and then frantically washing them off for the sake of a baby face. The makeup artist will have to warn you about this, but it’s better to be aware of it yourself.
8) Preparing for plein air shooting. Point 7 is also relevant, but there are a whole bunch of nuances. You should think about the sequence of clothes to be worn if there are several looks. You will most likely have to change clothes in the car, and it should be as convenient as possible for you to get your clothes out. Place each bow in a capsule in a separate bag, including accessories, otherwise you will forget about them. Under no circumstances should you put separate bags with shoes, bags and dresses if you are filming without a stylist. You will definitely forget to put on your hat in the shot, because it is in another bag, and this bag fell between the seats and you did not remember about it. Or the dresses will wrinkle while you take them out of the bag. Important! Iron items before filming and transport items that are very wrinkled in trunks. If the item is wrinkled, it is not a fact that the photographer will fix it. He's not a wizard after all.
In the cold season, try to wear gloves or mittens. Blue hands are very difficult to fix in photographs, just like a red nose, but you can’t hide it. IN summer time use powder or shimmering lotion, the skin will look well-groomed (in the studio this technique is also relevant, and it is better not to wear nylon stockings or tights - they glare).

Outdoor photography requires an experienced makeup artist and hairdresser. You will be repainted and combed in a canopy, with cosmetics laid out, for example, on the hood of a car. For this you need good level professionalism and participation in such filming.
9) Look on the Internet for different winning poses for filming, and practice a little in front of the mirror. Try the full range of emotions that you are capable of: from playfulness to passion, you should not have the same facial expression in every frame. Photographers correct and suggest what and how to do, and you try not to argue, saying that you know for sure “that your working side is the left.” Trust that you chose the photographer based on his work.
Don’t be indignant if the photographer takes a picture of you at a moment that is not the best from your point of view - it is quite possible that you will get the coolest shot.

10) Family photography. In addition to all of the above, choose the right clothes for all participants. A unified style must be maintained, otherwise it happens that “some go to the forest, some go for firewood.” If you are wearing a soft sweater and suede boots, then you should not dress your husband in a “feminine” suit, or in a sports suit, just because it is so comfortable for him. Find words to convey the idea to him.
The pictures where everyone is wearing the same T-shirts with logos or sweaters look even sillier.

11) Attributes during the shooting. A cup of coffee in your hands, or a glass of wine (the contents can be non-alcoholic), sweets, croissants looks very appetizing. In nature, umbrellas or baskets are perfect, depending on the chosen theme. And so beloved by everyone Balloons It’s better to leave it for children’s photography.

12) I’ll finish the list with a little professional trick. It is absolutely not necessary to put together images for a photo shoot exclusively from your things. If a certain color is missing, look in your husband’s closet and choose the right one. Size and style are of secondary importance. With the help of clips and invisible things, the item is transformed into the desired size, and it will look like a glove in the photograph.
Why do you need stylists for individual photo shoots?
I’m telling you, because this is a great way to promote your services.
There are several options. First, I come to your home in advance, and together we make looks for you, or for your whole family, from things you already have. If necessary, I bring missing accessories to the shoot.
Option two - I take full responsibility for the items during the shoot, using clothes from showrooms and stores. You just set the theme, and I coordinate the outfits with you.
During the shoot, I keep a keen eye on how the clothes fit on you, whether the sweater is wrinkled, whether the buttons are undone and whether the collar has moved to the side. Photographers don't always pay attention to this. Plus, coordinating looks with a makeup artist and hairdresser is my task.
The post used photos from my personal archive and fashionbank.ru
It's much easier than it seems
The thought of setting up a photography studio with the right lights, backdrops, etc. right in your home is often daunting and seems unattainable. But you can rest assured that the portrait photography lighting equipment you'll need has gotten a lot cheaper and easier to use. Moreover, it does not require much space.
The beauty of a home photography studio, especially for portrait photography, is that you have complete control over the light sources. And also decide what additional accessories you will need and where to place them.
You decide for yourself what equipment to purchase, focusing only on your preferences and budget. Should I make do with a foam panel as a reflector or shell out for a life-size softbox? You decide.

If you want to save money, you should pay attention to sets of studio equipment for beginners, equipped with 2 pulsed light sources. At a cost ranging from 15 to 25 thousand rubles, you can purchase a kit suitable for the first time.

Newcomers to studio photography are often concerned about how to control exposure when the scene is illuminated by flashes. You can use the “shooting” method to estimate the light intensity using a hand-held flash meter. But you don't have to use this rather outdated method.
The histogram is an ideal tool for checking and adjusting exposure. A histogram can be displayed on the camera screen for any shot taken. Using a histogram, it is enough to check that the tones of the image are evenly distributed within its boundaries.
Below we show what the three exposure states can be - normal, overexposure and underexposure - and what histograms correspond to each of the states.

By decreasing or increasing the aperture value, you can adjust the intensity of light passing through the lens. This best way working with exposition. Or try adjusting the power of the light pulse on the light sources to increase or decrease the intensity of the illumination.
Add drama
Most studio kits for beginners include a reflective umbrella. This is a very useful accessory. It is very convenient to place two umbrellas “for reflection” on either side of the model. They create soft, evenly covering and pleasant lighting.

However, the photo above was created using "high energy" lighting, creating deep shadows. This was achieved due to the fact that only one source with an umbrella was installed to the right of the model and above the level of her head.
Due to the proximity of the source to right side face, the largest “portion” of light falls on the model, and the opposite side of the face is less illuminated. The shadows were deepened by a black foam panel installed to the left of the model.


There are no rules that uniquely define your camera settings for studio portraits. But there are parameters, adhering to which, you can get better results. Let's start with ISO. It should be minimal so that digital noise shows up weakly in the pictures.
It's best to shoot in manual mode. In it you control the aperture value and shutter speed. In automatic and semi-automatic modes, the camera takes on these responsibilities.
Shoot in RAW format. Even if you monitor the exposure using the histogram on the camera screen, you may miss slight overexposure in certain areas of the image. Shooting in RAW format will allow you to correct the pictures taken in a photo editor.

If you shoot at a shutter speed shorter than your camera's sync speed, you will see black stripe on one side of the frame. This strip is the shutter “curtain”, which is still moving at the moment the pulsed light source is triggered.
Obviously, the photo from black stripe- marriage. To avoid this, just set the shutter speed longer than the sync speed. Most modern cameras have a sync speed of 1/200 second. Some cameras can sync flash at 1/500th of a second.
One of the most useful studio accessories is a radio synchronization kit. With its help, you can remotely control the moment of operation of pulsed light sources. Connect the receiver to one of the sources, install the transmitter on the hot shoe connector, which is located on the top of the camera. Now you can take photos without worrying about wires or being careless about knocking over your light stand.

You should also purchase a softbox big size. This versatile item can be used to create a variety of lighting effects.
Take a few shots, then move the source. Place it on different sides, at different heights. Also, try lighting your subject's face on one side to create dramatic shadows on the other side.
As you can see, today there is nothing difficult about creating a photo studio at home. So if you have enough space at home, go to the store!
Working on photography projects with a variety of themes is a great way to break away from routine photography and focus on the creative process of creating photographs. Limitations in shooting subjects and equipment sometimes really force you to resort to very creative solutions.
We have prepared 52 great ideas for filming in 2015. For every week of the year, in theory. We've divided them into three sections: easy indoor projects you can do today, ideas you can do outdoors, and temporary projects you can start right now.
Photo ideas for home
1. Manipulation with water drops
To implement this idea, you need to install a container of water with a small hole through which drops of water will flow. Your task is to press the shutter button at the moment when the drop is forming or is already flying. The most important thing is to determine the time to close the shutter as accurately as possible. We achieved the best results using two flashes set to their lowest power (1/128th). The aperture was set to f/22. To give the water a more viscous consistency, we added a little food thickener to it. We also used the SplashArt Kit series device, which helps regulate the size of the drops and the frequency of their fall.
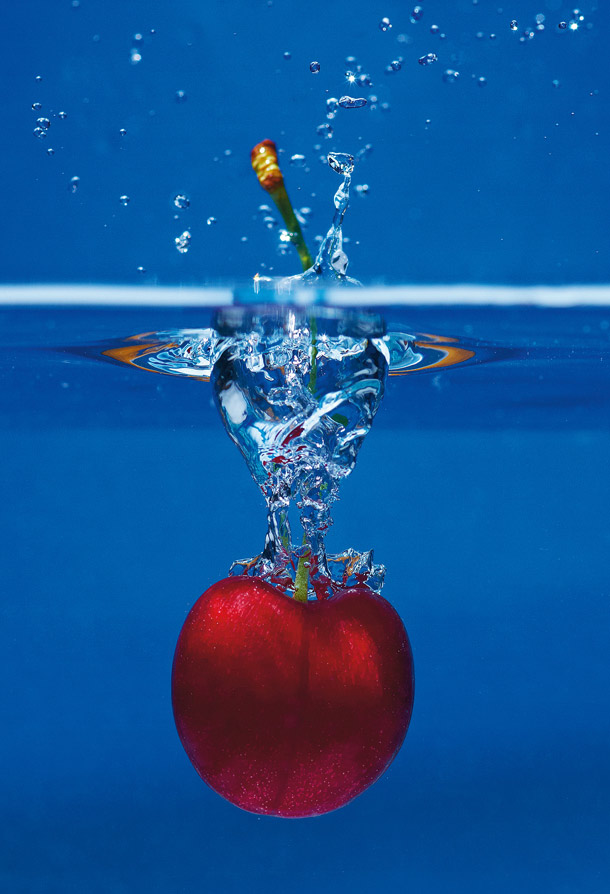
2. Photograph the splash of water
For this project you will need a remote control flash, a water container with clean, clear sides, a colored background, and a tripod. Set up a container of water and a colored background, then place the flash over the container. Place your camera on a tripod and switch to manual focus mode. With an aperture of f/8 and ISO 200, set the fastest shutter speed possible. Don't forget about flash synchronization. So, throw the object into the water and press the shutter button as soon as it touches the surface of the water.
3. The art of painting with smoke
Many photographers, for example, lovers of still lifes, are happy to use smoke in their photographs. What if you take it to the next level and use the intricate shapes of billowing smoke to create paintings? You can create an unusual art project in Photoshop. So, after taking a few good shots of smoke swirls, create a new blank document in Photoshop. Then copy and paste one of the resulting photos onto it. Set the blending mode to Screen and use the Warp Transform command (Edit > Transform > Warp) to change the shape of the smoke. Keep experimenting by adding more pictures to your document.

4. Cross polarization
The basis of this fun idea is the effect that polarized light creates when hitting plastic objects. You will need two polarizing filters, ideally one of them should be a sheet of polarizing film. An A4 sheet of Lee 239 polarizing film can be purchased for around £50. The sheet of film should be placed on a lightbox or any other light source. The iPad screen and most computer screens have a built-in polarizing filter, so if you don't have polarizing film, you can easily create a blank white document that fills the screen and use your gadget. Attach a polarizer to the camera and rotate it until the colors appear on the clear plastic parts.

5. Edible landscapes
Spice up your food photography! All you need is to creatively place figures on the food, for example Hornby. They are ideal, as this company's men are offered in a variety of poses. It is important not only to place the figures, but also to tell a story. In this photo you watch as two heroes help a climber trying to climb a potato mountain with advice.

6. Food as art
Turn your dinner ingredients into photo art using a lightbox and a very sharp knife. Slice the fruits and vegetables as thinly as possible and then place them on the lightbox. Place the camera directly above your subject and use Live View to manually focus on details. Set your aperture to f/8 for optimal depth of field. It's worth resorting to exposure compensation and setting it to +1-+3 stops, since the bright light from the lightbox can mislead your camera's light meter.

7. Flowers in ice
A relatively inexpensive way to take great macro photos is to freeze flowers in plastic containers filled with distilled or de-ionized water. The flowers will float, so take care to secure them in one position. Place a piece of ice on the surface of a clear glass or bowl in a white sink or other container so that light will reflect off all surfaces of the container. Place the flash on one side and point downwards, and place the camera on the opposite side.

8. Oil and abstraction
Oil stains spreading across the surface of the water are a great idea for creating bright abstract photographs. This project utilizes the refractive quality of oil to highlight and distort colors. All you need is to pour water into a transparent bowl and add a few drops of regular vegetable oil. Place the bowl approximately 25 cm above the table. Place different things under the bowl colored paper, illuminate it with a regular table lamp or using a flash.

9. Oily reflections
This idea echoes the idea described above. But in this case, the color pattern is created using a colored overlay for the lamp, and not a multi-colored background. Start by making a table lamp cover using construction paper, film, and tape. For safety reasons, make sure that the paper does not touch the light bulb. Place a container of water in front of a table lamp and add a few drops of oil to the water. Spread the oil over the surface, bring the camera as close as possible and shoot.

10. Psychedelic soap film
This project is a great idea for a colorful desktop or abstract wallpaper for the wall. You will need liquid soap mixed with glycerin; this combination forms a durable soap film. Arm yourself with a wire loop, a black background and a macro lens such as 100mm. The colors formed by the soap film appear only at a certain angle of incidence of light. Position yourself near a window and choose the right angle for shooting.

11. Refraction effect
Passing through water, light has the property of being distorted, i.e. refract, as a result, objects under water visually change their appearance. This phenomenon is called refraction, and we will use it as part of this small photo project. All you need is a few clear glasses, a flash, a tripod and a black and white patterned backdrop. Simply place the glasses of water against the patterned background and shoot.

12. Macro photography in the kitchen
Your kitchen - perfect place for macro photography. Its reflective surfaces can be used to create an interesting background for photographs, and its shallow depth of field can transform the most ordinary objects. By combining several pictures together, you can create a wonderful decorative element for your own kitchen, but before you start shooting, think about how the frames will resonate with each other. Our series consists of three photographs taken at the same angle and with the same depth of field.

13. Bokeh
Something as simple as a crumpled piece of foil can easily become the basis for a beautiful photo project. Place your subject on the glass, and place a piece of dark material under the glass. Hold regular kitchen foil in your hands a little, then straighten it and place it as a background. Direct light from a table lamp or any other source onto the foil. With the camera on a tripod, open the aperture as wide as possible. Light the foil with flash while shooting.

14. Bokeh bubbles
Small light sources always create beautiful bokeh. Garland is perfect for this. Place the garland at such a distance that when the aperture is open, its bulbs are out of focus. The subject of shooting, in this case the glass, should be close to the camera, and the focus should be on it. Position the garland itself in such a way that the bokeh eventually takes the form of multi-colored bubbles flying out of the glass. This technique is also used to create this “flow” bokeh from mugs with hot drinks.

15. Drawings with light
Streaks of light and light patterns can be used in a variety of photography genres, and are ideal for still life photography. To do this, you can use a simple flashlight, and to make the light less diffuse, you can remove the top cover, thereby exposing the light bulb. Use insulation tape to attach a piece of colored paper to the flashlight. Set the shutter speed to about 30 seconds and the aperture to around f/8. While exposing the frame, make smooth circular movements around the bottle, drawing a spiral.

16. Light spirals
Tie the lantern to a rope and hang it from the ceiling. For this photo, you'll need the widest angle lens you have in your arsenal. Mount your camera on a tripod and point it straight at the ceiling. With the room light on, manually focus on the tip of the flashlight. Set your aperture to approximately f/11 - f/16 and use Bulb mode and a remote shutter release to take pictures. Keep the shutter open for about a minute after you launch the flashlight.

Ideas for outdoor activities
17. Portraits with the Brenizer effect A
The Brenizer method, also known as a portrait panorama or boquerama, provides an excellent basis for a series of portrait photographs. The method was invented by New York wedding photographer, Ryan Brenizer. This technique allows you to create photos with the effect of an ultra-wide-angle lens. The point of this method is to create a series of photographs that, when stitched together, form a full-fledged frame. You can put the mosaic together using the Photomerge option in Photoshop or in a program designed for gluing frames together. Use manual camera settings, starting with white balance and ending with focus, so the parameters will be the same for all shots. Take 30-80 frames to create one photo, and do not forget that each subsequent frame should overlap the previous one by about a third.

18. In the right place with the wrong lens
Force yourself to look at things differently. When going for a walk with your camera, choose the opposite lens to the one you would most likely take with you. For example, take a wide-angle lens to the zoo or limit yourself to the focal length of a telephoto lens the next time you go out to photograph landscapes.
19. Landscapes in pieces
Try to explore your surroundings in a new way by creating compositions from several fragments taken during a walk. Go outside for literally 20 minutes. Don’t spend a lot of time on settings, just select aperture priority mode, don’t take a tripod and various filters with you, and give up complicated techniques. Take photos of everything that catches your attention. When you return home, create a document with a grid in Photoshop and insert the resulting images into its cells using layers.

20. Minimalist landscapes
Instead of confining the view in front of you to one boring shot, try shooting a series of minimalist landscapes with long exposures. A symmetrical composition and square format will help emphasize the simplicity of the frame. You will also need a neutral density filter, which will give you the ability to use long exposures throughout the day. Use a tripod and remote shutter release.

21. Starscapes
To capture the perfect starscape, you need a completely clear sky. It is advisable that the moon does not fall into the frame, otherwise many details may be lost. For a high-quality photo with clear, unblurred stars, you should photograph at fairly fast shutter speeds; to do this, go to manual mode, set the ISO value to about 1600 or 3200 and the shutter speed to two seconds. Even with these settings, you'll have to set your aperture wide open: f/4 or even f/2.8.
22. Photograph something that never inspired you
Write a list of objects or places that you find uninteresting, boring, or even ugly. Now force yourself to take attractive and interesting photographs of these unphotogenic places and objects.
23. Looking for abstraction in a parking lot
You don't need to travel to distant countries to carry out an interesting photography project. The photo opportunities are plentiful, and even in something as mundane as a parking lot, it's possible to create something interesting. For this project, all you need is a digital camera. Without focusing on technique, look for and photograph different textures, color combinations, interesting shapes and patterns.

24. Selective colors
Instead of using glorified techniques to make a subject stand out from the rest of the frame (for example, when the main subject is left in color and everything else is converted to black and white), try choosing a color and looking for its embodiment in all the diversity of the world. Draw attention to this color using the right composition.
25. Night photography
Take up night photography. Limit yourself to the use of additional light sources, take the maximum from the available lighting.
26. Optical illusions
As part of this project, we invite you to play with perspective, which affects the viewer's perception of the relationship between objects of different sizes that are in the frame. It is best to take as a basis objects whose dimensions are known and do not raise any doubts, and make them interact with objects bigger size, located in the background. For these types of photographs, shoot with a small aperture to ensure greater depth of field.

27. Miniature world
Capture miniature toys and models in natural environment. Such projects are popular and very common today, and there is nothing difficult in their implementation. Just take a small figurine or toy with you and shoot it in different situations, everywhere and always: while traveling or on a walk or even on the way to work. In order for the figurine to blend into its surroundings, you should, firstly, remove it from close range, and secondly, to properly balance the lighting.

28. Create a tilt-shift effect
The well-known and beloved “toy town” effect is obtained by using a special expensive tilt-shift lens. But a similar effect can be achieved in Photoshop by blurring everything in the photo except a small area where you want to focus attention. For greater verisimilitude, photograph from an elevated position and preferably in sunny weather.

29. Photo alphabet
No, we do not suggest that you look for letters of the alphabet in inscriptions on stores, road signs, etc. Instead, look for items and objects that are shaped like letters of the alphabet. You don’t have to look far for an example; let’s take a children’s swing on the playground. What does their frame resemble from the end? That's right, the letter A. A bird's eye view of a curved river English letter S.
30. From 1 to 100
Similar to how we suggested you create a photographic alphabet, you can expand this project a little and try to find illustrations for the numbers.
31. Faces in unusual places
Another simple and fun photo project idea. Sometimes we can observe how familiar things in our everyday life, and simply surrounding objects, have some similarities with a human face or take on a form that vaguely reminds us of facial features. Learn to look at the world of things differently. For inspiration, check out the blog dedicated to this topic.
32. Light orbit
Painting with light gives you a limitless variety of different ideas for photography. But what about a series of images with light orbits? You don't need complicated equipment. All you need is a bright LED backlight, powered by batteries, and a hoop on which the backlight is wound. Place the camera on a tripod, select the optimal shutter speed and simply rotate the hoop.

33. Burning steel wool
To carry out this project, make sure that the shooting takes place in an open area away from flammable objects. Place steel wool in a metal whisk and attach it to the chain. Then set fire to the wool and rotate the whisk on the chain, burning sparks will fly around. You'll need a dedicated volunteer, a tripod, and a shutter speed of about 15 seconds at f/11 and ISO 100.
34. Car movement
For a change, try capturing the movement not from the outside of the car, but from the inside. Of course, you should shoot at night. Ask a friend to drive smoothly and slowly on a well-lit road. Set the shutter speed to about 30 seconds. Mount a tripod on the passenger seat and use the remote shutter release.
35. Deliberate mistakes
Make a list of the most common mistakes a photographer can make. And then try, by deliberately making these mistakes, to create a beautiful photo. You may overexpose or underexpose, crop your subject incorrectly, or focus on the background rather than the subject.

36. Cinemagraph
Create a series of animated GIFs that illustrate subtle movement. This project requires minor work in Photoshop. You will have to create not just frames, but video sequences, but the result may exceed all your expectations. You will need a tripod; the background must remain unchanged throughout the entire video sequence. Choose a scene in which some action occurs continuously or cyclically so that the starting and ending points in the finished cinemagraph are not obvious. Record movement, such as the wind moving leaves on a tree.
37. Intentional camera movement
You are used to doing everything possible to ensure that your photos are as clear as possible. But to make the photo metaphorical and mysterious, try doing the opposite. For relatively long shutter speeds, move the camera intentionally. Shoot in shutter priority mode. For inspiration, look to the work of British photographer Chris Friel (http://www.cfriel.com).
38. Retro effect
Various noises and distortions are very easy to add in Photoshop or Lightroom. As a result, you will get a more colorful and atmospheric photograph, but you should think about its final style already during shooting. The retro effect works well with simple photographs that are not overloaded with details, where the subject is easily recognizable.

39. Time-lapse photography
Many of us may well have time to engage in time-lapse photography, which is on the border between video and photography. The subject of shooting can, in fact, be any phenomenon of yours. Everyday life. Master this exciting technique in 2015.
Projects designed for a long period of time

40. Project 365
A classic project where you take a photo a day for an entire year. You can go down two possible paths: limit yourself to just one shot per day for a given project, or take several photos and then choose the best one. Can't spend that much time on photos? Then think about an alternative project for which you need to take one photo per week, so there will be 52 photos in total.
41. 50 strangers
This idea is also not new, but that makes it no less fascinating. You should meet and start a conversation with people you don’t know, and then, with their permission, keep their portrait as a souvenir. You can decide the number of strangers you should photograph. The most important thing is to overcome yourself and take the first step.
42. Project 50x50x50
It's simple: 50 days, 50 photos taken with a 50mm lens. An extremely simple project that will help develop your vision as a photographer.

43. Creative selfies
Of course, you can take self-portraits at home, but how boring it is! Why not challenge yourself to create a series of self-portraits outside the walls of your home? Check out a series of beautiful self-portraits taken by renowned photographer Vivian Maier. She portrayed herself as part of some big scene, playing with light, shadow and reflections. It will be easier for you if you choose a specific theme for the project, as, for example, photographer Alex Bamford did as part of his series of works called the ‘Sleepwalking’ project (http://www.alexbamford.com/sleepwalking).
44. The world under your feet
Every day at the same time of day, take photos of what is under your feet. Arm yourself with a wide-angle lens and look for new and interesting places.
45. Portraits without a face
Take portraits different people, but do not include their faces in the frame. Try to convey their personality in other ways. Using colors, surroundings, lighting, paraphernalia, and even parts of their body - especially their hands - will all help you reveal their character to the viewer.

46. Photo game
Ask someone to write 30 things on paper cards. Things can be very different, but always easily accessible. At this time, you will describe 30 different aspects of the photograph (50mm, black and white photo, long shutter speed, tilt-shift effect, etc.). Take a card from each pile and start completing the task.
47. Monochrome month
The name of this idea gives it all. Force yourself to take exclusively black and white photographs, forget about color for a month. You will learn to see the most appropriate scenes and subjects to photograph in black and white. This project will help you develop your vision. Shoot in Raw format, but change your camera settings to monochrome beforehand. As a result, while shooting, you will be able to see the scene in black and white, and the image itself will store all the color information. You can use this information to process the photo.

48. Four seasons
Unlike the project, which involves shooting every day, here you will be shooting the same subject every three months for a year. The idea of this project is to show the change of seasons. When choosing your subject wisely, imagine in advance how the chosen scene will look after the transformation caused by the change in weather. A lone tree in a field is certainly perfect for this project.

49. Geocaching
Download a geocaching app to your smartphone and head to the cache location to artistically capture the surrounding area. Don't take pictures of the cache itself, because you don't want people who go looking for it to lose interest.
50. Create a texture library
Textures can give your photo a special look. You can apply texture to a photo in several ways, such as using multiple exposure mode. It is much easier to use Photoshop for this purpose and apply textures through layers. Although you can find textures on the Internet, you will agree that it is much more pleasant to use your own. Wood, old crumpled paper, plaster falling off the walls and other things can serve as an excellent texture for your photo.

51. Pinhole photography
With your own hands, using available tools, turn your expensive camera into an analogue of a pinhole camera and try to shoot without using newfangled equipment.
52. Make a photo book
Take the project you worked on last year as a basis. Think about the structure of the book, about the placement of photographs on its pages. Try distributing them according to color scheme, theme or style of execution.
It's not easy to shoot indoors. Especially if you are a beginner. In this type of shooting, a lot depends on technology. There is usually not enough light in the room. If it does come through a window or is emitted by lamps, it falls at the wrong angle onto the subjects, so it has to be redirected with reflectors or compensated for by flashes. Without a good, bright lens there is absolutely nothing to do indoors. Just having the technology is not enough to start taking good photographs. You need to be able to use it and be able to use the environment.
How not to shoot indoors
Due to the small amount of light, you will have to use a flash. So as not to get it in the picture a large number of noise, ISO is usually set to minimum. What comes out of this? Most often the photo looks like a white face against a dark background. The flash just doesn't light up the whole room.
Remember about the background
The background in photography is no less important than the subject itself. The background may be blurred or in sharp focus. but he must be present. It doesn't have to be black. The photo must include the foreground, medium shot and background. During training, it is not necessary to create an interesting background. First of all, you need to achieve a technically correct rendering of the background, and only then you can engage in artistic activities.

In a dark room, the first thing to do is to increase the shutter speed to the value at which movement does not yet appear. There is a rule that states that in order to avoid blurry pictures when shooting handheld, the shutter speed should not exceed 1/lens focal length. For example, if you are shooting at a focal length of 28mm, then the shutter speed should not exceed 1/25 sec. If the focal length is 80mm, then the shutter speed should be 1/80 sec, etc.
The aperture will help to slightly increase the brightness of the scene, but if it is not enough, then only ISO is left to increase the brightness. By increasing the light sensitivity by 2 times, you get a gain in lighting by one step. This means that by increasing the ISO, you can reduce the shutter speed or close the aperture. Modern cameras allow you to take pictures with virtually no noise up to ISO 1600. Full-frame models have a higher threshold. Older cameras can work with ISO 800-1000 without much loss of quality.

A small amount of noise does not particularly harm the image. It may not be visible to the naked eye. Additionally, small amounts of noise can be hidden in Lightroom. You just need to shoot in RAW. In Lightroom The color noise and light noise sliders are responsible for adjusting noise.
Use your flash wisely
Indoors, the flash should not play the role of the main light source. It should only highlight shadows, act as a fill light, or add light to the foreground slightly. Pointing the flash at the ceiling or walls is not the best the best option. The interior decoration of the room can be multi-colored, and the light reflected from green, blue, red, etc. the walls acquire the appropriate shade. All photos will turn out multi-colored, and white balance correction will be painfully long.

The ideal reflector color is white. Therefore, you should strive to use this particular color on reflective surfaces. The most common flash mode when shooting indoors is rear-curtain firing. It's easy to explain. If the flash fires against the front curtain, blur will be visible in some situations. The flash puffs at the first moment, and then the frame is exposed, during which movement may occur, and it will be superimposed on top of our subject. If you use a rear-curtain flash, the exposure will first occur, during which some movement may appear, and then the flash will fire, which will capture a clear and bright object on top of the movement.
Quite often indoors you can do without a flash. Many wedding photographers in the registry office shoot this way.
When shooting, you should also think about the temperature of the light. Only the flash produces neutral light, close to natural daylight. All other lighting devices create bluish, reddish, yellowish light. This inevitably affects the result.
If different light sources are used in the same room, they will mix and create an incredible cocktail. An outbreak in such a situation can only do harm. If the general lighting has a greenish tone, and you use flash to illuminate the foreground, then everything in the background will have a greenish tint, and objects located a few meters from the lens will receive natural white lighting.
Correcting lighting in Photoshop is a thankless task, especially if you have several hundred photos, so it's easier to take care of light sources in advance. In order to Various types lighting did not mix, you need to have a set of color filters with you. After taking a test shot, you need to evaluate what color the frame is painted in natural light. Then you need to select a color filter for the flash with the same shade and install it. After this, the color temperature of the flash will not compete with the temperature of the light from the lighting fixtures in the room.
Choose adequate means
"Photography indoors" is a broad concept that includes many various styles and shooting methods. You can be a reportage photographer at various events. If you are going to sell your photographs to various publications, then the photographs must be of the highest quality. Otherwise, no one will buy them from you. This kind of work requires an expensive camera and optics. Wedding photographers are allowed to have less expensive equipment, since the pictures will only be collected in a family album, but if you want to gain respect from your clients. then the photographs must also be of the highest quality. You must be able to extract all its capabilities from your technique. If you shoot at friendly parties and feasts, then there are usually no special requirements for photographs. For such shooting, the most important thing is to capture the atmosphere and capture some events. No one will look closely at the natural color rendering of sandwiches and salads on the table. For such shooting, the simplest DSLR or even an ordinary, but high-quality compact will be suitable.
To make it easier to decide which camera to buy, you should read the recommendations for choosing a camera in the article How to choose a digital camera.

Professional cameras, which have price tags starting from $3,000, not only shoot accurately and quickly. They have full-frame sensors that allow you to get several times less noise compared to cropped ones. This means that the permissible (working) ISO values can be an order of magnitude higher than when working with crop cameras. Consequently, this makes it possible to take better pictures in low light conditions, which is exactly what professional reportage photographers need.
Flash most often gives a gain of about ½ or ⅓ stop. This is not much, but often this is what is missing. You can also use flash to soften shadows. The quality and functionality of a flash are directly proportional to its cost. You should choose a flash based on the tasks you are going to assign to it. We can talk about the outbreak for a very long time, so it is better to refer to our articles on this topic:
- Basic principles of working with flash
- On the advisability of using an external flash
- Errors when using flash
- Flash Photography: Tips for ISO Control
- Fill flash
Professional lenses start at $1000. Expensive optics differ from cheap ones in higher sharpness and aperture ratio. These are very important parameters that affect the quality of the resulting photographs. High-aperture optics allows not only to obtain nice pictures thanks to an impeccably constructed lens system, but also to use lower ISO values, which also has a positive effect on the quality of photographs. To decide on the choice of lens, you can read our article on this topic: “Choosing a lens.”
Professional equipment makes it possible to obtain better results in any conditions. But the price of such equipment can upset many, therefore, when choosing a camera and its components, you need to understand the tasks it will perform and, based on your available budget, select exactly what you need.
Experiments
Everything you have read in this article is just the basic principles of indoor photography. Each type of shooting has its own rules and nuances. If you are overcome by the spirit of rebellion and you do not want to obey the rules, then it is still worth familiarizing yourself with them in order to be aware of what exactly you are breaking.
There's no need to spend tens of thousands on lighting equipment to create professional-quality portraits. In this guide, we'll show you how to shoot truly original portraits worthy of any photographer's portfolio, with a standard home studio kit.
You don't need fancy light sources or expensive equipment to create powerful lighting effects for portrait photos. A simple set of two monoblock pulse sources is a great start.
Fortunately, such a kit is available and relatively inexpensive. Even if you don't have one or don't plan on purchasing one, an external flash and a few basic accessories will be sufficient for the practical application of this tutorial.
Once you have the right accessories, you'll discover ways to control the light. You can dramatically improve the technical level of a portrait using a few simple tools, accessories, tips and techniques. However, it's worth taking the time to experiment with different lighting schemes.
Prepare your equipment for creativity
There are a bunch of attachments that you can use to control the intensity ( approx. translator - and quality) lighting: softboxes, umbrellas, tubes, curtains, beauty dishes, etc. Most beginner kits come with a softbox and an umbrella.
They are perfect for creating diffuse, diffused, soft lighting, while tubes, curtains and honeycombs are designed to create a directed light flux.
A good way to learn how to control light is to think through a lighting design. At first glance, this seems like a difficult task. But it only seems so. Most monoblocks are equipped with a source of modeling, pilot, light - a constant radiation lamp, which can illuminate the scene throughout the entire shooting without affecting the exposure.
Modeling light is great for assessing how light from a flash source will fall on your subject. First, make sure the modeling light is on.
Move the monoblock relative to the model. The closer the light source is to the subject being photographed, the softer the lighting - the transitions from highlights to penumbra and penumbra to shadows are longer and smoother. And vice versa, the further you go, the harder it is, the shadows are thicker and their edges are clearer.
The height at which the source is placed relative to the model is also important. In most cases, you may want to mount the monoblock higher than your subject. But it's worth experimenting and seeing how the light falls on the model when the source is above or below her head. Also think about the angle of inclination of the monoblock in relation to the model: the direction of light “opposite” or “top-down” is usually the most acceptable options.
- Find out more: Setting up a home studio: equipment, setup, filming.

Practice
The classic, “Rembrandt” light scheme to start with is named after Rembrandt Harmensz van Rijn, a 17th century Dutch artist. The fact that this particular scheme is involved is evidenced by a light spot in the shape of a triangle on the model’s cheek. ( approx. translator - one side of the triangle is formed by the shadow of the brow ridge, the other by the shadow of the nose, the third by the shadow located along the unlit half of the face from the cheekbone to the chin.) Rembrandt often used this type of lighting in his portraits.
Ideally, you should position the light source relative to the model's head so that the shadow from the tip tends to the corner of the mouth.
Despite the fact that Rembrandt's scheme - a good start, do not stop there, do not use it constantly. In a different shooting situation and with a different model, a different distribution of highlights and shadows would be more appropriate.
- Find out more:
The great advantage of digital technology is that you can experiment and, at the same time, monitor the test results on the camera screen. Gone are the days when you had to calculate every frame with utmost care and take care of expensive film. Then wait until she returned from the darkroom to finally see what the experiments led to.
In addition to installing a suitable lighting scheme, it is necessary to psychologically win over the model. The pose in which the model looks best, the emotion and atmosphere of communication... and, of course, the composition that makes the photo expressive.
Prepare the studio

Install lighting
Set the main (picture) light source at a 45-degree angle formed between the model-photographer and model-source lines, and above the model's head. Try moving the source to achieve a triangle of light on the model’s face, on the half of it that is distant from the source. The shadow from the tip of the nose touches the corner of the mouth.
- Find out more: The best external camera flashes for portrait photography. Comparative test of 6 models.

Highlight your hair
Place the second light source with a tube behind the model - in a position opposite to the main light source relative to the model. The second source gives directed hard light to the model’s hair. Finally, use a reflector to highlight the shadows on the face, on the side where the light from the key source creates a triangle of light.

Tune in
Turn on the manual shooting mode on the camera, focusing on the picture on the camera screen and the histogram, achieve normal exposure. Make sure the shutter speed you shoot at is not faster than the sync speed, which is usually 1/250th of a second. ( approx. translator - the synchronization shutter speed for your camera is indicated in the instructions, it can also be equal to 1/200, 1/180 seconds and other values). Now everything is ready for shooting. Create comfortable conditions for the model to remain relaxed, even though you may be excited about the upcoming creation.
How to create a beautiful highlight in a model's eyes?

Glare in the eyes is the result of reflection of a light source from the mirror surface of the eyeball, usually it white. Most serious photographers ensure that the highlight is in its place and looks attractive. And there are reasons for this.
Without highlights, your subject's eyes may look slightly lifeless and flat. The shape of the highlight depends entirely on the shape of the source and how far and high it is located relative to the model's face.
Exists general rule: The highlight in the model’s eyes should be positioned like the hand of a dial at 10 o’clock or 2 o’clock.

Explore
In this article we mainly focused your attention on technical side creating a home studio. But don't forget about its artistic component. Look through magazines, go to exhibitions of those artists and photographers whose work you like, make written notes about everything that may be useful for shooting: manners and styles of shooting, poses, color combinations, tones, textures.
Make notes, something like wish cards ( approx. translator - moodboard, like English. "mood board» ). Do them in order to develop your own style, create principles, reference points, of your own style.
Melt the ice
Communicate with the model in advance, or better yet, try to arrange a meeting. Regardless of whether you are planning a fashion shoot, a family or business portrait, this approach will help establish trusting relationship between you and the model so that both you and the model feel more comfortable during the shoot. Offer to prepare for the shoot together - create a moodboard together, which will help you take into account the model’s expectations.
About a smile
Try not to get caught up in stereotypes about what a good portrait should be. A “Hollywood” smile is not always the basis for the best photo. More subdued, deeper emotions will help create the more expressive, captivating photographs we suggest you strive for.