How to make an iron man breastplate from cardboard. DIY iron hand. iron man hand
Preparing for New Year's holidays or for a child’s birthday, this is not only a gift, but also the creation or purchase of a costume of a favorite hero.
What do boys dream of being?
Iron Man, Spider-Man, Assassin, Astronaut, Alien, Robber, Pirate, Indian, Knight, Batman, Robot...
Parents solve the problem of purchasing or making a suitable suit. Those who have more time and a creative streak are happy to solve the question of how to make a costume iron man or assassin, spider-man in favor of making it yourself.
How to make an iron man suit?
Please note that there are several costume options, so before you start creating, choose the option you like best. Iron Man Mark VII is considered the most spectacular.
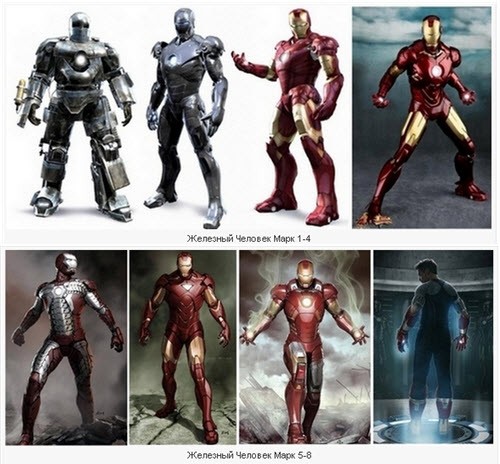
It is this model that will be discussed, although the creation process itself is easy to apply to any costume.
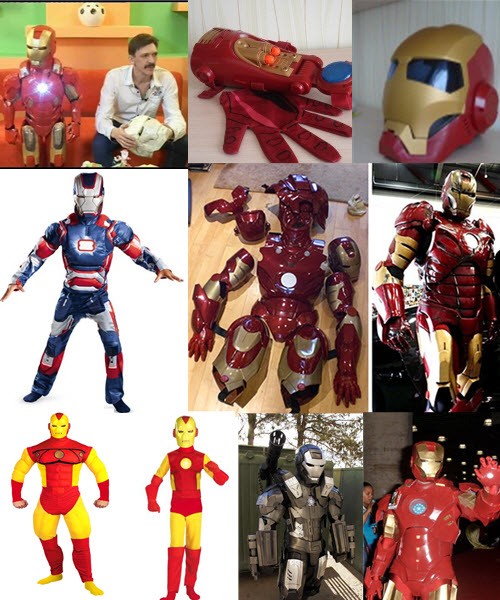
There are many variations of this costume, from the simplest ones made from fabric to those made from paper.
![]()
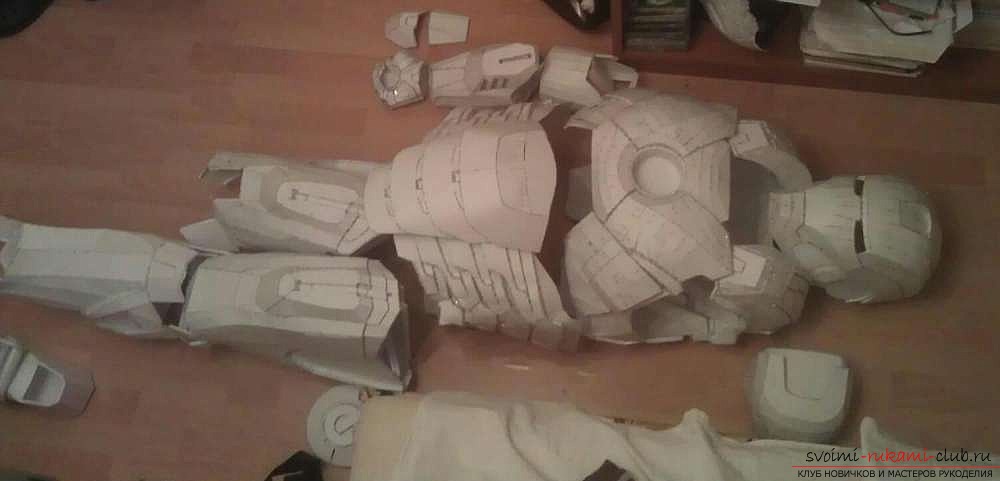
Making an iron man suit from paper
Before starting work on the costume, look at photos and video materials so that the costume is imprinted in your memory. This will make it easier for you to see any parts that don’t fit together or missing little things.
1. You need drawings according to which you will make the costume. There is a lot of this goodness on the Internet, and also get acquainted with the Pepakura Designer program. The extension of these files is *.pdo. Print them out on thick paper. This way you get the original, but additional measurements of your child and changes to the drawings are required to adjust to your size. Reprint.
2. Cutting and gluing parts. There are other options, but they are more labor-intensive - this is casting parts from plastic. For this stage you will need: a sharp stationery knife or cutter, a special cutting surface, a ruler and an awl or a ballpoint pen.
3. When the parts are cut out, you need to glue them together using PVA glue and give them rigidity. For this we use epoxy resin. Pay attention to the moving parts, we recommend taping them with tape and securing them with paper clips. Glue the helmet and other parts on the inside with fiberglass. Be sure to try it on and make sure the fit is correct.
4. Painting of parts. Use automotive enamel in cans. Externally, the parts look like the original, they shine perfectly after drying, make sure that there are no gaps or omissions. We reassemble the costume and try it on the child. Air it thoroughly before trying it on.
5. We give mobility to the parts. At this stage you will need: a glue gun, wide elastic bands, we use a narrow one for the hands, plastic snap hooks for large parts. This is how you assemble the suit and test its ability to stick to the child’s body. You will also need Velcro for the panties and neck parts. To ensure that your connections can be inserted with nuts and bolts, additionally glue them with tape, like on carabiner snaps using a glue gun.
6. Use magnets and a simple manual mechanism to open and close the helmet.
7. Electrical component. Glowing eyes, chest and arms. For a more simplified version, we limit ourselves to the glowing chest and arms. For the chest, this is a battery-powered LED night light, and for the hands, a flashlight, sawing off the unnecessary part so that it fits easily into the hand. Think about how Iron Man can turn on the glow; use the mouse button on the side of your index finger.
If this option is too complicated for you, then we will consider other options.
Fabric iron man suit
The costume consists of the following parts: mask or helmet, gloves, suit and shoes.
Iron Man helmet-mask
A helmet or mask can be made from papier-mâché. Having molded the necessary blank from plasticine, cover it with ordinary paper and water. The first 2-3 layers can be used with napkins, the remaining layers with newspaper and glued with PVA glue and water. Let the layers dry, use different colors to see which parts of the helmet you haven't glued.
Every 2-3 layers should dry for about 10-12 hours to give the necessary rigidity. If you want a voluminous mask, then you need to remove it after 5-10 layers, carefully cut it and continue gluing, hiding the places of the cuts.
We prepare the finished mask for painting using sandpaper, cleaning the areas for the eyes and other places in contact with the child’s body. Carry out painting, as in the first case, with car paint from cans.
iron man suit
Cut and sew the suit itself, use foam rubber to give volume to the necessary parts so that the relief is noticeable on the chest and other parts. Gold-colored stripes to match the original costume.
In a simplified version, it is used: a yellow turtleneck and trousers; red ones are put on over them: panties, a vest, gloves, and red knee socks on the ankles.
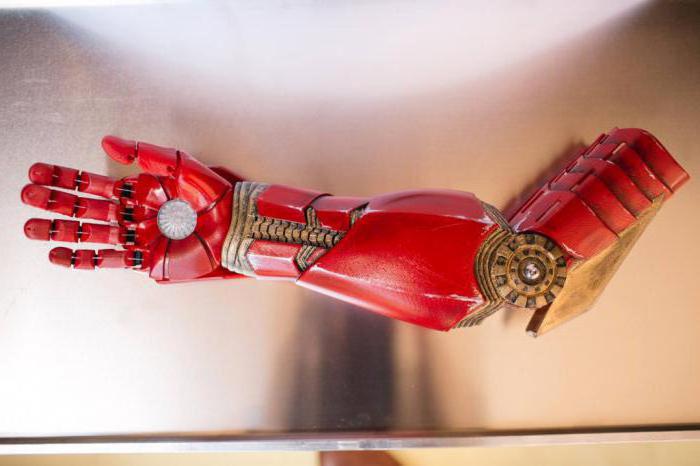
iron man hand
If the glove version does not suit you, and you decide to make a more complicated version, in communities dedicated to the film, there are detailed instructions for making a luminous hand.
This suit is offered to be made to order, but the problem of repeatedly trying on and adjusting the suit is quite difficult to solve.
If your baby wants to be an iron man, you can give him a dream, the proof is in the video. You just have to stock up on time to make the costume and patience - these are the most valuable components. In order not to rush, you can start looking for drawings, printouts and adjustments now, since most often there is no time before the holidays.
We offer 2 more DIY costumes for boys.

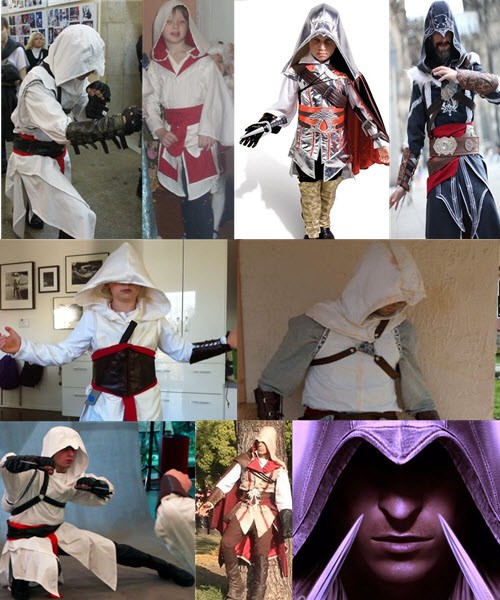
How to make an assassin costume?
The costume is: a hood, a cloak or cape, a robe or tunic, trousers, sleeves and greaves, a hidden blade, a sword, a saber, a mount on the chest for a weapon, a belt.
Since there are several variations of the assassin costume, let’s look at the simplest ones to implement at home.
Tunic for assassin costume
For a tunic or robe, white or gray fabric is used. The length of the tunic varies, so it depends on specific model, but the hood is the same for everyone and should hide the face. Look at the photo, you will see that a corner is sewn onto the finished elongated version of the hood.
The shape of the tunic in front resembles an elongated shirt, the edges have stripes in the shape of parallelograms. The sleeves are voluminous and smoothly transition into oversleeves, the fabric used is light and holds the pomp.
pay attention to reverse side tunic, like the cloak, is red.
Belt and other accessories of the assassin costume
The glove and the sleeve must be one piece and provide the ability to hide the dagger in the hand. The belt is always wide, in some cases with different symbols.
Greaves should be able to conceal weapons.
For a chest connection to carry a weapon on your back, you can use old belts, connecting them through a ring.
Small details in the form of stripes or red triangles on the tunic emphasize the effectiveness of the image.
The cape can be white or brown depending on the chosen costume.
Over the tunic you can wear a vest, to which a hood will be sewn and edges with stepped edges, or the hood can be sewn to the tunic, then the unbuttoned vest will have a collar and an opening lapel, which can be trimmed with red details.
Assassin Costume Pants
Any plain colored trousers and not trousers with arrows will do. Experiment with bloomers; it’s possible that your baby will like this option more.
For special fans, it is worth consulting with your child, he will point out the missing details himself. Be sure to do several fittings to eliminate any inaccuracies and to see the entire assassin costume in its entirety.
If your boy is a Spider-Man fan, then the next part is for him.
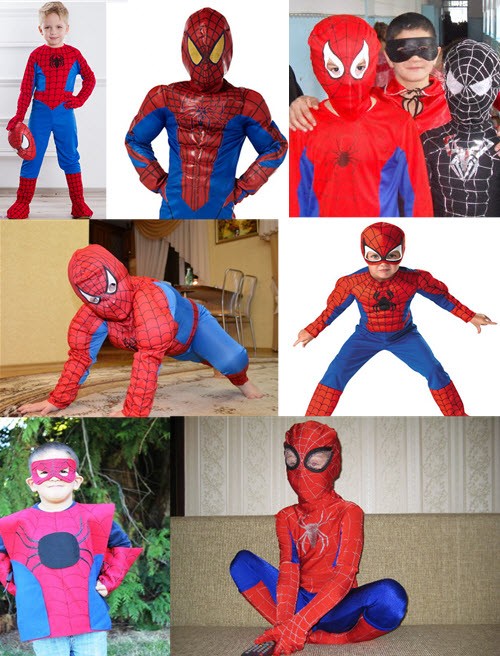
How to make a Spiderman costume?
The costume itself consists of the following set: mask, suit, gloves and shoes.
Spiderman mask
It can be made from papier-mâché or use already sold plastic ones. The mask should stay on the child’s face; to do this, use a Hungarian elastic band.
Another option for creating a Spider-Man mask from a T-shirt.
There is a variant of a crocheted hat instead of a mask, this is how it turns out child's face open.
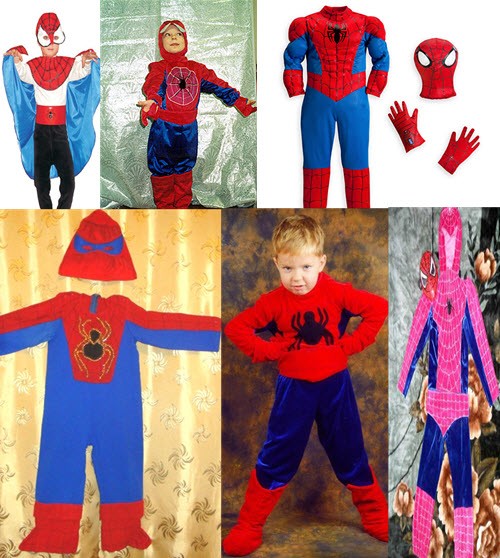
Spiderman costume
In the very simple version- these are blue trousers and a turtleneck, trimmed with red sections with embroidered cobwebs.
The option of a one-piece jumpsuit with a zipper at the back has a number of disadvantages, including the inability to remove it yourself.
Using different textures of fabrics, the stripes look different; to give relief to the torso, use foam rubber.
The sleeves should fit snugly around the wrist to hide the edges of the gloves.
Another option is three-quarter sleeves and long gloves.
Completely covering the child's face, better under a mask than with a cloth, as it is uncomfortable for the child to breathe.
Spiderman shoes
Felt boots made of red fabric, worn over shoes and without soles; elastic bands are sewn along the contour in this place, but in this case they can move.
One-piece fabric boots are more suitable.
Remember about the spiders on the suit itself and think about possible special effects with cobwebs.
Your costume is ready, do the final fitting and enjoy the enthusiastic screams of your child.
For very young characters, use simplified versions of costumes, putting comfort first; for older children, there should be a resemblance to the original.
What do parents need to remember when making their own costume for their child?
1. It is better to choose natural fabrics; the child will run and jump in this suit for several hours. It should be light and not hot.
2. Convenience and the ability to easily remove it yourself.
3. Hygiene, it is better to exclude parts of the costume that come into contact with the child’s mouth and nose or make a gap of several centimeters.
4. Safety first. Let your child try on the costume at home, walk around, run and jump.
If you doubt your abilities, then start making a costume now, so you will have a lot of time. And if you see that it’s difficult for you to do it yourself, you can buy another costume.
We are confident that you will be able to make your baby's dreams come true. Inspiration and creative determination!
Exists a large number of popular superheroes who save this world. Thanks to comics from Marvel and DC Studios, we have the opportunity to observe their destinies from TV and computer screens, from comics. Many of us would like to have similar abilities and also save the world from evil, using the most noble deeds as our main weapon.
Nevertheless, fan culture many characters generate their own ideas. For example, you can now make your own Iron Man suit using only certain technologies and schemes.
iron Man is a popular Marvel comics character who is a multifunctional robot under human control. Tony Stark- the wearer of this suit, made it in order to save himself and the world from militant and bloodthirsty pests. You can also make your own costume using modern advice and lessons from experts.
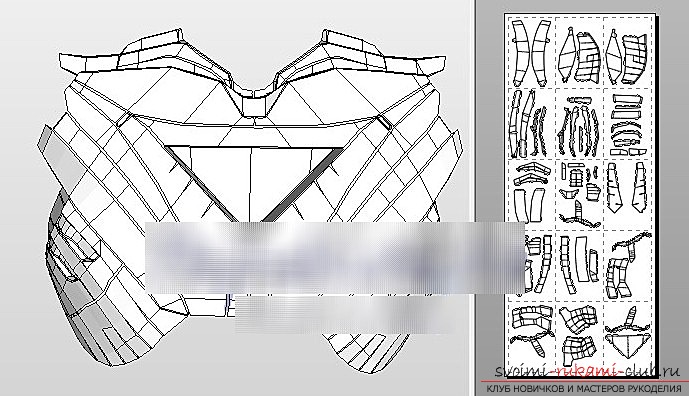
Papercrafting is one of the techniques for creating a beautiful suit. You can make an iron man suit thanks to Papercrafting technologies. What it is? This scheme includes the use of only paper and gluing using special technologies. Such a costume will not last too long, however, it is perfect for a themed party or for making beautiful photos in the image of your favorite character.
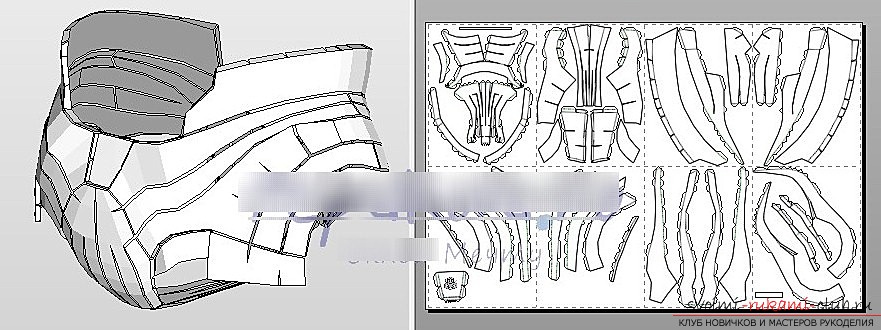
In order to make similar costumes it is necessary to use drawings on paper, which can be recreated from the attached drawings. The costume consists of a torso, head, legs and arms. Accordingly, each element has its own drawings, each of you can redraw them or print them using a printer. Then, these elements must be connected to each other so that they form a one-piece suit.
An iron man suit is a rather difficult and time-consuming undertaking for any needleworker. However, all the basic techniques and materials for creating such a suit are available to everyone. You can use this knowledge and do your own DIY suit. A large amount of material and the necessary skills will allow you to make your own version of the iron man suit.
You can decorate a paper suit at your own discretion, everything is entirely up to you. You can choose the look decorate it with paint or markers. Some people prefer to attach papercraft to various, harder elements to maintain the durability of the suit.
This way, you will have an incredibly beautiful and quite detailed version of the Iron Man suit, which can be used for a wide variety of holidays.
Such a costume is quite simple to create if you can master these patterns and cut them out with scissors, and then glue them together. Wear an iron man suit carefully enough so as not to damage the frame. However, this option is more suitable for one-time use.
When they talk about an iron hand, they usually mean either just a model, or The article will tell you how the first sample is made, and how it is turned into the second. But before we look at how iron is made, let's look at what science has achieved now.
About the state of affairs
Just 50 years ago, a person who lost his leg or arm could only dream that one day he would be able to make up for his loss thanks to scientific developments. And not just to get something, but to be able to function as if the organ was in place. Nowadays, quite a large number of companies and technology enthusiasts are engaged in the creation of iron hands. Simple devices that cannot perform the actions of fingers are simply called prosthetics. While those that can detect signals from human brain and react to them with bionic hands. Due to the high cost, not everyone can afford such a device, but you can make it yourself. The iron one may not turn out as perfect as that, but even this option is better than nothing at all. And now we suggest you familiarize yourself with how such a device is built and how it is made.
Device
 An ordinary “cosmetic” iron hand looks like a human one. It can be made of plastic and already look like a regular one, or made of metal - in such cases it is usually covered with synthetic leather. The bionic iron hand is designed in this way: when a person wants to move a finger, the brain sends a corresponding impulse to the muscles. The sensors pick up these signals by contracting the surviving muscles. Each sensor is responsible for its own “field of activity,” so if it detects an impulse, a certain finger will contract. The possibilities for using this technology are wide, and even if the arm above the elbow was damaged, the normal functioning of the prosthesis occurs without problems.
Installation process
It may take 5-30 days to connect and set up the iron hand. The time depends on the size of the body part being replaced, the patient’s diseases and problems, as well as his age. Then you need to get used to the new limb and understand how it should be controlled. Typically this process lasts a week for young people; for pensioners it can take a month. But, alas, using an iron fist is not always possible. The fact is that if too much time has passed since the amputation of the limb, then the muscles will atrophy, and then controlling the device will be performed with significant difficulties or the signals will be too weak. Made from iron, it has the peculiarities that it will be necessary to study the anatomical structure of your case in order to install and then correct the placement of this device.
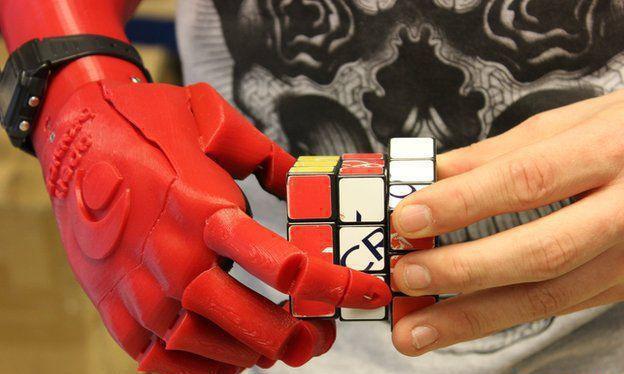
Possibilities
 The more complex and expensive an iron hand is, the more similar it is to a human one. So, if we discard cosmetic devices and focus exclusively on bionics, then we can say that the simplest models can usually make only one grasping movement. More complex ones can perform dozens of movements, but the cost of creating such a technique will be much higher. Made of iron, it can perform several movements or only one. But even at home, you can create equipment that can satisfy the main range of applications.
Reduction in price
The cost of conventional prostheses ranges from 500,000 to 5,000,000 rubles, and given their dependence on the price of currency (since the vast majority of equipment is imported), this price can rise significantly. But there is a potential opportunity to reduce the cost - 3D printers. Most foreign samples printed in this way can boast a price of 100,000 - 150,000 rubles. The greatest success was achieved by the Ukrainian Victor Baklan, who was able to create a bioelectric prosthesis for holding things at a cost of only 1,500 hryvnia (4,500 in our money). This solution is a very effective answer to the question: “How to make a 3D iron hand with your own hands.” It also shows that this technology has significant promise here.
How to create a “cosmetic” iron hand?
 Where to start? Let's say you want to make an object such as an iron man's hand. To create it, the minimum required set is a file, a soldering iron and the desire to work. All this is necessary if it is to be created from metal. When working with other materials, the set will change. So, first you need to decide on the parameters of your own hand and make the initial structure. And then additional components will be put on it. The most important part here is the frame. You can follow certain drawings, developing an already developed concept, or start your own creativity. If there is no desire or opportunity to devote significant time to this, then an iron man’s hand made of paper is the simplest option. True, it is also the least durable.
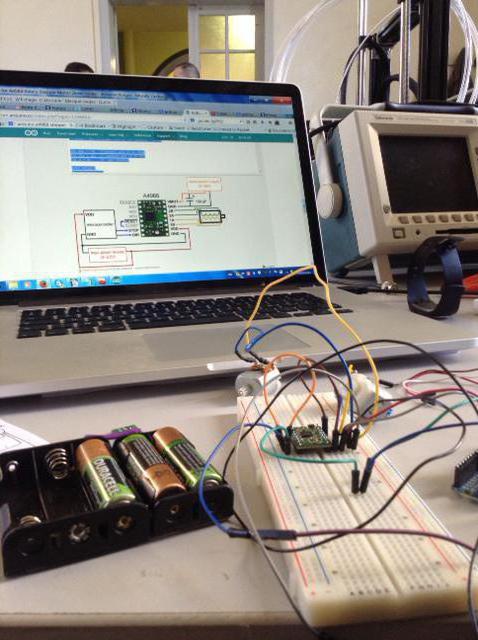
How to create your own bionic hand?
This point is already more complex. It should be noted that if you do not have sufficient experience in creating such devices, then it is unlikely that you will be able to get creative here. Therefore, it will be necessary to completely follow the design specified in the topic. To implement the movement mechanism, you can use servomotors as the most suitable in terms of volume/power ratio. When working, you will always need to be careful and do everything carefully. An important step is to configure the sensors in such a way that they receive signals for those fingers that should be (a book on the anatomy of the hand will help you with this). Of course, everything will not work out the first time, so you will have to further hone and bring the technique to mind, but the result will be very pleasing.
Conclusion
 Based on the designs presented here, you can develop your own versions of iron hands. They can differ in both appearance, and in terms of capabilities and functionality. Of course, at first it will be difficult, but then you will be able to create various designs “for all occasions.” In addition, if a goal was set and the search began for how to make an iron hand, then part of the path has already been completed. You just need to not stop.