How to make clothes for a dog from an old sweater. DIY cat bed made from an old sweater
While wandering around the Internet, I came across interesting idea creating a bed for cats (or dogs) from an old sweater or jumper with your own hands. The idea is simply cool because it requires virtually no financial costs, just a little work and a lot of love for your pets.
I myself have two cats – Gina and Lyusenka. Gina has been living with us for a long time, more than 5 years. And Lyusenka is still a kitten, she came to us in the fall.


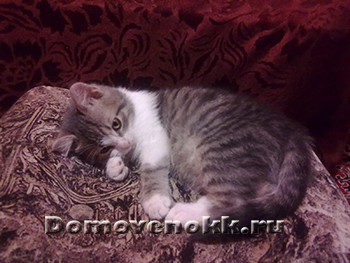

So for them, I decided to embody the idea of a bed from an old jumper.
For this I took:
- old jumper;
- threads with needles;
- scissors;
- two old pillows.


Description of work
I left one pillow untouched and happily gutted the other. 
If you have a sweater, cut off the collar and sew up the neck. If you have a product without a collar, then just carefully sew up the neckline. 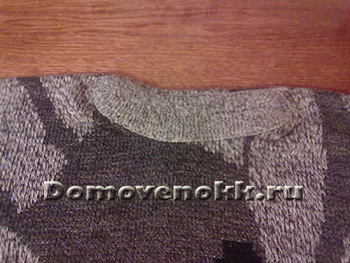


I put a whole pillow inside and sewed the bottom.


The inside of the upper part of the sweater was stuffed with padding polyester from a pillow through the sleeves. 
I sewed the sleeves together and evenly distributed the padding polyester in them. 
The last thing I did was sew the sleeves to the body with a pillow inside. 
The result is a cat bed made from an old jumper. 
Of course, the cats immediately checked the bed to see if it was comfortable and edible.


I can say that both Gina and Lyusenka really liked the bed.
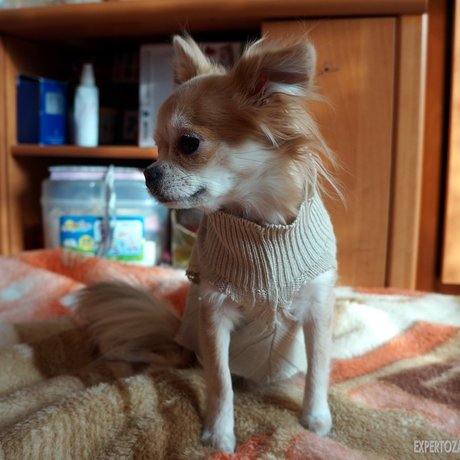
A bed made from an old adult sweater or jumper turns out to be large. It can be suitable for dogs too. And for cats you can make a bed from an old children's sweater.
I used old pillows as filling. You can use both new padding polyester and old unnecessary things. Everything that can be found on the farm.
And this is a photo of beds made from old sweaters made by other people.


If you have a pet, then you can make such a bed for him from a sweater with your own hands. And I think that your pet will be immensely happy and grateful to you. Of course, for a cat you need to have not only a bed, but also many other devices, which you can read about in the article.
My cat had kittens :)
Description of the question
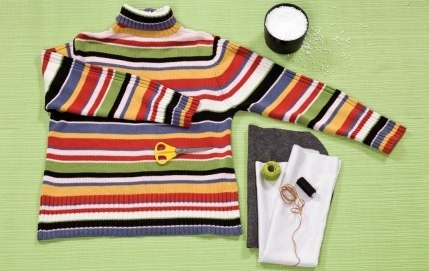
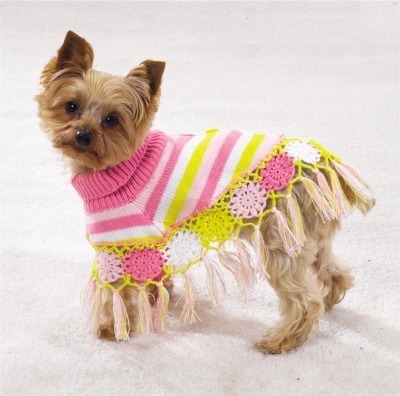
Dog - best friend humans, and the owners of small tame dogs (Chihuahuas, Yorkshire terriers, toy terriers, etc.) will doubly agree with this. After all, when you buy a dog three times smaller than a normal one, you get five times more affection, love and good mood. I personally feel offended when they say about small dog breeds that they are ugly, stupid and that keeping them is generally the lot of narrow-minded glamorous ladies. This is what people say who have not actually encountered these animals. The main charm of these breeds is that they are eternal puppies, with devotion and loyalty no worse than bulldogs and Labradors. A little dog is not just an animal, but in fact full-fledged child and a companion for all occasions. And any child, no matter how much he likes it, just wants to be dressed in cute clothes. However, after you see the prices in a pet store for such outfits, you are horrified to realize that you can buy yourself a dress for almost the price of a dog’s dress. But in fact, sewing for our younger friends is not at all as difficult as it might seem at first glance. I offer an option for sewing a wonderful dress for a dog, which does not require special skills or equipment, and, moreover, does not require any special expenses, since we will use a sleeve from an old sweater as the base material. Not only economical, but also convenient!
Step by step solution Every home probably has an old and long-needed sweater that has been on its way to the trash heap for a long time. But you'd be surprised how well it can still serve! In our case, not the entire sweater will serve, but only one sleeve. So, cut it as far from the end as possible. The beauty of sleeve sewing is that you have an almost ready-made base and there is no need for a pattern. Please note that your dog should fit comfortably in the volume; who likes clothes that are a size smaller?
 Now we take a submissive dog (if yours is not so submissive, you will have to sweat a little) and apply the future dress to mark the length. First turn the sleeve inside out, and it is convenient to mark with a felt-tip pen (just do not overdo it with pressure so that the color does not imprint on the front side).
![]() I celebrated brown so that it is clearly visible. The length from the very edge to the first mark is twenty centimeters. A little lower is the second mark at a distance of about five centimeters. The bottom line is the maximum allowable length along the back (do not make the dress very long, as adding the length of the frill may not be comfortable for the dog).
I celebrated brown so that it is clearly visible. The length from the very edge to the first mark is twenty centimeters. A little lower is the second mark at a distance of about five centimeters. The bottom line is the maximum allowable length along the back (do not make the dress very long, as adding the length of the frill may not be comfortable for the dog).
 Now we connect the marks as shown in the figure: starting from the top, we move to the sides at the level of the second line. Of course, if you want a different model, but the bottom may just be flat, it all depends on the model you choose.
 Cut off the excess along the line. Also, it is important what material the sleeve is made of. If the knitting is loose (threads come out easily), then sewing can turn into real hell. So I advise you to choose a base material that is as finely knitted as possible.
 Turn the product over. To figure out where the back will be and where the breast will be, a seam will help us. In clothing for dogs, the opposite is true: the back is the main part that will be visible and needs to be decorated, and the chest is the part that no one can see. Based on this, the side where the seam is located will be the inner side. The length at the chest in a dress should be significantly shorter. Walking down the street in beautiful clothes, unfortunately, the dog does not think about whether it might get dirty, and goes to the toilet, regardless of whether the length of the dress allows it or not. So let’s be more prudent and, if the length of the entire dress is twenty-five centimeters, then the length of the front part should be about seventeen (it all depends on the size of your dog). Mark the desired length with an arc.
 And now we cut off the excess along the drawn line.
 All clothes need holes for paws. Considering that there will be no sleeves, and holes for the legs are also not needed, we only need two holes. We draw two ovals with a felt-tip pen, leaving a distance of about two centimeters between them. To ensure that the circles come out the same, you can first draw a template of the required size on a sheet of paper. It all depends on the parameters of your dog, but mine came out with a diameter of about eight centimeters. Then place the template in the desired place and trace it with a felt-tip pen.
 Carefully cut out holes for the legs. I advise you to cut out such small details with sharp nail scissors, it will be more accurate.
 Time for fittings. You don’t have to turn the product inside out so that you can mark problem areas directly on the dog. Here it is important to pay attention to the holes for the paws - is it comfortable for the dog to walk, is it not cramped. The more holes you make, the better. Another equally important point is the length, both back and front. The length on the back is important so that the dog can not only walk comfortably, but also sit down, and also freely wag its joyful tail at the sight of such a caring owner. The length at the chest should not hinder walking or interfere with going to the toilet (I advise you to make this length as high as possible so that you do not have to wash the dress after each walk). If you notice any errors somewhere, it’s time to correct them before it’s too late.
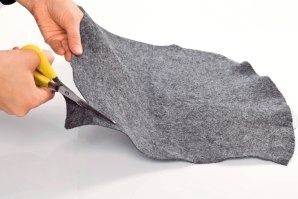
 When the base is ready, let's do the decorations, namely the bow. To do this, cut out a rectangle of about eighteen to twenty centimeters from the leftovers. Of course, you can do without a bow altogether or make it smaller or larger in size. Also, in addition to a different size, you can use another material, for example, knitting of a different color or ribbon, or maybe just lace. It all depends on your taste.
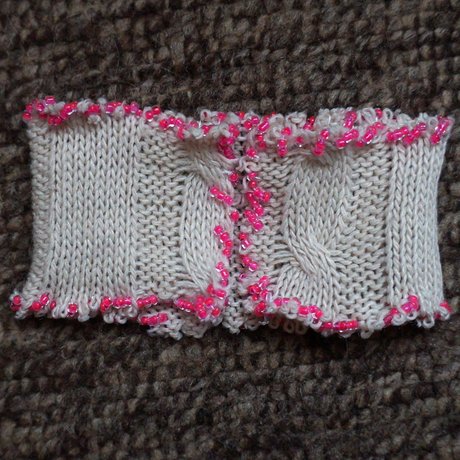
 As you probably noticed, the threads are bristling at the ends, which looks very sloppy. There are two ways out of this situation. First: bend half a centimeter inward and sew with threads to match the color of the material. And the second way is what we will do. This method is not for weaklings, but I really like the result. To prevent the threads from sticking out, we will trim the edges with beads. To do this, choose beads (I have Pink colour) you need a shade, but also pay attention that the eye of the needle passes freely and does not get stuck inside ( eternal problem). In addition to the beads, you will need a container for beads, the best option, which everyone definitely has - a jar lid.
 Now comes a step that is easy to do but difficult to explain. I have schematically depicted your movements in the drawing. First step: when embroidering with one thread (that is, a knot is only on one end, and the other is always free), make a large knot so that it does not fit through the fabric, and thread the needle so that the knot remains on the wrong side. Now pick up three beads and insert the needle a little to the right of the knot on the wrong side. Second step: Pick up three beads again and wrap them around the edge again, removing the needle from the front side. Third step: repeat the second stage, and you will see how the threads gradually hide under the beads.
 When you sew all the edges around the perimeter, you should end up with a base like this for the bow. I’ll say right away that the work is painstaking and long, but it’s worth it.
 Place the rectangle face down on the table in front of you. Now fold the edges towards the middle. Immediately see if this size of the bow suits you (attach it to the dress), and if it’s too big, then you can cut and overcast the edges again, but if it’s too small, you’ll have to accept it. Now, using threads matching the color of the fabric, baste the folded edges to the middle. Don't worry if there are sloppy seams on the front side - there will be one more detail on top and nothing will be visible.
 Cut out a square approximately six by six. Fold it in half with the wrong side and sew along the side edge with threads. Then turn this structure outward.
 Wrap what came out in the previous step around a bow. At the back, secure the middle with threads, but make sure that the threads are not visible from the front. Arrange all parts of the bow beautifully. This is what a knitted butterfly should look like.
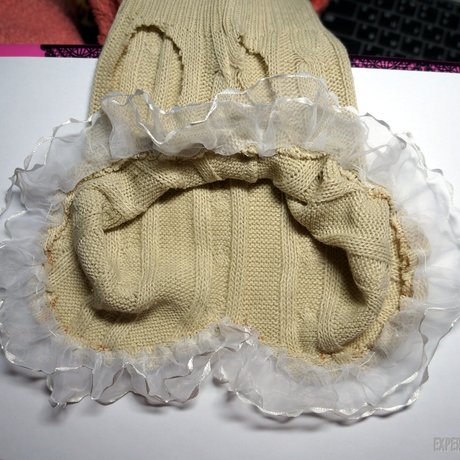 Take the lace you prepared for the frill at the bottom. It can be of absolutely any type, but this is exactly what I came across. Now turn the edge to the wrong side along the entire perimeter of the bottom by half a centimeter (even less is possible), and baste with a regular seam. When the edge is folded (this was done so that the threads would not stick out), apply lace from the wrong side and baste again with an interfacing stitch. With this type of seam, the thread is tensioned evenly, the stitches are spaced at a distance of about a few millimeters. However, pay attention so that the seam is not noticeable from the outside; I advise you to make the stitch longer from the inside, and only lightly catch the fabric with thread from the front part. There is another option for decorating the bottom of the dress - to cover the edge with beads, as you did with the bow. But in this case, there are two obvious disadvantages - you will spend three times more time and effort, and with a lace frill, in my opinion, it is much more beautiful.
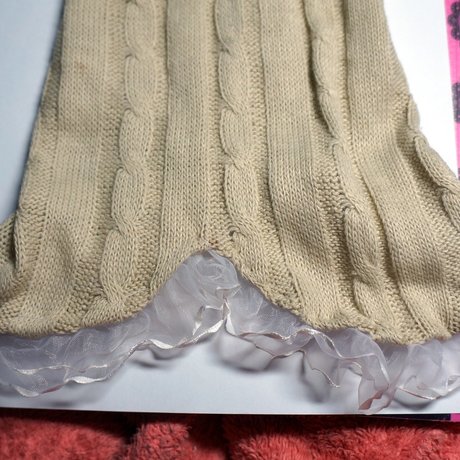 This is what the bottom of the dress looks like from the front side. Clothes for a real princess.
 Let's return to the holes for the paws. By analogy with how you turned up the hem of the dress at the bottom, do the same with these holes. Also fold about half a centimeter inward with a spacer seam. Or, if you have time and desire to make the clothes more elegant, sew around the edges of the holes with beads.
 Sew a bow to the bottom of the dress, just above the hem. I advise you to attach the bow more firmly not only in the middle, but also to baste its edges to the dress so that the decor can withstand combat conditions during walks.
 We continue to decorate clothes. I chose this red glass bead to decorate the fabric, but everything here is very individual. If the base material is made of a beautiful knit, you may not even have to embroider it, because the dress will look complete without it. However, in my case, I considered it simply necessary to somehow diversify the outfit. We take the jar lid again, pour the required amount of beads into it and check whether our needle is compatible with the bugle bead holes.
 I decided to do the embroidery in the form of stripes from the beginning of the collar to the end of the dress. A beautiful combination with bugles is when the beads are laid parallel to each other at a certain angle. Of course, other options are also possible, for example, laying beads directly under each other or “twig”, or simply in one line... You can find a lot of examples on this topic on the Internet. The very nice thing about bead embroidery is that the scope for imagination is simply unlimited and there is simply no wrong way to do it.
 In order for the stripes embroidered with red beads to match the dress as a whole, I decided to decorate the bow with the same beads. To do this, taking two beads at a time, I embroidered several parallel strips in the middle of the bow. This is my decision, but you can come up with something else.
 Well, to finally make a dress for a real princess, we’ll use small white pearl beads. The knitting of my sweater originally had a cable pattern, and I sewed a bead in the middle of each new turn. All that remains is to try it on and make sure that the dog is comfortable.
 This is what happened elegant dress.
 All that remains is to try it on and make sure that the dog is comfortable.
18 reasons not to throw away your old sweater: cozy DIY crafts
A familiar situation - the closet is packed to capacity, there’s nowhere to even stuff socks, but all you can wear out of it is a pair of jeans, an oversized cozy sweatshirt, two simple sweaters and a T-shirt bought a hundred years ago? Because, no matter how beautiful and elegant a thing is, we will always be drawn to coziness and comfort. And that is why some new clothes, after their only release, lie untouched for years, and some are worn out to holes. Then they become “household”, patched, trimmed and worn a little more... And then more or less “living” flaps are cut out of them and used as potholders, kitchen towels, etc.... Conclusion - with your favorite thing as with It is very, very difficult to separate from a loved one! So I suggest reviewing your wardrobe for “no five-minute throwaway items” and giving them a second chance! After all, how many useful, beautiful and original things can be made from the same sweater!
1.Socks
These bright and warm socks are sewn in one sitting from the sleeves of an old sweater. You just need to cut a piece of the sleeve to the desired length and carefully hem it at the cut site so that the edge does not fray. These socks look very stylish under high boots or on top of ankle boots.


2. Poufs and pillows
Puff bags are now in fashion. They are very light, as they are filled with weightless holofiber or padding polyester, comfortable and soft like down pillows. In addition, such poufs look quite stylish. It's easy to sew them yourself. All you need is: an unnecessary sweater, thick fabric for the bottom, fabric for the inner cover, stuffing, scissors, needle and thread.


Sew the inner cover and stuff it with holofiber or other stuffing, and secure it with thread. Cut off the sleeves from the sweater and sew the resulting holes from the inside. You insert a padded cover into the sweater and sew a bottom cut from thick fabric at the bottom.


You can also try sewing pillows...


3.Bags
Unusual knitted bags can be easily made, even if you don't like to knit! You can use a ready-made knit of an unnecessary sweater - just cut out two pieces of the desired size and shape, sew them together, attach the handles, make an inner cover with pockets for your favorite little things, and the new thing is ready!


4.New dress or skirt?
If you have several relatively new things that you don’t like or that are partially out of order, you can combine them into a new thing, for example...


5.Fashionable winter accessories
From one sweater, if you try hard, you can sew yourself a very original set of warm clothes - a hat, mittens and even a scarf! And if you decorate them with felt flowers, ribbons, beads or buttons, you will have a few more favorite things.


6.Pencil
Cut out a piece of fabric from a sweater or other unnecessary knitted item and sew it for a glass ( tin can without a lid, a miniature coffee can, an old cup with a broken handle...) a warm case - now you have a cute pencil holder.

7.Diary case
Notebook covers, unless of course it is high quality leather, wear out quickly. Sometimes you don’t even have time to fill it halfway - and it’s already pretty tattered. Sew him a cover from a not very rough sweater! Choose a brighter piece with a pattern, or decorate it yourself.


8. Clothes and soft bed for your beloved pet

The simplest scheme for a fashionable jumpsuit...

But a comfortable and practical bed for your pet...

I think it’s easy to guess how it is sewn. Cut off the top of the sweater from the bottom (draw a straight strip just on the “chest” and cut). Sew the neckline, sleeves on the “tassels” and the bottom from the inside, and fill it tightly with stuffing. From the “bottom” of the sweater, cut out and sew an oval pad. Fill it with stuffing too. Now sew both parts and that's it!
9.Vintage candlestick
For this candle holder, all you need is jars and scraps of knitted sweater!


10. We insulate flower pots for winter

11. Knitted bracelets


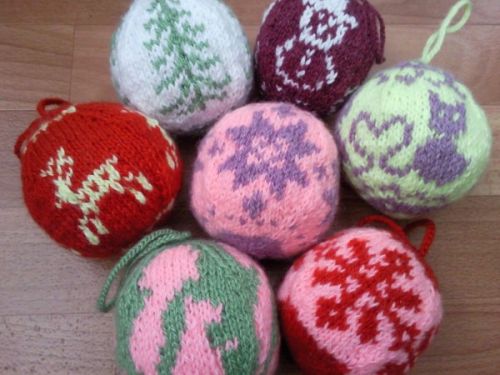
12. Christmas balls in a “fur coat”
An original way to update New Year's toys is to cover them with knitted patches. Such toys “warm” themselves.

13. Bottle case
Another idea on how to set the New Year's table in an unusual way! Let all the bottles be in winter “fur coats”.

14. Sox balls
Sox is a variation of the game “footback”, in which all sorts of tricks are performed with a small ball filled with sand or cereal. They are mostly made from old socks, but you can also use sweaters for the same purpose! Children, or your favorite cat, will especially be delighted with such a fake!

15. Potholders


16. We insulate our phones, netbooks and e-books
![]()


17. Warm coat for cups

18. Knitted decor

Friends, in this article I will tell you how to make, with your own hands, a bed for your beloved dog from an old sweater or jacket.
Easy and simple, with the help of this master class on sewing a dog bed.
An old sweater or jacket will come in handy - it will become a bed for your dog after the remodeling process.
This handmade dog bed is an original sleeping place for your pet.
A master class on sewing a dog bed for your attention.
For the remodel you will need:
−1. old sweater
−2. pillow or synthetic padding
−3. scissors
−4. threads
−5. needles
−6. padding polyester
Progress of sewing a dog bed:
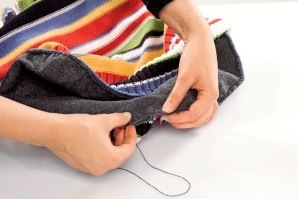
1. Let’s prepare your old sweater, preferably a thick one. For example, this sweater with a high neck.
2. First, let's cut off the neck (CUT 1), we will use it again - don't throw it away.
The figure below shows everything.
3. The hole from the neckline needs to be sewn up nicely (STITCH 2).
4. Sew the sweater with a needle and thread as shown in the picture (STITCH 3).
6. Sew the sleeves to the body (SEW 4 and SEW 5).
8. Now sew the bottom of the sweater (STITCH 6).
9. Sew the sleeves together, you can add the previously cut neckline if there is not enough fabric (STIT TOGETHER 7).
10. We sew the sewn sleeves to the bottom of the sweater in the same way as we sewed the sleeves in step 6.
That's all - the dog bed is ready.