Walkthrough of Rice of the Tomb Rider. Rise of The Tomb Raider guide: passage of the tombs Ice Ship, Soviet Mine, Ancient Cistern and Voice of God
Rise of the Tomb Raider - a new game about the adventures of Lara Croft. This time the famous adventurer will be carried into the snowy wasteland of Siberia. Here, the Tomb Raider will find a lot of secrets and mysteries that will have to be solved in the process of the Tomb Raider. Challenges are small missions that will occur in each location of the game. Our short review will tell you how to complete these quests.
Rise of the Tomb Raider: Challenges
The first task will become available at the very beginning of the game, in Syria. The mission called "Hang 'Em High" is to destroy all the censers that can be found in the area. In addition, you will find several relics and documents in this area.
Siberian wilderness
The following riddles await you in this small location of the game Rise of the Tomb Raider. The tests to find three relics and six documents are quite simple to complete - search the area and you are sure to find all these artifacts. In addition, in the Siberian wilderness you will have to complete another challenge called “Grab and Run”. To complete this mission, find three enemy soldiers and, after killing the opponents, search their corpses.
The first challenge of this area, Into the Dark, is very easy to complete - visit any five caves. However, you don’t have to explore them, just go inside. The next task, Data Corruption, is a little more difficult. To complete it, you will need to find ten red computers on the territory of the base and destroy each of them.
There are several more missions in this area that you will complete as you progress through Rise of the Tomb Raider. Challenges called "Freedom of Thought" and "Capture the Flag" will require you to destroy posters and flags located within the base.
Geothermal Valley
In this location of Rise of the Tomb Raider, the challenge map is quite extensive. In addition, to complete these tasks you will need to perform certain actions. In the mission “Bird in a Cage” you need to catch one of the chickens, of which there are plenty within the camp, and throw it into the pen. The task will be completed when you catch 5 birds.

The next mission, “High Height Jumping,” is challenging for most players because simple jumps from a ledge don’t count here. In order for the mission to be completed, you need to find four springboards and correctly jump from them into the water. Before you make a jump, go to the edge of the springboard and hold down the key that the game offers you. Only in this case will the test be completed.
To complete the next task “To the Bullseye”, you need to find and destroy seven targets with a bow. In this case, you must try to ensure that the arrow lands as close as possible to the red circle of the target. In the "Hung in the Sun" challenge, you need to find and cut rabbit corpses from ropes. The last task to complete in Geothermal Valley is Pumpkin Throwing. In this test you need to find five barrels and throw pumpkins into them.
Acropolis
The test in this location, called “Breakage of Communication,” is quite difficult and lengthy. To complete it, you need to find six radios, each of which is hidden in improvised tents or under awnings. When searching, do not miss a single building, and then you will be able to find all these items.
scientific station
There is one challenge in this area called Scorched Earth. To pass it, you need to find and explode four fuel tanks. Each of them will not be difficult to find, because they are all on trucks and visible to the naked eye.
Path of the Immortals
To pass the test in this location, which is called “The Enemy of My Enemy,” you will need to set fire to six signal braziers. They are all located slightly above your character. Beacons can only be lit using vessels with explosive powder, which must be shot from any weapon.
Lost City
Many adventures await you in this final location of Rise of the Tomb Raider. The “Banner Down”, “For Whom the Bell Tolls”, “Burn Baby Burn” and “Hooligan” challenges are a lot of fun, but will also force you to thoroughly search the entire area. In the first test you need to find and set fire to eight posters. In the second - destroy five bells located at the beginning of the city. To complete the third task, find and light the signal torches. In the last task you need to break eight statues that you will find in Kitezh. This concludes our review of the tests of the game Rise of the Tomb Raider and wishes you successful searches.
In front of you complete walkthrough games Rise of the Tomb Raider, which is divided by location.
Peak
This is a training mission. So follow the instructions. The only difficulty that may arise here is poorly working triggers. When climbing up and jumping towards the rescue hand, make sure you get to the maximum height available and move as far to the left as possible, otherwise the trigger will not work. Same thing when swinging on a cable later - jump only with maximum amplitude. No other problems are expected here.
Syria
You need to find the grave of the prophet. Climb up until you find a gap in the wall. On the right, take the treasure and roll inside. Inside you will find a large room with a pillar in the middle. You can't read it because you don't know Greek (surprise), but if you study the fresco on the left and the fresco on the right, your level will increase and you will be able to decipher the code. The treasure is nearby, take it and move on. Outside you need to get to the other side. Nothing too difficult, just remember to double jump in the middle of the stone bridge. When you reach the desired point, climb up and go inside. After the scene, you need to break the wall on the left with an ice pick. After the flow of water, go back, jump onto the resulting bridge and get over to the other side. In the next room you need to go around the massive building right in front of you, and climb up the other side, past the spike trap and jump to the other side to the entrance to the next puzzle. This is where things get a little more complicated. When you step on the boards, water comes and washes you down. You need to shoot down the board and, without waiting for it, jump to the other side. There, right in front of you, use an ice ax to break the cracks in the wall. The water level will rise, and you can jump on the board again and wait until you are washed away. It will wash you right in front of a floating raft, which you need to quickly climb onto, jump onto the wall and climb onto the beam. After the video, run to the exit, shooting back from the Trinity bandits.
Siberian Wilderness
Go down and collect resources near the abandoned camp using the stick to highlight the necessary items. Return to the campfire and make a bow. Having upgraded everything you can, go forward to the mark and collect resources along the way. After a series of QTEs, you have to run away and press buttons again. As a result, Lara is injured and needs medicinal herbs. Having collected everything you need and recovered, you have a new task - to make a poisoned arrow against the bear. For this you will need mushrooms, fabric and trees. Collect everything you can on the way back to the camp, at the same time looking into the cave on the right, where there is a scroll and explosive ore in the walls. Also, climb the illuminated trees so you can find more scrolls and hidden resources. At the campfire in the camp, make poisoned arrows, upgrade your bow, the skills you need (I recommend thick skin and quiet jump) and return to the bear. But not everything is so simple - detachments have set out to search for you. The easiest way is to destroy all enemies one by one with a bow (remember to shoot arrows with the right trigger). At the central point, take the canister and explode it with an arrow in the cave nearby - this will open the way to the treasure. Using the map as a guide, find the prince's crown and examine it. This way you will gain the Mongolian language skill and be able to decipher the pillars nearby. Collect the newly discovered treasures on the map and go to the bear. The easiest way to destroy a predator is to sneak into the cave and poison it with a shot of a poisoned arrow, and finish it off with two precise shots to the head. If you miss, use poison again and deal damage with regular arrows. If you miss here too, run back to the edge. The bear will not follow you, and you will be able to restore your strength and create new ones. poison arrows right bumper. After defeating the bear, take its skin, collect all the items in the room and use an ice ax to break a passage into the ice cave.
Ice cave
Go down and the climb on the right will help you collect another scroll. Continue along the road and you will come to the second camp, which needs to be activated. Remember that you can move freely between camps and if you forgot something, you can always clean up the treasures later. Upgrade your ice ax and distribute your skills and move forward. As soon as you see giant ship, hanging over the cliffs, finish walking along the ledge and head along the mast to the first optional task.
Ice Ship(Tomb of Trials)
The puzzle is not difficult - you need to knock down the ice and climb up. To do this, launch the mechanism with an ice ax, double jump up the mast and jump over to the right pendulum. Wait until he goes down, get off and climb up the wall cleared of ice. Again the mechanism. Twist the stick until the left pendulum lowers to an acceptable height for jumping. Walk along the mast and jump onto the pendulum to break the ice here too. Descend and climb the ice wall using ice axes. There's a ton of treasure waiting for you, including a holy book that improves your archery skill, a second level of Greek, and a ton of gold. Having collected everything, go down cable car and pick up a medallion near the descent, which, after exploring, will reveal an important secret to you. You can continue the story mission. Upon leaving the cave and after swimming in the water, do not forget to pick up the scroll on the right.
Soviet base
Now you need to get to the Soviet Base and this is not at all easy. First, go down and examine the opening on the right. It leads to a cave with treasure and a fragment of an ancient bow. There are no riddles there - it’s enough to navigate the labyrinth well, especially since it’s circular. Once you pick up the artifact, return to the starting point. There is a new element here - kerosene lamps and crowds of enemies. Throw a lamp into the crowd and the enemies will light up. Finish off the rest with a bow. Further up the path with weak resistance and the interrogation room, where you will find the first pistol. In the hangar, destroy all enemies with a bow, or distracting with bottles and climbing up, pick up a kerosene lamp and set fire to the tank. A drawing on the wall will help you improve your Russian language skills. Move on. This is your first side quest. If you destroy all the transmitters on the map, you will not only receive a lot of experience points and loyalty, but also a master key that will open several important chests and cabinets in the level and allow you to collect a second pistol. Note that when destroying the transmitters, one is located above the cave with the wolves. You can get to it only by climbing the steep surface to the right of the cave and then spiraling upward. The rest of the transmitters are no problem. Near the rise to the plot point there is a factory building. At the top is a relic, next to it is the same cave with the wolves, and a little to the left, covered with boards, is a secret cave with another useful skill. In order to break the boards, shoot the rope and a block of stone will open a passage for you. Go downstairs.
Cistern in the Cave (Tomb of Trials)
You can immediately run towards the relic, but the boards will break off and you will fall into the water. If you go to the lower right corner, you will find a passage to a hatch and a canister. Blow up the canister and add some water. Now go back around the structure and you will find three canisters on the right. You have a difficult trick ahead of you. You need to take the canister and throw it on the raft. Then jump onto the beam and drive the raft with the canister to the other side with water. Jump off and wait for the raft with the canister to float next to the hatch. Blow up the canister and a new passage will open. Inside you need to climb up and break the wall. Jump down. Throw the canister back onto the raft and repeat the trick with the lever. Now you need to have time to swim to the raft and throw the canister into the broken window. Go all the way back, take the canister and blow up the last hatch inside. The water will reach its limit and you will be able to take away the skill. Head back to the Soviet base. You can explore the wolf caves, but there's nothing special there. The cave in front of the story marker will open up another dungeon for you. You can go in and complete the task in the dark. Return to the last bonfire, destroy all the enemies at another camp. Enter the back ones and discover a merchant who is ready to exchange valuable items for gold coins. Higher up and down. Enjoy the plot twist.
Jail break
Break off the pipe and break down the wall. Pick up a new bow upgrade on the table - cable. Break down the beam above the door with a cable and get out. Hack the box with a master key and go outside. Here you need to strangle all the enemies in the level one by one. Start on the right, tower and slowly choke them one by one. Then destroy all the laptops to complete the side task and shoot the cable to make your way to the window. Another video. Get out and go forward. Attach the rope to the cable and then to the winch and get rid of electricity in the water. Get a machine gun. Forward again. You will be presented with a grenade with shrapnel, which can be made from a tin can. Don’t refuse, and when you’ve dealt with all the enemies, run outside. You have a new battle ahead of you with several armored opponents - use cans of bolts. After winning, you will have several runs against the clock, plus you must swim underwater - do not forget to quickly press B to speed up. Run again and finally you will come to your senses in a new place.
Finding Jacob
Before you go looking for Yakov, return to the cave in front of the camp. Kill snow leopard, spending a bunch of bullets or arrows on it and then break down the boards in the cave and save in the camp. Don't forget to upgrade your skills and in particular the advanced campfire crafting in the survival section, which will give you the ability to large quivers, ammo bags, etc. Do everything you can and move on to the Tomb of Trials.
Voice of God (Tomb of Trials)
You need to go forward and only be afraid of the second collapsing ice beam - have time to jump in time and grab the wall. On the other side, shoot at the post and tie the rope. Now you need to go inside the tomb. There will be a map, a note and some gold. The far counterweight is stuck so you can't lift the second gate. Lower the first ones. Climb up them and get over to the other side. Jump down to the right and attach one end of the rope to the counterweight and the other to the reel. Pull the rope as tight as possible and remove the bolt on the right. If you did it correctly, the coil will no longer be active. Go back and break through the wall to the other side. Raise the gate again and you can secure the counterweight in position. Go back to the lever and pull it to the maximum and then cut the rope on the right. The ice is destroyed - you can raise the gate and take away another useful skill. This will restore your health in battle in case of critical damage. Go back using arrows and cables to the base camp. You can return to the Wilderness Hideout and open the previously inaccessible cave with an arrow and rope and return to Jacob's slips.
In search of Jacob. Part 2
On the way to the goal, you will meet a wounded descendant. He will ask you to clear the cave of wolves. Yes, the same one that you have already cleaned twice from wolves and a leopard. Use poisoned arrows against the animals and they will die very quickly. As a reward, you will receive upgrades for your pistol and gratitude. Near the lumberjack camp, you can receive another optional task to get out of prison. The easiest way to reach the prisoners is through the river and using a rope to climb up. The prisoners are next to the air duct below, the geographer's backpack is on the left. And next to it is another short cut that will take you to the interrogation room. Upon completion of the task you will receive another skill. There is one more optional task left from the wounded man in the cave. There you need to explore the enemy base or another one near the lumberjack camp and look for a crow. The missions are not difficult and there is no point in describing them. They will give you an important skill and components for weapons. Continue the main mission along the markers. Collect all documents and artifacts, read the frescoes. Once you receive the Molotov cocktail you are almost there. To the right of the main building you will find another optional tomb - the Uranium Mines.
Uranium Mines (Tomb of Trials)
You need to go lower and lower, fall into the water and go around all the forks. During the jump, the structure will fall apart. That's how it should be. Along the way, you will come across a pipe with water covering a flammable structure - just throw the incendiary mixture over the top. Next, a puzzle awaits you. You need to jump onto the far counterweight and break the paths. Rise higher and shoot an arrow with a rope at the mechanism, thus pulling out the trolley. Then jump over the pin in the wall to the other side and go up. Near the pillar, shoot an arrow with a cable at the trolley. Go down, jump on the counterweight, and the trolley will close the water source. Throw an incendiary mixture at the opened flammable barrier. Jump inside and pick up the Keen Eyes skill - it gives you the ability to see traps. Go back.
In search of Jacob. Part 3
Burn the obstacle on the way and go forward until you hear voices. Explode gas pipes over the heads of enemies and throw them with an incendiary mixture. Eventually, you will reach a point where you need to stretch the rope and slide down through another rope. Get ready to run. Upon completion of the videos, you will find yourself in a new location.
Abandoned mines
Kill three enemies and call the elevator. Adjust the cart and climb on it to get another new item - a knife. Cut the cable for them. Get to the other side and eliminate two more cables that hold the elevator. Climb to the very top and go forward to the fire. Upgrade your skills, weapons and bow if you have collected all the artifacts along the way. Examine the fresco and gain level 4 Greek proficiency. In the next room, destroy all the enemies either by attracting them with a bow shot and finishing them off with a cocktail, or simply in hand-to-hand combat with an ice ax if you have upgraded it. Works flawlessly even on maximum difficulty. Collect all the artifacts and notes and move on. There is a door in front of you that is difficult to open. Go down the cable to the right. Attach the trolley to the cable and pull it to the top. Cut the cable. And one of the locks will be torn down. Go around the structure and in the dungeons, jumping over the pit, you will rise to the top. Destroy all enemies with explosives. First of all, with the shield and then blow up the barrel at the top. Now go upstairs and go to the crane. There is a winch on the other side - attach it to a large bucket. Move the trolley so that the bucket is above the water. Now run. Remember to jump right in front of the steps. And now you are inside. After a short video, explore everything and, after going through the underwater caves, you will find yourself in a new place.
Geothermal Valley
This is another large territory with tons of quests, tombs and treasures. But most you won't be able to get it because you don't have oxygen for diving. Therefore, concentrate on exploring the area and completing side quests. For shooting drones you will be given a bow. Hunting boars and deer will bring experience points and equipment fragments. Once you complete all the tasks except the last one to inspect the tombs, follow the story. You need to light the torch on top, and by doing this you will receive a fire arrow. Go to the next story point and get a shotgun and a new enemy type - the flamethrower. Run in circles and shoot bullets at him. After killing him, move on. Everything is destroyed and you need to go get the atlas. Along the way, you will come across a tomb of trials on the right - a water-bearing cave.
Aquifer Cave (Tomb of Trials)
Pull the rope and get over to the other side. Go around the graves on the right and get to the top. The base camp awaits you there. The next puzzle requires dexterity. You need to hook the boat to the mechanisms and have time to choose the next point. When you reach the island, collect everything and hook the rook first to one millstone and then immediately to the second. Use the lever to pull up. And you will reach dry land. Inside the tomb, the skill of hitting animals in the heart. Useless garbage, as it does not work against leopards and bears. Get back on the route.
Acropolis
Not far from the dungeon there is a new location - the Acropolis. Follow the story. Everything is not so complicated here. When you receive an explosive arrow, blow up the door through the hole in the grate - the target will be highlighted. Then go to the tower. Inside there will be a meat grinder, at the end of which you will have a perimeter defense. Use poison and explosive arrows. Save some explosions for enemies with shields at the end. Upon completion, you will receive a new item - an ice ax on a rope, which you can use to cling to ledges and special objects in the air. AND new goal- church with atlas. Go to the goal, and leave all the tests for later. As soon as you find yourself in the swamp, go to the far right corner and shoot the armored guard on the left with an arrow. Then go around the area and detonate the gas canister, shoot at the barrels at the top and there will be two or three enemies left that you can easily finish off. If you don’t succeed right away, shoot the cluster with exploding arrows. The next group will be after the window. Kill three guards at once with an explosive arrow, and finish off the rest with a shotgun without leaving cover. The last group will consist of two near and several far away. Use a Molotov cocktail up close and an explosive arrow at a distance. Finish off the rest with an explosive arrow or machine gun. Next, go through a series of long jumps with an ice ax on a leash until you reach the entrance to the cathedral.
Flooded Archive
If you are stuck finding the entrance, then look at the upper beams at the very top and use the grapple. After a short scene, shoot two batteries with a pistol and enjoy the video. Activate the fire. You need to find the entrance to the archive. Everything is not very difficult - the atlas is nearby. Along the way you will receive an oxygen apparatus for a long stay under water. So that you can open the last four tombs - their description will be at the end of the guide. As soon as you receive it, enemies will begin to surround you. Use Molotov cocktails. They will try to open the door with an autogenous gun - wait until they enter and throw the second fire bottle. Now you need to get out of the Cathedral with the artifact. Blow up the barrels and the statue will tilt. Go left, swim underwater and blow up three enemies at one point. Go up to the right. You need to drag through the first amphora with fire. Release it and then blow it up with a fire arrow to clear the way. Get over to the other side and release the amphora again. Tie it to the pole with a rope and then, when it floats around the burning obstacles, cut the rope. When the amphora reaches the sculpture, explode it with a fire arrow. Now go in the opposite direction. Roll out the amphora and tie it to the lift. Pull the other end with the rope. Roll out another amphora and tie it again. Kick the amphora away. On the other side, cut the rope from the amphora and push it into the water. Wait for it to swim to the monument and blow it up. Now you just need to run to the exit. The ancients are very unhappy with you. Now you need to get to the Observatory. But we won’t rush there and will look into another tomb – Ketezhnye Baths.
Ketezhnye Baths (Tomb of Trials)
Swim underwater, then wait and run between the streams of water to the fire. Jump over the trap and crawl between the roots. There is a lot of water waiting for you below. You need to attach the boat to the beam on the left and then lift it to the edge. As soon as you climb up, run to the lever and drain the water. Secure the cable to the lever and winch. Wind up the winch. One water level has gone down. Go down and pull the boat to the right beam. Climb inside and drain the water on the right. Attach the lever to the boat with a cable. Now go down, blow up the barrels and take the manuscript. He will give you a climbing bonus. The cave has been completed. Return to the main route - you can simply teleport to the nearest camp. As soon as you get the steeplejack arrows, you can climb the mountain next to that very cave with the wolves. Walk forward until you reach the Trinity Research Station.
Science Station and Iona Rescue
You need to destroy all enemies on the way. The easiest way is to use an incendiary mixture against groups and finish off those remaining from around the corner. Repeat this tactic several times and if you want, blow up all the cars with fuel. When you are forced to defend the camp and find yourself under the ice, first swim out the first window and quietly remove the enemy. Then swim to the far left window and from there destroy all the enemies you can with poison. Swim through the far right window and get ashore. Use jars with explosives. When you destroy everyone, it will be revealed to you great secret, and you can try to enter the city.
Planetarium
Use the climbing walls until you reach the planetarium. This is not a difficult puzzle. You must turn the structure with arrows and ropes so that a bridge is formed. In fact, you have to line up the planets so that there is a bridge right from which you can use your cat to jump to the other side and then climb onto the washboard lattice surface. On the second tier, you need to remove the support on both sides, and the structure will rotate. You need to climb to the very top, so you jump on the cat to the center, jump onto the board, your main task is to hang on the structure with two beams and Lara herself will tell you when to jump from it. Then, with a running start, jump onto the center of the structure and climb up. You quickly run along the beam to the exit. You have gained the skill and passed the test. The path of the immortals awaits you.
Path of the Immortals
Just move forward, hiding from the immortals and enjoying the city. When you climb up, it will become clear that they are not immortal and you have to fight. Save in the camps. Use a shotgun hand-to-hand combat and jugs during battle. They explode great. After a short scene, everything will be in flames. Shoot with explosives, blow up the pots and go upstairs - it will be safe there. Once you are done with everyone, go forward and after a short scene you will find yourself in the Lost City, where the last tomb awaits you.
Lost City
If you go forward and swim underwater, you will find yourself in a crypt with a valuable item, and if you go back and enter the cave on the left on the map, you will not only meet a bear that can easily be killed with explosives or poison arrows, but you will also unlock tomb of trials.
Chamber of Exile (Tomb of Trials)
After defeating the bear, break the wall and move forward. Use a fire arrow to blow up the gas passage. You need to turn two levers with a rope while at the bottom and then run to the cage with the skeleton and cut the chain. Explode or wait for the gas to dissipate. Now lift the cage using the mechanism at the base of the crane. Turn the cage towards the gate. Climb up, release the gas from two levers and explode with a fire arrow. You will receive a bonus to fire damage. Return to the main route.
Lost City. Part 2
You need to get into the city, but the gates are in the way. Use the trebuchet. As soon as you get inside the first gate, a circular battle awaits you. Use a rifle - it is most effective and has exploding arrows in close combat. When the enemy is finished, go to the second trebuchet. As soon as you deal with the enemy, turn the beam with a cable and cross it to the other side. Attach a bucket. Turn the structure and close the bottom of the bucket with a cable. Bring the bucket to the water. Then rotate the bucket so that the counterweight is opposite the ice. Drain the water from the bucket by opening the latch with a cable. But not completely. Close the bottom again with the cable. Jump onto the counterweight and the ice will be broken. Shoot at the second gate. Your trebuchet will be destroyed and you will have to go to another one. Destroy the enemy there. Attach the rope to the boards and fastening. Release the propelling mechanism and turn the trebuchet. Archers will attack - cover them with fire from the trebuchet. Now break down the gate and go inside. After the cutscene, you need to climb the tower. In the end, you will get to the tower and an enemy will hang on you - shoot off his helmet with a pistol shot and then shoot him in the head until he falls. Rise higher. After the video, the boss is waiting for you - a helicopter. Use the "X" digger when you're ready and shoot the fire projectile from the trebuchet when it's above the helicopter. You need to repeat this three times and each time everything will be interrupted by waves of enemies. Use poisonous arrows against your enemy - they are the most effective. After destroying the helicopter, you will have to fight another boss. Your weapons will be taken away, so make bombs from cans and throw them at the enemy. When he is stunned, hit him with an ice pick. At the end you need to dodge “B” and counterattack “Y” in time. Kill the wounded enemy or go up to the Chamber of Souls.
Chamber of Souls
Enter the temple and enjoy the ending. Congratulations, you have completed Rise of the Tomb Raider.
Below are the remaining two dungeons out of the nine that I promised earlier:
Chamber of the Suffering (Tomb of Trials)
In the geothermal valley, you need to go to the lowest corner to the waterfall. Use a rope to jump over to the other side, crawl under the gate and defeat a pack of wolves. After breaking the grate, you will find yourself in a cave with a tomb of trials. The puzzle is difficult at first glance. Roll the spool of rope all the way forward. On the right, attach the figure eight to the beam and go to the opposite corner with the bucket. Pull the rope and the bucket will drop down. Tie him to the reel cart and the puzzle is solved. Climb up the steps to the left of the entrance and run to the next secret with the skill - quick healing. Return to the valley for the second tomb.
Pit of Redemption (Tomb of Trials)
This is the last of the challenge tombs and one of the easiest. Once in the cave, you must go down into the water and follow the right railway, since the left one is blocked. Having gone up, roll the cart forward and turn the platform with three wooden fences forward. Push the cart down. There is a pillar to your right - tie a cable to it and move to the other platform on the other side. Climb to the very top and use the lever to lower the lifting platform down. Turn the mechanism with three paws and roll the cart onto the moving platform. Now turn the platform so that it is on the opposite side from you. Lift the platform up and push the cart down. Another secret and useless skill of a geologist has been revealed to you. Congratulations, you have completed the entire tomb, received an achievement and can complete the last task from your descendants.
We are finishing the walkthroughRiseoftheTomb Raider. This time, the young, but already gained strength, Lara Croft will meet one of her main enemies and try to save the Holy Spring.
Abandoned Mines
These mines were built by the Russians and pose a threat - both naturally and in terms of the mercenaries prowling here. Lara will have to make her way through the mine very quickly, otherwise the enemy will get to the Holy Spring first.
Follow the mine until things get bad. You will be cut off from Jacob and will have to run through the collapsing mine. When you reach the exit, kill three enemies. Then activate the elevator. After that, push the cart along the rails to the far ledge. Climb onto it and take the knife. Using a knife, cut the ropes holding the boxes blocking your path, and then cut the two cables holding the elevator. Now jump down and climb onto the elevator, crawl up the shaft, and then along the ice wall.
Continue forward along the corridor, beware of the floor traps - you'll eventually end up in the main area. Kill the two nearby enemies before continuing forward. After that, kill those guys who are digging around near the car. Get to the other side using the rope attached to the door.
Facing the large door, go right and jump onto the cable attached to the truck. Move to the aisle and push the cart. Use the rope arrow to send the cart towards the truck. After this, cut the rope so that the truck falls and thereby breaks down the door. Walk back down the passage to return to where you were. Now you will have to fight several waves of mercenaries.
Now the wall is broken, we can move on. Enter the dark hall and climb up the ice wall, then go forward and go through the barricaded exit - it can be opened with arrows and ropes. From here, climb up the ice wall and kill the enemies above.
Climb the stairs to reach the next area. Use the cable to climb onto the crane and get over to the ledge on the other side. You need to lower the cart down the tracks and then connect it with a rope to a large container. It will fill with water and the faucet will break off. Run along the falling crane to the large doors and go inside.
Now in Rise of the Tomb Raider, leave the room, beware of the traps in the floor. Swim to the exit, diving into the tunnels. Once you're outside, turn left and go up until you reach the cable. Jump on it to complete the mission.
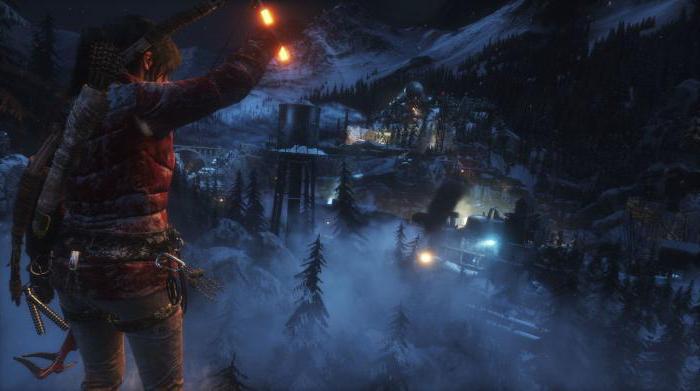
Geothermal Valley
.jpg)
The village where Jacob's people live is under attack. Get down and protect people.
Move to the farthest part of the valley, using your instincts to find the right path. There are several ways to get there, so choose the one that suits you best.
Once you are in the ruins, go to the broken bridge leading to the signal tower. Get there using the cable. Here you will receive fire arrows.
When the battle begins, go back along the already created cable. Go through the ruins to the battle site, along right side mountains. You will receive a shotgun - usually it can kill with one shot if the enemy is without armor. Kill the guy with the flamethrower by climbing up from behind him - don't use cover, he'll burn it. Shoot him four or five times with the shotgun and keep moving. The shotgun reloads quickly enough that you should be able to kill him without any problems.
The Acropolis
.jpg)
This battle in Rise of the Tomb Raider is not over yet. You need to save people. Get to the very heart of Akropolis and protect them. Cross the lake, climb up the wall until you reach where the villagers should be hiding. Go up, then turn left, get over to the other side. Swim to the next area and engage in battle.
Kill the enemies on your way to make way for Jacob's daughter, go right when everyone is dead. Go into the tunnels and kill the mercenaries. Having dealt with the group, you will fall down. Along the way there will be two more mercenaries and a hole in the wall through which you can get to the hostages. Kill the mercenaries before they start executing the hostages.
After the cutscene, break the wall to the left of the door and go through the hole. You will receive explosive arrows that will allow you to unlock doors. Now go upstairs, killing the mercenaries.
Flooded Archive
.jpg)
Atlas - The best way for Lara to find Kitezh. But she will have to get to a place where no human has gone for many centuries.
Get to the other side using rope arrows and your new hatchet. Then head down towards the valley to reach the mercenary camp. Kill them, preferably quietly. After making your way through the house, you will find yourself in a place where there are even more armored guys.
If you are spotted, use a shotgun or machine gun. However, it is better to kill them quietly. Go through the house, climb onto the wall of the building opposite. In the next area, continue moving upward until you reach where Anna is. After the cutscene, shoot at the generators. Then just go down to the Atlas.
Go back with Atlas. Mercenaries will start using big guns- use containers against these guys to blow them up. The next area will have even more enemies and more smoke, so it's best to do everything quietly here.
Swim away quickly before you die from the gas. Follow the flooded passage until you reach the exit. Now you need to use explosive containers to bring down the statue. Shoot the first container, then go right - here you will find a lever. Use the rope arrows to pull the lever on the other side, then shoot the barrels on both sides. Then make the barrels roll into the water and shoot them too.
The next riddle is a little different. Lower one barrel and let it fall onto the barricade. Blow up the barrel to destroy the barricade. After that, quickly swim to the other side and use an arrow with a rope to connect the barrel so that it floats to the right. Cut the rope and blow up the barrel.
Now run - immortal soldiers will try to kill you. Try to stay away from the barrels as enemies will shoot at them. Having reached the water, swim to the exit.
Research Base
.jpg)
Go forward, kill enemies. You will again find yourself in the place where Lara's difficulties began. You will get flat arrows. Continue through the tunnels until you find yourself in enemy territory. Go forward and prepare for battle.
You will find traces of a truck. Follow these tracks. Then it is very advisable to do everything quietly. After killing two guys, go through the forest near the red car. Kill all enemies - they come one at a time. Once you're done, use your new arrows to climb up the wooden wall to the highest part of the forest. There will be two enemies here - kill them with a bow. Move forward until you reach a hole in the wall of the base. You will find yourself at a frozen pond that you can swim across. Don't swim out through the first hole - swim further to deal with enemies quickly and efficiently.
Once again in the forest, kill seven enemies: two pairs and one three. However, couples will sometimes break up, so they can be easily killed without making too much noise. Go forward, climb up the yellow stairs until you reach the Atlas.
Get to John before it's too late - Constantine will beat him up. Kill enemies along the way, you can do it noisily. Go forward. Go through the house, use the shotgun. A helicopter will fly in and start shooting at the house - quickly run away.
Now you will need to kill armored enemies. Use the water to your advantage - they can be dumped there. However, these guys have thermal cameras and will easily see you. Beware of the lasers indicating where they are looking. Molotov cocktails are very useful here.
The Path to Kitezh
.jpg)
You need to get to Kitezh before your enemies.
Go down into the room and break the wall to go through the tunnel. Use flat arrows to get to the other side. Once you're in the planetarium, go through the hole in the wall to reach the lower part of the building.
Now you need:
- Use the jib boom to pull the first turntable towards you;
- Using the same arrows, turn the platform to the left 180 degrees with a surface that makes it possible to climb up;
- Climb up the lower platform;
- Use the hatchet to move to the next platform;
- Climb up the next platform;
- Climb the wall.
Now push the locking mechanism, go to the other side and push another mechanism. The whole system will begin to move. Jump to the center, then wait until you can't jump to any platform below, then jump to the beam, drop down at the right time to the platform, and finally to the lowest platform. From here, jump onto the central structure of the machine and climb up.
Use flat arrows to cross the gap and go to Old city. Here you will need to climb a lot, but the camera will guide you to the right place.
A warrior will attack you - if you don't press the right button at the right moment, you'll have to fight for a long time. Fight waves of enemies as you make your way through the old city and dodge fiery attacks. Go to the next area.
TheLostCity
.jpg)
Lara has one last chance to save Jacob's people and prevent their enemies from obtaining the Holy Spring. However, first she needs to go through Kitezh.
Use the cables to make your way to the gate. Now go back a little and go to where the siege weapon is. There will be a lot of armored guys here, but most of them will fight in close combat. Once in the far right corner, use the flat arrows to climb up. Get to the siege weapon, kill the enemies and use the weapon to break down the gate.
Go left to the next gate, get new arrows. Here you will have to kill several waves of enemies. Now go through the door and up to the siege engine. Aim it at the nearest ledge with ropes. Now go to the platform and use the rope arrows to connect the pillar to the rubble in the siege engine. After this, turn the gun towards the gate, the debris will move and you can destroy the gate.
For the second shot, use the gun on the other side. Get there using arrows with ropes. Do the same thing with the weapon as you did last time in the mine.
Use the cable to get down to where the archers were. Kill a few enemies, run until you find yourself at the edge of the rooftops. Make another cable straight from the rope post. Run through the gate and kill enemies along the way.
Climb up the walls. Go to the tower leading to the highest point in the city. Beware of enemies, falling pieces of ice and all kinds of debris. Once at the top, you will fight the mercenaries. Use arrows - poisonous and exploding. A shotgun and a shotgun will also be effective.
Now get ready for the final part of the game. First there will be a wave battle with a helicopter. The siege weapon will help damage the helicopter - you will need to hit it three times in total. There will also be many waves of enemies.
After falling through the ground, you will find yourself in a room with immortal soldiers. It is better to kill them quietly and one by one.
When fighting Konstantin, attack him quickly, either from behind or from above. Two such attacks can kill him. Now you can either spare him or kill him.
Run to the temple to prevent Anna from using the Holy Spring.
Go forward behind the forwarder, and after Lara slides down, click on the corresponding button. Climb to the right, jump to another ledge. Even more to the right and jump higher. Approach the icy wall and press the key to start climbing up. Go around the icicles on the right side, jump onto the rock to the left. Climb a little higher and jump towards the forwarder.
Continue forward until you see a cutscene. Next you will need to climb with John. Use all your skills by moving right and up. An avalanche will come soon. Run away from her along the paths. Slide down on the rope. When Lara slides down the slope, you will need to jump to the right side, where there is an icy wall. You'll get out of here eventually.
Two weeks earlier
London, England
Northwestern border of Syria
Lost Tomb
Move up the slope, jump along the ledges until you see a hole in the rock. Approach it to get inside the mountain. Go forward. In the cave, examine several huge icons to increase your knowledge of Greek to level one. You can now examine the column in the center. After examining the column, the location where the coins are buried will be marked on the map. It's not far from the column. Find the coins and then go to the wall with the hole. Examine it and then hit it with a pickaxe several times to destroy it.
Hidden Oasis
Follow left. You can jump on the brick wall twice. Jump on it, then press the jump key again to push off and fly higher. Continue further to the entrance to the Oasis. When you are there, climb up the ledge and go inside. Move through the cave, then kick through the wall.
Tomb of the Prophet
Examine the notes and icon on the left side. On the right there is an urn with a coin. Walk along the corridor until the thing with spikes falls. Shoot her with a pistol and make your way under the log. Walk forward until you fall down. Please note that there is a wooden stand hanging at the top. Shoot the fastener you saw with the spikes earlier. The wooden stand will fall into the water. There is a wall with a crack on the left. Destroy it to raise the water level. Use the wooden stand to climb onto the ledge. Walk forward until you fall down. When Lara falls into a trap, first shoot at the fastening element, and then press the indicated key (button) to break it. Swim forward until you get out of the water.
Walk forward and at the top you will see a dome with a tomb. Go down into the water. Destroy the wall on the right to raise the water level. Then go left, where there are shelves with corpses. Climb up the shelves. Jump on wooden platform to raise the water level. Climb up the shelves with corpses in the center, where there is a tomb at the top.
After going up, go forward and jump so as not to fall down. Follow this until you reach a new room, where you will need to play with the water level. Destroy the wall on the other side first. By the way, when you go into the new room, where you need to go down into the water, you can find manuscripts on the right side.
So, after destroying the wall, look up. One wooden platform hangs level and the other is held at one corner. Shoot the fasteners of the second platform so that it falls down. Now jump onto the wooden platform hanging level. It will lower, and the room will be filled with more water for a while. Climb onto the floating platform, and from it jump onto the ledge on the column nearby. Jump onto another column, and from it onto the rail on which the wooden stand that regulates the water rests. Watch the cutscene. Kill the enemies and leave the cave.
Which you will find in the Geothermal Valley location. After studying it, you will receive the “True Grit” skill, which improves Lara’s climbing skills.
You can find it at entrance number 1 (Entrance 1), which is indicated on the map below. Wandering through the forest, you will find a cave, near which you will have to fight a bear. Take enough with you strong weapon to deal with the furry one. After the battle, break the wall and jump into the water.
Periodically, the water flow stops - at this time you can run further. You will need to overcome such traps several times in order to reach the last ledge, along which you can climb to the camp and save.

At the rest stop, take the relic that lies near the fire, and then climb higher, using the path through the right corridor to take the document. After that, walk along the left side, passing the roots and trees. You will soon reach the main chamber of the tomb.
Dive into the water and move towards the boat. Once on it, shoot a rope arrow at the beam passing under the arch. Having reached it, shoot at the new beam that is on the right. Finally, having swam up to her, climb onto the ledge and jump into the water again. From here, swim to the stone platform on which there is an important mechanism.

Activate the mechanism to reduce the water supply. In a limited time, you must quickly secure the reel on the water with ropes, which you saw in the hall, diving into the water, with the mechanism that you found on the platform. Now this coil will appear above the water, since you have reduced the level of the latter.
While there is not enough water, you can reach the coil and manually activate it. The action must be done very quickly, as the chamber will soon flood back.
Having dealt with this, get to the boat. Shoot at the beam on the right side of the heroine if you are facing the ledge along which you climbed into the hall. Having reached it, dive under the window to get into the second room, where you previously reduced the water level.

Once again, reduce the water supply, and then attach the mechanism to the stone platform with a boat (no, not a reel this time). Leave the hall by the upper route, picking up the archivist’s card in the process, and using the boat, turn the mechanism to lower the water level.
Run along the “land” that appears to the gate, near which you will have to blow up the fuel containers. Inside you will find the treasured book.
Chamber of the Afflicted
The sixth tomb you may encounter during your adventures. Having fully explored it, you will receive the “Instant Recovery” skill, which speeds up the “licking” of wounds.
You can find the Chamber of the Suffering in the Geothermal Valley zone, namely at entrance number two (Entrance 2). You can't get inside directly, so be prepared to take a detour along the rocks.
Along the way, Lara will have to fight a pack of wolves, so restore your health and capture good weapon. Having reached the gate, go inside and go down further.
Passing a corridor with narrow passages, you will come to a camp where you can save your progress. By the way, listen to what the heroine says - at the well, Lara will touch the surrounding architecture, hinting to the player about the secret. Go down the well to find collections.

After the camp, find the stairs, under which lies a cache and a relic. By the way, there are also hiding places in the well (you'll have to dive). Having collected all sorts of things, go outside to the square. Here you will find a hole in which the platform hangs.
You must connect the platform to the mechanism using a rope to activate the device.
It will take a long time to get to the book, since it is located at the very top. After the puzzle with the mechanism, find a pillar in the same yard standing directly opposite the hanging bucket. To the left of him is a cart that you need to move a little closer to you.
Then return to the bucket and shoot the mechanism next to it to fill the piece of iron with water and lower it. At the same time, you must have time to secure the bucket with the cart using a rope so that the bucket lowers to the end.

Now climb the stairs to the new area. Run around it using beams and awnings until you reach the balcony. Inside you will find the book you are looking for.
I'm ma Redemption
For the seventh time, Lara is forced into deep, dark caves. The next tomb, located in the Geothermal Valley, will allow you to find a book hidden in it to obtain the “Geologist” skill, which gives one hundred percent success during the development of chrome deposits.
You can find the entrance to the pit from above from the very first camp of the location. Follow the river from there until you reach the waterfall. Walk along the mountains until you find a cave hidden just behind the waterfall.
Once inside, jump onto the ledge and climb through the gap to exit to the save point. After this, jump to the opposite side, where Lara will find a stream and a backpack.
Next, go to the next passage, located right next to the tree. When you jump down, you should move to the next part of the wall and have time to catch the ice ax on the plumb line when Lara begins to slide down.
Then go higher and take advantage fallen tree to move on. Here, pass the thin hole and move forward until you find another drop. This is the only way you will fall into the hole.

Once in the water, head towards the land in the center of the room. The entrance to the room with the relic is blocked by a gate, which can only be opened in one way - by blowing it up. Standing in front of the rail tracks, climb to the top of the right one to find some valuables and information.
After this, use the bow, fastening the near and far pillars. Rotate the mechanism to wrap the platform with the load exactly halfway. Now you can push the trolley and then blow up the gate blocking the path. By the way, being at the top, notice the niche on the right where the archivist’s map lies.

Finally, use the rope that was pulled between the pillars. Follow it to the next room where the trolley is located. Pass it and get to the mechanism that is located on the rise to the left. Rotate it to lower the platform and move the trolley onto it.

When the trolley is on the platform, use the left mechanism, and then the mechanism opposite, then go up right on the platform. This trolley will have to be pushed down in the same way as the first one.
Behind the opened passage lies a treasured book.
To the attack of the sacred waters
The tomb behind number eight can be found in the vast Geothermal Valley. For researching it, you will be given one of the many skills in Rise of the Tomb Raider - “Knowledge of Anatomy”, which increases damage to animals.

Getting into these catacombs is quite easy. In front of the valley camp where you fought the Trinity warriors. Climb the tree into the tunnel, moving along the right side. Pass the waterfall and jump down, then step further forward, all the way to an extremely narrow crevice.
After going through this hole, install the rope between the pillars and climb over to the opposite side. Next, move to the room with the skulls (stick to the right wall to find the relic). Find the passage upstairs leading to the camp.

From the last one, find the pillars located to the left. Use a rope arrow to shoot at the boat that is located near the small island and pull it towards you.
Get into it and swim to the island, using the classic method - cling to the pillars and pull the boat towards them. There, grab the document and gold.
Then you need to find the boat behind the waterfall. Get off the island a little and use the same method to shoot at the pillar in the waterfall, from where you will then pull yourself a new boat.
Get in it and head to the other end of the square. Climb up using a rope, securing it to a pole. Act quickly, as the boat may be carried into the cliff. Once at the top, go through a couple of corridors (they are linear) and enter the room with the book.
Chamber of Exile
The final tomb, located in the Lost City, completes the adventures of the plunderer. Completing it will unlock the “Greek Fire” skill, which increases fire attacks from a bow.
You will find the entrance at the edge of the location. Inside you will again meet a bear, which can only be defeated with the strongest weapons in the game. After killing him, move on and collect all sorts of relics and other items for the collection.
Once at the water, dive into the depths, but before that, look around the place near the rocks. There you will find a backpack, a relic and a cache. Once underwater, get to the opposite exit. On land, activate the camp and go right, picking up the collector's information and the hidden chest in parallel.
Go forward until you come across a gate surrounded by a gas cloud. To disperse it, shoot it with fire arrows. The gate will explode, and you will be able to get further.

In the new room, take information and get ready to solve a couple of riddles. Use a rope arrow to shoot at the two levers at the top. With this action you open the valve and let gas into the room.
Immediately run to the cage, near which the cloud has not yet formed, and cut the chain. Then carefully detonate the gas, or wait until it dissipates on its own.

After this, you need to launch the structure at the crane. Open the valves again by attacking the levers with arrows. When the gas fills the room, shoot at the cloud to cause an explosion. This way you will open the gate and be able to reach the book.
Video: Rise of The Tomb Raider - all tombs with map

Found a mistake?
Let us know by selecting a fragment with the mouse and pressing CTRL+ENTER. THANK YOU!