Exercises for posture at home. It is necessary to begin treatment with an accurate diagnosis and solve the problem comprehensively, strictly individually for each case
Correct posture has always been considered a matter of greatness, pride and beauty. It’s not for nothing that they call it “royal”. Meanwhile, correct posture is, first of all, the health of the spine, which is responsible for the functioning of all organs and systems in the body. But not everyone can boast of good posture. Statistics show that more than 40% of children under 10 years of age have initial signs scoliosis or lordosis. In order not to start the problem and strengthen the spine in time, doctors have developed a corrective set of exercises for posture.
Causes of poor posture
We list the main reasons that lead to spinal curvature:
- overstrain of the spine during periods of intense growth (incorrect posture at the computer or desk);
- diseases that affect the musculoskeletal system (tuberculosis, osteochondrosis, bone tumors, rickets);
- decreased vision, forcing a person to stretch forward and look at what is happening;
- incorrect working posture;
- weak muscle frame;
- back injuries.
The essence of posture exercises
Any posture correction methods are primarily aimed at restoring muscle balance, which means relaxing tense muscles and tensioning relaxed ones. This approach allows you to restore the normal functioning of the muscular corset, aimed at keeping the torso in the correct position. Physical exercise is only one type of posture correction, but it is the most effective and efficient of all possible. Regular gymnastic exercises improve posture, strengthen the heart and skeletal muscles, and increase the volume of the lungs and chest.
A set of exercises for posture
1. Standing straight, hands must be clasped behind your back. Then you should make springy movements, raising your arms as high as possible and at the same time arching your back. Repeat 10 times.
2. Standing on all fours, supported by your knees and straight arms, you should swing alternately: first with your right hand and left leg, and then with your left hand and right leg. Repeat 8 times.
3. Lying on your back, you need to stretch your arms along your body and bend your knees to rest on your full foot. You should lift your body, pressing your chest to your hips, and then return to the starting position. Repeat 5 times.
4. Sitting on the floor and bending your knees, place your feet on the floor and place your hands behind you, resting your palms on the floor. Using your hands as a lever, you should bend upward, lifting your pelvis and at the same time throwing back your head. Having frozen in this position for 5 seconds, you can return to the starting position. Repeat 8 times.
5. Lying on your stomach and stretching your arms to the sides, you should smoothly lift top part body as high as possible. Having fixed this position for 4-5 seconds, you can return to the original position. Repeat the exercise 8 times.
6. Standing facing the wall, you should lean your palms against it. After this, without lifting your hands, you need to try to bend backward as much as possible, while maintaining balance. After freezing in this position for 4 seconds, you should return to the starting position. Repeat 5 times.
7. Turning your back to the wall, you should press your whole body against the plane, as tightly as possible, while standing straight. You should maintain the position for 10 seconds, and then you can relax. Repeat 8 times.
8. Standing with your back to the corner of the wall or to a gymnastic pole, you need to press the back of your head and buttocks against it. In this position, you should perform squats, which you need to do alternately, 5 times, and then tilt to the right and left (5 times), returning after each tilt to the starting position.
9. While facing the floor, you need to lean on your straight arms, as well as on your toes. At the same time, the stomach should be pulled in and the back should remain straight. You should stay in this position for 30–40 seconds. Repeat 5 times.
10. Having stood up and straightened up, you need to put a book on your head. While moving slowly around the room, you must maintain correct posture so that the book does not fall. You need to start the exercise with 2 minutes, gradually bringing it to 20 minutes or more.
This simple but very effective set of posture exercises is sure to give positive results after 3-4 months of regular exercise. It is only important to believe in success and learn to constantly control the position of your own body, wherever you are. I wish you health and beautiful posture!
Everything in the body is interconnected, and correct posture is the key to health. By latest research psychologists people with correct posture more confident in themselves and significant in the eyes of others.
In addition to external data healthy spine is responsible for the proper functioning of the body's internal systems, creating a balance of overall health.
Little rules for good posture
Poor posture leads to:
- pain in the lumbar region,
- muscle tension in the shoulder girdle,
- disorders in the structure of the spinal column,
- Osteoporosis develops with age.
In school-age children, incorrect posture leads to scoliosis, the formation of a “hump,” as well as lordosis, when the spine bends forward.
Needless to say, a person with poor posture looks stooped and visually loses several centimeters of height.
The main reasons leading to poor posture are:
- congenital pathologies,
- various diseases (osteochondrosis, tuberculosis, rickets and others),
- spinal injuries,
- musculoskeletal disorders, such as flat feet,
- complexes due to high growth in adolescence,
- wearing heels at an early age, when the spine has not yet formed,
- poor vision (forces a person to take an incorrect position in order to see objects),
- “sedentary” work with a long stay in one position,
- incorrect body position at the computer or table.
Most of the causes of poor posture can be prevented, especially in childhood and school age.
Adults can partially correct their posture with the help of special exercises.
- Gymnastics and special exercises
Therapeutic exercise helps strengthen muscles, stabilize the position of the spine, and has a general strengthening effect.
Below we will look at a number of effective sets of exercises for posture correction that can be performed at home.
Before starting classes, you should consult with an osteopath to prevent improper loads on the spine.
- Corsets and belts for correction
Corsets for posture correction are used to fix the upper shoulder girdle and unload the muscles of the thoracic region.
The corset helps to consolidate the correct muscle stereotype and also prevents the progression of existing disorders.
Wearing belts helps relieve tension and pain during prolonged static positions.
- Visiting a chiropractor or osteopath
For a comprehensive approach, several sessions should be carried out manual therapy. A specialist will be able to assess the condition of the spine and help adjust the posture restoration program.
A set of exercises to correct posture
Before starting gymnastics correction of posture and physique It is recommended to do a warm-up to prepare the body for the load.
Increase the load gradually, and if pain occurs, exercise should be stopped.
Exercises with a fitball for posture
Fitball is an inexpensive and effective equipment for performing gymnastics to correct posture.
These exercises will help develop a sense of balance and stretch your core muscles.
1. Lie on the exercise ball with your stomach, keeping your legs in upright position, socks should be on the floor. Place your hands on the floor.
Leave your legs in the starting position, inhale and raise your right arm, turn your body to the left. Stay in this position for 3 seconds.
Return to the starting position and do the same with the other hand. Repeat 5-7 times on each hand.
2. Take a position as in exercise 1. As you inhale, one arm should be pulled back in an extended position, and the other should be extended forward.
Hold the position for 2 seconds. Take dumbbells as an additional load. Alternate arm raises. Repeat 5-10 times with each hand.
3. Take the following position: get down on your knees, lean towards the fitball at an angle of 45 degrees and lean on your stomach (your back should be straight), stretch your arms straight forward.
Exhaling, bend your elbows and touch just behind your ears. Inhaling, return to the original position. Repeat 10 times.
4. Get on your knees, lean your body on the ball, keep your back straight and your arms perpendicular to the floor.
With active movements, raise your outstretched arms up, with your thumbs up and your fists clenched. Perform 10 to 20 approaches.
5. Take the position as in exercise 4. Now your arms are directed to the sides of the body, looking at the floor.
We perform active upward swings (fingers and fists, as in the previous task), after which we relax our hands. Repeat 10-20 times.
6. Kneel down in front of the ball and rest your stomach against it, keeping your back straight. Place your palms behind your head and spread your elbows, forming a straight line with your back.
Make active movements with bent arms, moving your shoulder blades. The load should fall on the back muscles. We repeat the exercise 15 times.
7. Get on your knees and rest your body on the fitball, keeping your back straight. Spread your arms straight to the sides, lifting them from the floor to parallel with the body.
To enhance the effect, you can use dumbbells. We repeat the exercise 15 times.
8. Lean your body on the ball, kneeling, as in the previous exercise.
Raise your arms straight out in front of you and return to the starting position. It is also recommended to use dumbbells. Repeat 15 times.
Gymnastics for the neck
1. Sit on a gymnastic mat, bend your knees, feet should be on the floor, grab your knees with your palms. Keep your back straight with your shoulder blades touching each other. Slightly tilt your body back, keeping your back straight, and while inhaling, stretch your neck upward. As you exhale, take the starting position and repeat the exercise 8-10 times.
2. Sit cross-legged, clasp your shins with your palms from below, keep your back straight and your head looking forward. On the count of one, two and three, turn your head to the left, while the movements should be clear and fixed, do not make sudden movements. On the count of four, return your head to the starting position. Do the same with turning your head to the right, repeat the exercise 4-6 times.
3. Lie on your stomach, your body should lie in a straight line, your toes extended, clasp your palms at the back of your head. Move your elbows to the sides, try to bring your shoulder blades closer together, rest your forehead on the floor. Inhaling, raise your head, press with your palms and try to interfere. After this, take the original position. Repeat 6-8 times.
1. Lie on the floor with your stomach down, bend your elbows, your hands should be under your forehead. Legs lie together, heels touching, toes pointed.
We inhale and smoothly lift the upper body, while straightening our arms and spreading them to the sides. Exhale and return to the starting position. Repeat 6-8 times.
2. Get on all fours, arms straight perpendicular to the body, legs forming a 90 degree angle. Slowly raise the right straight arm and left leg at the same time - straighten, lift and pull the toe - an arc should form from the tips of the fingers to the toe.
We return to the starting position, repeat with the left arm and right leg. Repeat the exercise 6 times.
3. Get down on your knees so that your shins are on the floor and your feet are extended. We keep our back straight, raise our arms up, forming a straight line with the body. We smoothly lower the upper body forward, as if bowing, do not bend our arms, and try to hold our back.
We touch our fingertips to the floor, our chest should touch our knees, we relax our shoulders and lower our head. Then we smoothly return to the starting position. Perform bending while exhaling, and straightening while inhaling. Repeat 4-6 times.
4. Press your back firmly against the wall: straighten and press your shoulders and arms, tense your buttocks.
You need to stand in this position for about a minute, while you need to take seven breaths through your nose and exhale through your mouth. Then, without relaxing or changing your posture, walk around the room for a few minutes.
5. Sit on a chair. Turn left and right with the greatest possible amplitude. Perform turns 10 times.
Regular execution therapeutic exercises will help in the prevention, as well as in the correction of postural disorders. For questions about adjusting and selecting exercises for you personally, you should contact a chiropractor.
Correct posture not only makes a person’s gait more attractive, but also indicates fully developed and healthy muscles and joints. Slouching, on the contrary, is an indicator that a person has certain problems. This flaw significantly spoils the external impression and self-esteem, and is a sign that the joints and muscles are poorly developed. Special exercises that are combined into complexes and can be performed at home can correct stooping in adulthood.
Strong and confident people have a special body position. They move, stand and sit completely differently. The reason for this is ideal posture, in which the head is raised high and the chest is straightened. This body position tells others about a person’s readiness to overcome absolutely any goal and has a positive effect on all aspects of life. Many people dream of becoming the same, but not everyone is moving in the right direction. If you're tired of constantly slouching and feeling insecure, it's time to change the situation. The main thing is to set a goal and choose the most effective and time-tested techniques that allow you to correct and correct your posture.
Getting rid of slouching not only improves self-esteem, but also has a positive effect on your own well-being and health. Age-related deterioration of posture is directly related to an imbalance of ligaments and muscle fibers responsible for correct body position. This manifests itself not only externally, but also over time causes a number of problems with the health of the musculoskeletal system and the following Negative consequences, which appear as:
- chronic pain in the cervical and spinal regions, as well as in the shoulder girdle;
- injuries knee joints, feet, hips and, of course, back;
- headaches and fatigue;
- muscle weakness and atrophy;
- digestive disorders and respiratory systems s;
- tight mobility;
- carpal tunnel syndrome;
- sciatica - sciatic neuralgia;
- compression and pinching of the nerve.
It is possible to correct your posture and stop hunching over as an adult. The main thing is not to let the situation get worse and start taking action. Having an idea of what correct posture looks like, you can easily determine deviations from the norm and select a set of exercises that allows you to correct and adjust your stoop. Thanks to correct posture, the body position will become correct, and, therefore, the muscles will function properly, becoming stronger. This will avoid problems with musculoskeletal system, reduce the risks of injury and the development of chronic pain, as well as change your appearance and well-being for the better.

Correcting stoop requires first identifying the cause of the problem. Posture is most often crooked due to weakening of the muscles that hold the joints in place. In other words, some muscle groups are too tense, while others, on the contrary, are overly relaxed or weak, that is, they do not receive any load for a long time and become undeveloped.
Slouching in people who slouch is caused by the pectoral muscles being too tight. The result of this is that the shoulders are pulled forward and shifted toward the center. If a person also has a poorly developed back, an imbalance occurs, which results in a displacement of the shoulder girdle from the normal position. The muscular system is designed in such a way that it tries to compensate for any deviations from the norm. Weak activity of some leads to overexertion of others, which causes a feeling of increased discomfort and rapid fatigue.
Imbalance, as you can already understand, is the most common cause of stoop. To bring the muscles to a normal position and not have problems with posture even in old age, it is necessary to work on strengthening the low-active ones and stretching the over-active ones.
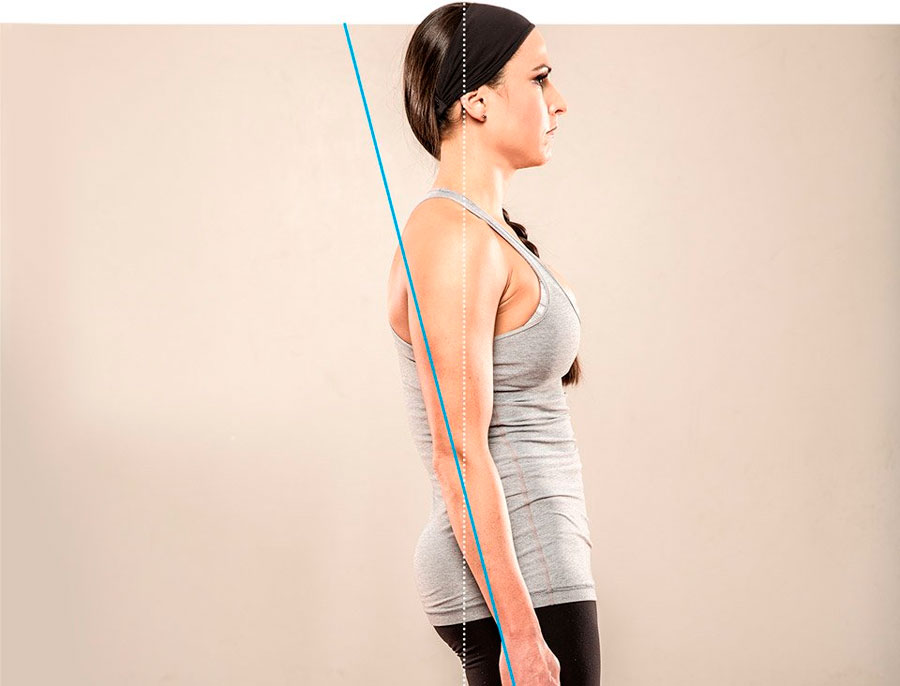
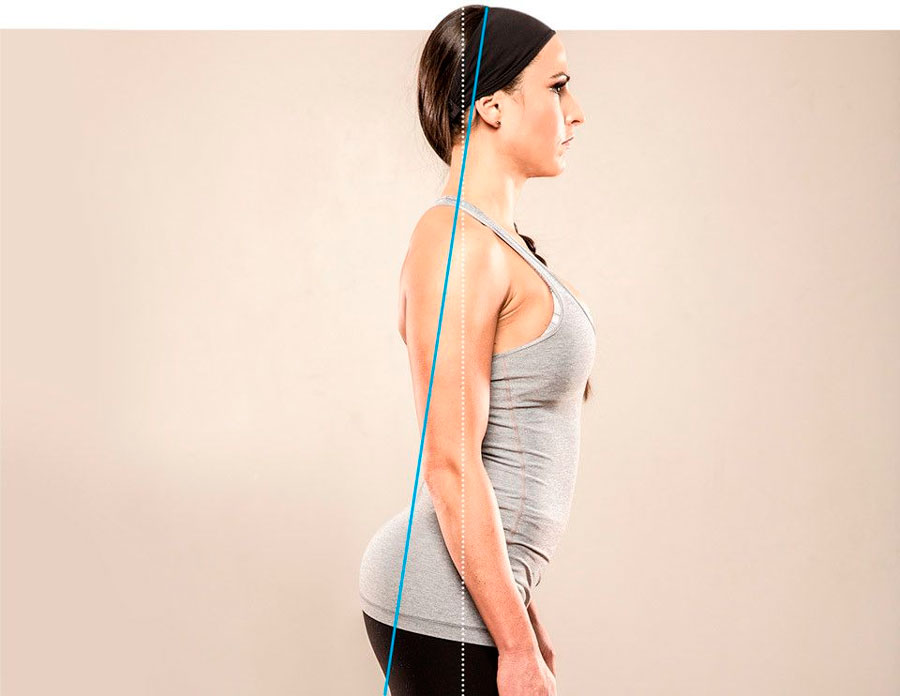
How to independently assess your posture and identify existing problems?
Not all people pay enough attention to their posture. Many people don't even realize how twisted it is. To get rid of doubts and identify the presence or absence of a need for posture correction, you should first perform a small test. It's not complicated. It can be easily made at home.
You must wear tight-fitting clothing. This is done so that any deviations can be seen. Shoes are not worn on feet. They stand barefoot on the floor, but do not try to give the body perfect evenness. You should take the most comfortable position for yourself. For the purity of the “experiment”, it is recommended to close your eyes and walk a little in one place. This way, the feet will stand in their usual natural position. Next, they stop and take photographs from the front, back and side. You need to ask one of your friends or household members to take pictures.

The ideal posture shown in the photograph implies that the shoulder joints and ears are in line, the ribs are located above the hips, and this, in turn, is above the heels. The spine and pelvis should be in a neutral position. If, looking at your photographs, it is clear that the body position is exactly like this, then there are no problems with posture. In other cases, you will have to conduct an independent assessment of the existing defects.
Basic assessment of postural deviations
Uneven body position indicates certain problems. To determine a specific postural deviation, you need to understand this issue much deeper. If you identify the specific cause of stoop, this will allow you to choose the most effective exercise that will get rid of the curvature.
Deviation 1: Slouched back and leaning backwards
This position is characterized by the emphasis of the hips forward when they protrude above the line of the ribs.
Problematic overactive muscles: surface of the thighs, erector spinae, gluteus medius and maximus, lower back and buttocks.
To stretch these muscle groups, do:
- runners stretching;
- “the best stretch in the world,” which involves stretching the buttocks while sitting;
- twists from a lying position;
- hamstring stretches;
- releasing the hamstrings using a massage roller.
Problematic inactive muscle groups: straight femoral, which includes the flexors and lower abs, external oblique, iliopsoas.
These muscles are activated by:
- hanging leg raises;
- "scissors";
- folding on a fitball;
- “Cocoon” twists.
Accordingly, by activating the sedentary ones and stretching the overactive ones, you can get rid of a slouched back.
Deviation 2: Lower cross syndrome
Characterized by a forward tilted pelvis and excessive deflection in the lumbar region.
Overactive muscles affected are: erector spinae, lumboiliac.
Stretched by:
- “pyramids” on a fitball;
- knee lunges performed on the floor;
- quadriceps stretching;
- pulling the knees to the chest from a lying position;
- self-massage of the quadriceps.
Among the inactive muscles, they are responsible for the correct position: gluteus maximus and abdominals.
They are activated when running:
- crunches with legs raised;
- gluteal bridge (regular and on one leg), as well as on a fitball;
- pull-ups from a lying position in a “frog” position.
Deviation 3: Rounded shoulders

This deviation is manifested by excessive protrusion of the shoulders beyond the line of the ears.
Overactive muscles in this case include: pectoralis minor and major.
The following exercises allow you to stretch these muscles:
- stretching the anterior deltoid;
- moving the elbows back;
- stretching the deltas in a sitting position;
- dynamic stretching for the chest;
- stretching the pectoral muscle groups on a fitball.
Inactive muscles are: rotator cuff of the shoulder girdle, lower trapezius, serratus anterior.
Strengthen these muscles by doing:
- arm abductions with a tape back;
- external rotation of the shoulder girdle;
- traction for the rear deltas and on a low block.
Deviation 4: Forward head

The ears extend beyond the line of the shoulder girdle.
Overactive muscles: levator scapula, which is located on the back of the neck and is responsible for tilting the head back, upper trapezius, neck extensors.
Exercises for stretching overactive muscles:
- myofascial release (self-massage) of the neck;
- pulling the chin to the chest;
- stretching the pectoral, clavicular, mastoid muscles by moving the arms back up with the palms up and turning the head to the side.
Inactive muscles: forward flexors of the head, which are located in front of the neck.
Strengthens these muscle groups:
- isometric exercises on the anterior surface of the neck.
In other words, both the anterior and posterior flexors of the neck are worked out.
Deviation 5: Upper cross syndrome

Rounded, excessively crooked shoulders.
Superactive are: levator scapulae, trapezius, pectoralis minor and major, posterior, upper spinal and thoracic extensors.
Stretches when performing:
- dynamic stretching of the pectoral muscle groups;
- myofascial self-release of the neck;
- anterior deltoid stretches;
- moving the elbows back as far as possible;
- stretching on a fitball for the chest and deltas, but already sitting on a chair.
Inactive: rotator cuff, trapezius inferior, serratus anterior, deep extensors cervical region, which are located in front of and around the shoulder blades.
Strengthened by doing:
- isometric exercises for the front of the neck;
- moving the hands with the tape back;
- external rotation of the shoulders;
- thrusts on the rear deltas and on a low block.
Deviation 6: Head tilt

This deviation is characterized by a tilt of the head to the shoulder. Often accompanied by a turn to the left or right.
Overactive muscles: pectoral, clavicular, mastoid, and also inclined to the central part of the body.
Stretches with the following exercises:
- independent myofascial release of the neck;
- stretching of the pectoral, mastoid, clavicular muscles;
Passive muscles: located on the opposite side to the active sternocleidomastoid and oblique, but already from the central line.
Activated thanks to:
- everyday movements when chewing food, using the phone, when it is necessary to evenly load not one side, but both;
- lateral isometric exercises.
Deviation 7: uneven shoulders

Expressed by one shoulder being lower than the other.
Movable muscles: trapezoidal, stretching from the back of the neck to the shoulder girdle, on the raised part of the shoulder girdle.
Stretch thanks to:
- myofascial self-release of the neck;
- lateral stretch of the cervical spine.
Passive muscles: serrated anterior, running under the pectoral, starting from the top of the ribs and ending at the shoulder blades.
Correcting the “curvature” of the shoulder girdle is possible not with special exercises, but with everyday routine tasks performed correctly. It is necessary to evenly distribute the load when using a smartphone, lifting and carrying heavy objects, and chewing food. In addition, performing rows with one hand in a pulley (upper) helps a lot.
Deviation 8: Hip misalignment

Represents a deviation when one hip joint (left or right side) is higher than the other. Such a flaw often creates the impression that one leg is shorter than the other.
Active muscles are: the quadratus lumbar and is responsible for straightening the spine on the side that is higher, as well as the external and internal oblique abdominal muscles, which abduct the hips. The tissues of the knees, ankles, shoulder girdle, lower back, and neck can also be overactive.
The following exercises allow you to stretch these muscles:
- for stretching and self-release of the iliotibial tract;
- for stretching runners, gluteal muscles from a sitting position;
- lying on a twist.
You should also do the “best stretch in the world” and the stretches that dancers do.
Inactive muscles may be different. It all depends on the specific situation, but the following movements are generally strengthening:
Such exercises help align the pelvis and also reduce the likelihood of injury to the lumbar region, knee joints, hips, and ankles.
Basic analysis of postural curvatures: feet and ankles
Often, stooping develops due to problems with the muscles of the lower extremities.

The feet and ankles also have the correct position, deviation from which leads to stooping. If they are positioned correctly, then the ankles and feet look forward. Other deviations are no longer the norm. There are several postural abnormalities in the ankles and feet. Once they are identified, you should begin doing muscle strengthening exercises and stretching.
Deviation 9: Feet turned inward

The toes are turned towards the central part of the body, and not directed forward.
Overactive muscles: external femoral - tensor fascia latissimus.
The external thigh muscle can be stretched by stretching and self-myofascial release of the iliotibial muscle.
Passive muscles: gluteus minor and major.
To strengthen these muscle groups, you need to perform side walks, squats, and glute bridges. All exercises are done with a fitness tape, which is held on the hips in the last two movements.
Deviation 10: One or both feet turn outward

One or both socks are turned in the opposite direction from the central part of the body.
Overactive muscle groups: the external deep rotators, which are located deep in the femoral muscle and connect the femur and the sacrum, the piriformis.
The following exercises allow you to relax and stretch these muscles:
- myofascial self-release and stretching of the iliotibial band muscles;
- lying twist;
- stretching the gluteal muscle in a sitting position;
- myofascial self-release on the piriformis muscle;
- dancers stretching.
Inactive muscle groups: obliques and hip flexors.
Strengthened by:
- “cocoon” exercises;
- hanging leg raises;
- folding on a fitball.
After taking photographs, be sure to carefully analyze the position of your body, pay attention to your feet, ankles, head, shoulders, hip joints. If any deviations are identified, you should begin to strengthen and stretch hyperactive and inactive muscle groups.
The recommended movements, depending on the problem found, should be included in your usual training plan. People suffering from crossed upper syndrome should do shoulder rows and abductions on the day they work their back. This load should be done for at least 3 cycles of 8-12 repetitions.
It is recommended to complete the workout with static stretching exercises. They should be performed with little stress. The main thing is not to overdo it. There should not be any painful sensations. It is necessary to maintain the position adopted when performing static stretching from 15 to 30 seconds. The optimal number of repetitions is 3-5.
6 exercises to correct your posture
Ignoring stoop for a long time leads to serious problems. Every 2.5 centimeters that the head protrudes forward from its normal position places an additional 4.5 kilograms of stress on the upper back and neck. If the head weighs 5 kg and is pushed forward of the shoulder girdle by 7.5 cm, the total load is 7.5 cm from the shoulder girdle, the total load is about 18.5 kg. Thus, it turns out that a person, making absolutely any movement, experiences additional pressure three times more than someone who has correct posture.
Ignoring slouching leads to chronic pain. Constantly sitting at a computer with a rounded back, standing in a bent position, and an uncomfortable posture during sleep lead to debilitating pain.
The natural curvature in the lower back is necessary to protect the lower back from pain. It is a shock-absorbing element, thanks to which the weight of the human body is evenly distributed throughout the entire spine, rather than concentrated in one area. And if they arise painful sensations, which means it is necessary to correct postural distortions.
People who spend almost the entire day predominantly in a sitting position should simply move and walk more. In addition, it is necessary to regularly do six simple restorative exercises that allow the muscles to relax and strengthen, and, therefore, correct slouching.

This is an exercise that helps correct posture if the head is pushed forward, as it perfectly strengthens the neck muscles.
The exercise is performed in a position either sitting or standing. The shoulders are turned back and lowered. They look straight ahead, and then put two fingers on their chin and tuck it slightly, simultaneously moving their head back. Stay in the accepted position for 3-5 seconds and relax. Do at least 10 repetitions.
It is necessary to press in such a way that a double chin is formed. The more pressure you apply, the better. This exercise can be done even while just sitting in the car. The number of repetitions should be increased over time to 15-20.

They press their backs against the wall. The legs are spaced 10 cm wide. The knees are kept slightly bent. The back, head, buttocks are pressed against the wall. The arms are bent at the elbow joints and raised. The shoulders should be parallel to the floor surface, the shoulder blades should be pressed against each other, forming something like the Latin letter “W”. The accepted position is held for three seconds.
Next, the arms are raised and straightened until the Latin “Y” is formed. The shoulders should not come into contact with the ears. Do at least 2-3 sets of 10 repetitions, holding for 3 seconds first in the “W” position, and then raising your arms to the “Y” position.
I is an exercise that helps relax tense pectoral muscles.
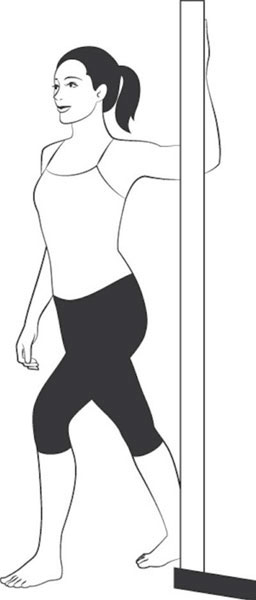
They stand in the doorway. The arm is extended parallel to the floor, the elbow is bent. The fingers should be pointing upward. The hand is placed on the door frame.
Bend towards the outstretched hand, pressing and holding it on the door slope for 7 to 10 seconds.
They stop pressing. Press your hand against the door frame while simultaneously lunging, pushing your chest forward so that it extends beyond the level of the doorway. Do stretches on each side 2-3 times.

Get down on your right knee. The left leg is placed in front of you. Fingers pressed to the floor. Place your palms on the knee of your left leg and push your pelvis forward, stopping only when tension is felt in the hip flexors. Tighten your abdominal muscles and move your pelvis back a little. The chin is kept parallel to the floor. Remain in the accepted position for 20 to 30 seconds, and then change sides.

It is performed using an elastic band and helps strengthen the upper back muscles. This exercise especially helps to increase the tone of the rhomboid muscles, which are located between the shoulder blades.
Sit on the floor and stretch your legs in front of you. The middle of the elastic band is fixed on the feet and crossed at the ends to form the letter “X”, and the ends of the band, held in the hands, are spread apart and then pulled to the hips, bending the arms at the elbows. Hands point upward. They pause and slowly return to the starting position. Perform three cycles of 8-12 repetitions each.

In 2013SSCPNM- The Scandinavian Society of Clinical Physiology and Nuclear Medicine conducted a study that showed that doing this restorative simple exercise with a band for five days for two minutes not only improves posture, but also reduces painful sensations in the shoulders and neck.
They stand and push one leg forward. They take it either by the handles or by the ends of the expander. The arms are raised up and slightly spread at an angle of about 30 degrees from the body in different directions.
The elbows are not extended, but kept slightly bent and held at shoulder level. Next, return to the starting position. When performing the exercise, your back should remain straight and your shoulder blades point down. Research has shown that you need to do this type of deadlift for two minutes a day, at least five times a week.
6 exercises for straightening posture in adults
Not only those who lead a predominantly sedentary lifestyle have problems with posture, but also people who regularly go to the gym. This is due to a lack of attention to the position of your body when leaving the fitness center. Even Joe Holden, who trains S 10 and Nike, says that pain or problems experienced when moving can indicate problems with posture. According to him, a close look at how a person stands is enough to determine which muscles a person has are weakened and which, on the contrary, are tense. Of course, we are not talking about correcting posture to an ideal position, but improving body position in any case will have a positive effect on the results of training and on general well-being, when pain in the back and neck will not interfere both in the sports field and in everyday life. life.
Strengthening and stretching exercises for the chest help correct the situation. Holden not only advises taking a closer look at your posture, but also offers effective exercises to correct imbalances in body position. The complex includes both stretching and strengthening movements, that is, it involves active and passive muscle groups. These exercises are ideal not only for those who regularly visit the gym, but also lead a predominantly sedentary lifestyle, spending a lot of time at the computer.

Performance:
- Feet are placed hip-width apart. Light dumbbells are held in your hands above your hips. The starting position is similar to that taken for inclined traction.
- Make sure that your back is straight and your lowered arms are slightly above your knees.
- Using the force of the upper back muscles, the elbows are turned back until a semblance of the letter “T” is formed.
- Hands turn up. Hold this position and then extend both arms in front of you and then to your ears.
- Return to the starting position.
Do three cycles with eight repetitions each.
Performance:
- Lie on your stomach. Extend your legs and arms, forming one line. The gaze is directed forward or down. The head is kept in a neutral position.
- The arms are spread out to the sides and down, making a movement similar to what they do when swimming. Return the hands to the starting position.
The exercise should be performed using the middle and wide back muscles. The shoulders should be relaxed when performing the movement.
You need to do at least three sets of eight repetitions.
Reading time: 14 minutes
Smooth posture is not only beauty and grace, but also a healthy spine. Poor posture is not just an aesthetic problem, but also the cause of back pain, which will cause constant discomfort and inconvenience in everyday life. If you feel that you have begun to slouch and want to work on straightening your back, then we offer you an excellent set of exercises to correct your posture.
Today, when an inactive lifestyle has become almost the norm for most people, spinal curvature is a particularly common problem for both children and adults. Slouching can cause many various diseases, and if you don’t do exercises to correct your posture, this can lead to serious problems.
Correct posture: basic rules
Correct posture is the ability to keep your back straight and relaxed. If supporting a straight back is accompanied by additional efforts or tension in the spinal region, then most likely we can talk about poor posture (or stooping).
Poor posture and stooping can provoke:
- Acute back pain
- Chronic fatigue
- Intervertebral hernia and protrusion
- Osteochondrosis
- Poor circulation
- Compression of internal organs
- Dizziness and general malaise
In addition, with poor posture yours is suffering appearance, gait is disturbed, the stomach protrudes and the chest falls in. Therefore, both from a health and an aesthetic point of view, stooping has extremely negative consequences. However, there is also good news. Regularly performing posture exercises will help straighten the spine, minimize slouching and relieve back pain.

10 rules for maintaining posture
Before moving on to posture exercises, let's look at the basic rules that will help you maintain a healthy spine.
1. Correct posture must be constantly monitored: when you walk, when you sit, when you stand. Pay attention to the position of the body: shoulders straightened and lowered, chest looking forward, spine straight, stomach tucked. When walking, try not to look at your feet.

3. An excellent prevention of spinal curvature is walking with a book on your head. You can only hold a book with a straight back, so this is good exercise for posture.
4. Many of us spend a lot of time sitting, so proper posture at the desk is important. vital role in maintaining posture.

6. When bending (for example, during physical work), do not round your back or slouch. If you can’t bend over with a straight back, then it’s better to bend your knees. When carrying heavy objects, distribute the weight on both hands; it is unacceptable to carry the bag on only one side.
7. Choose comfortable casual shoes. Heels put serious stress on the spine and also cause poor posture.
9. To prevent back disease and poor posture, it is recommended to sleep on a hard mattress. You can also purchase an orthopedic mattress.
10. It is better to buy an orthopedic brace for posture only after consulting a doctor. Otherwise, you run the risk of fixing an incorrect back position due to the bandage, rather than correcting it.

Top 20 exercises to correct posture
If you want to improve your posture, then 20-30 minutes of daily exercise is enough for you to notice positive changes in the thoracic spine within a month. Take before and after photos of your back and compare the results after a month of regular exercise. Slouching can be corrected if you regularly perform posture exercises! For acute and chronic diseases, it is better to additionally consult a doctor before training.
Perform the exercise 10-20 times if it is performed on a count, or for 30-60 seconds if it is static. Be sure to repeat each exercise on the right and left sides. Monitor your feelings and try to adjust the duration of the exercise at your discretion. During class, after each strenuous exercise, relax in child's pose. This will balance the workout and help avoid overload.
1. Low lunge
Take a deep lunge position, straighten your back and raise your arms up. Stretch your arms up, feel the stretch in your spine. Hold this position for 60 seconds and switch sides.
Stand against the wall, bend over and press your palms against it so that your body forms a right angle. Try to bend down as low as possible while keeping your back straight. This posture exercise is also useful for opening up the shoulder joints. Stay in this position for 40-60 seconds.

Get down on all fours, placing your palms on the floor. As you inhale, bend your back, hold for 5-10 seconds and as you exhale, round your back. The movement should be carried out due to deflection in the spinal region. Repeat the exercise 15-20 times.

4. Raising arms and legs in table position
Remaining in the same position on all fours, lift the opposite arm and leg up so that together with the body they form a straight line. Stretch your palms forward and your feet back, while lifting them as high as possible. Stay in this position for 30-40 seconds and change sides. Repeat this exercise for posture and strengthening the muscle corset 3-4 times on each side.

5. Leg grip in table position
From the position with your arm and leg raised, which is described in the previous exercise, grab your foot with your palms and hold in this position for 30-40 seconds. Switch sides and then repeat 2 more times on each side. Do not turn your body; your pelvic bones are facing forward. The grip should be carried out by extending the arm, bending into the spine and lifting the leg.

The Sphinx is one of the best exercises for correcting posture. Lie on your stomach on the floor, then lift your body and rest your forearms on the floor. The movement is carried out by bending the spine; feel the pleasant tension in your back. Hold the sphinx pose for 40-60 seconds, repeat in 2-3 sets.

This exercise will not only improve your posture, but also strengthen your muscle corset. Lying on your back, lift your opposite arm and leg as high as possible and hold for 5-10 seconds. Then switch sides. Repeat the exercise 10-15 times on each side. Make sure your chest, stomach, and pelvis remain on the floor. Do not strain your neck while raising your arms; it should remain relaxed and free. Lift your knees off the floor, keeping your legs straight.

Lie on your stomach and spread your arms out to the sides, bending them at the elbow. Lift your chest off the floor, leave your arms apart, and your stomach lies on the floor. Don't throw your head back or strain your neck. This posture exercise is incredibly useful and effective. Do it 15-20 times and practice as often as possible.

This is another useful exercise for improving posture, which is also performed while lying on your stomach. Cross your fingers behind your head and lift your upper torso up. Do not put pressure on your head with your hands or strain your neck. Perform the exercise 15-20 times.

Lying on your stomach, lift your chest and legs up. The hands are clasped behind each other, the shoulder blades are brought together, the legs are crossed. The body and hips are pulled up, but the stomach and pelvis remain on the floor. Stay in this position for 20-40 seconds, repeat 3-4 times. Boat - more difficult exercise for posture. You can make it easier if you don't lift your legs up, but limit yourself to lifting your upper body.

And another difficult, but very useful exercise for posture. Raise your upper body and move your arms back, grabbing your feet with your palms. The knees, chest, and stomach are torn off the floor, the shoulder blades are brought together, the arms are straight, the pelvis remains on the floor (Fig. 2). Stay in this position for 20-40 seconds, repeat 2-3 times. If it is still difficult for you to hold the bow pose, then take the position as in the first picture.

The elbow plank is one of the most effective exercises to strengthen the muscle corset. And it is also very useful for improving posture. Take a static pose with support on your forearms and toes so that your body forms a straight line. Make sure your back is straight (did not sag or bend), the stomach and knees are pulled up, the pelvis does not go up or down. Hold the plank for 30-60 seconds, you can repeat in 2-3 approaches.

And another option for a static exercise for posture and muscle corset is the hand plank. The principle of execution is similar to the previous exercise, only in this exercise you rest your palms on the floor. The body remains straight and toned. Hold the plank for 30-60 seconds, you can repeat in 2-3 approaches.

Get into a downward-facing dog position. To do this, from the plank position, lift your buttocks up so that your back and legs form a slide. What should you pay attention to in this situation? The spine remains straight, arms, neck and back form a straight line. Try to stretch your tailbone up and make the angle between your body and legs more acute. If you lack flexibility, then bend your knees and lift your heels off the floor. Stay in this position for 50-60 seconds.

Get on your knees and place your hands on your buttocks. Arch your back, moving your shoulders back. The movement should be carried out by arching the back, and not by throwing back the head. If flexibility allows, then deepen the arch and place your hands on your feet (Fig. 2). Stay in camel pose for about a minute.

16. Inverted Table Pose
This exercise is useful for both posture and elastic abs. Sit on the mat with your legs extended in front of you, your palms on the floor next to your buttocks, and your arms straight. Tilt your head back and lift your torso parallel to the floor. Lean on your hands and legs bent at the knees. Make sure to keep your feet on the floor and keep your head in line with your spine. Stay in this pose for 30-60 seconds, repeat 2-3 times.

First we do the half-bridge pose (Fig. 1). Lie on your back, bend your knees and lift your pelvis as high as possible. Rest your feet, neck and head on the floor, as well as your hands, which are connected together in a lock. Stay in this position for 60-90 seconds. Then, if possible, assume the bridge position. Place your palms on the floor and lift your pelvis higher. The arms are fully straightened, while the palms and feet are quite close to each other.

Lie on your back, left leg bent, right leg straight, left hand thrown to the side. Cross your left leg over your right, twisting at the back so that your shoulder blades remain on the floor. Feel the stretch in your spine. Stay in this position for 1-2 minutes and repeat on the other side.

Lie on your stomach, left arm extended to the side, left leg straightened. Place your right leg behind your left, turning your body and moving to your side. Right hand hold the position. The shoulder of the left hand lies completely on the floor. Stay in this position for 1-2 minutes and repeat on the other side.

From the previous pose, in a position on your side, grab the foot of the same leg with your hand. Squeeze your shoulder blades together, stretching your spine. Stay in this position for 1-2 minutes and repeat on the other side.

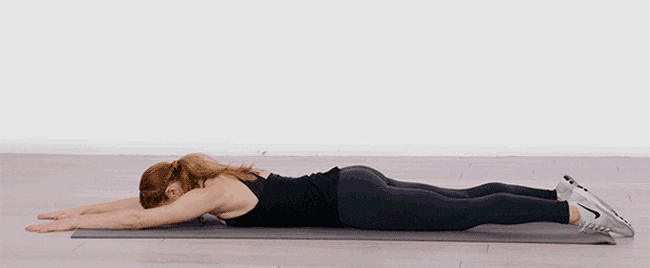
21. Child's pose
As we said at the beginning, after each exercise (planks, backbends, twists), you can return to child’s pose to relax your back and relieve tension. To do Child's Pose, kneel, extend your arms, and lie on your stomach on your feet. To benefit your back, you can turn first to one side, then to the other, and then to the center. Maintain child's pose for 45-60 seconds. At the end of the workout, you can linger in child's pose for a few minutes.

Finish your workout with a pose that is very beneficial for the spine and improves posture. To do this, place pillows under your knees and under your back so that a deflection forms in your back. Lie in this position for 5-10 minutes.

Video for correcting posture
1. A set of exercises for posture and a healthy back
2. How to get rid of stoop and create beautiful posture
3. Beautiful posture in five minutes a day
4. Gymnastics for posture and back strengthening
5. Exercises for the back and beautiful posture
A SET OF SIMPLE EXERCISES TO IMPROVE POSTURE
Exercise 1. To strengthen the muscles of the back and abdominals, 2-3 times a day (before meals) stand against the wall so that the back of the head, shoulders, pelvis and heels touch it. To avoid any gap between the wall and your lower back, pull in your stomach (especially your lower abdomen), and if you have a tendency to slouch, bend your arms so that your fingers touch your shoulders and your elbows touch your torso waist (the gap between the wall and the lower back should not increase).
The duration of this exercise (standing against the wall) is from 60 seconds to 2-3 minutes. The time spent doing the exercise should be increased gradually. You can breathe freely. After finishing “standing against the wall,” walk around the room, shaking your arms and legs alternately. Then walk with good posture, as if you were standing against a wall. Breathe freely.
During the day - standing, sitting - your neck should be kept vertical. When sitting, you need to lean on the back of the chair.
The exercise to restore good posture should be performed for 3-4 weeks.
Weakness of the back muscles causes curvature of the spine. Violation of the natural curvature of the spine, as previously indicated, impedes the functions of the cardiovascular and respiratory systems and causes displacement of the digestive organs. That’s why you need to regularly monitor your posture: don’t slouch, keep your neck vertical, tuck your lower abdomen a little.
The following exercises will help correct postural defects, which should be performed 2-3 times a day before meals or 2 hours after meals.
Exercise 2. While standing, inhale and exhale several times, while activating the exhalation, that is, drawing in the stomach in the second half of the exhalation.
Then, after inhaling, exhaling, sit on your heels, take the pose shown in Fig. 1a. Take the next inhalation while standing on your knees with your hands down, and as you exhale, again repeat the pose shown in the figure. And so 6-8 times in a row.
Exercise 3. Sit between your heels, as shown in Fig. 1b, bend your arms behind your back, place your palms with your fingers up (neck vertical). Stay in this pose for 10-30 seconds, then get up, walk and sit back in the pose. Repeat 6-8-12 times.
This exercise can also be done while walking. As your back muscles strengthen, alternate performing this exercise while standing and sitting.
Exercise 4. First standing, and then while walking, connect your fingers as shown in Fig. 1st century Every 5-10 seconds you need to change the position of your hands. If there are lateral curvatures of the spine, then you should check at what position of the hands the curvature of the spine decreases, and in this position perform the exercise repeatedly. This will help quickly eliminate lateral spinal defects. Breathe arbitrarily.
Exercise 5. Sitting on the mat, as shown in Fig. 1 g (legs bent, feet folded, neck vertical, chin slightly tucked), breathe arbitrarily, shallowly.
This exercise is useful for everyone to strengthen the tonic muscles of the back. At first, until the muscles are stronger, you can sit for every 20-30 seconds of tension, relaxing a little.
To improve your posture, in addition to developing your back muscles, you also need to strengthen your abdominal muscles. If they are not trained, they weaken and do not exert the necessary intra-abdominal pressure, which, in turn, maintains the abdominal organs in their normal position. This leads to the fact that the organs of the abdominal cavity seem to “fall out” - a spherical abdomen is formed. At the same time, the organs also sink a little, losing their working qualities. In addition, fat is most often deposited in the abdominal area. To counter this, it is necessary, along with performing the exercises described above, to specifically strengthen the abdominal muscles. You can do this while walking slowly.
Exercise 6. Take a shallow breath for 2 steps (the stomach sticks out a little) and exhale for the next 2 steps, strongly pulling the stomach - from the pit of the stomach to the groin. The exercise is simple, but at first it will require willpower. Repeat the exercise twice a day (you can go to and from work) 10 times, gradually increasing the number of repetitions to 30, and then to 60.
Do these exercises and!